


Although Photoshop was originally designed to be a digital darkroom, it long ago outgrew that niche market and is now a standard component of every type of graphic workflow, from print, Web design, and 3D graphics, to special effects and video production. In the latest release, Photoshop Creative Suite 2, Adobe added new features for everyone. In addition to new photo-editing features, such as automatic perspective controls and improved Camera Raw, the program’s new Smart Objects and Warping tools should appeal to all users.
I’ll spill the beans right now and tell you that Photoshop CS2 is well worth the money ($599 or $149 upgrade), although there’s still room for improvement.
Almost-Invisible Improvements
When you first launch Photoshop, you won’t notice a lot of changes. Photoshop CS2’s interface remains almost identical to recent versions, meaning you won’t have to struggle with new keyboard shortcuts or re-arranged tool palettes. Nevertheless, many little changes are spread throughout the application.
The Layers palette no longer includes icons for linking layers, because now — finally — you can select multiple layers by shift-clicking (or command/control clicking to select non-contiguous layers). Linking is still available in the Layers menu, but some link-dependent processes have changed. For example, to constrain an adjustment layer to a particular set of layers, you now group the layers with the relevant Adjustment Layer and then change the group’s blending mode from Pass Through to Normal. Experienced users should have no trouble getting used to this simple procedure.
Locking has also changed, and layers no longer sport a Lock icon. Instead, you lock a layer by selecting it and then toggling the lock controls at the top of the Layers palette. Adobe has greatly improved the locking facility, which now lets you lock content and positioning separately.
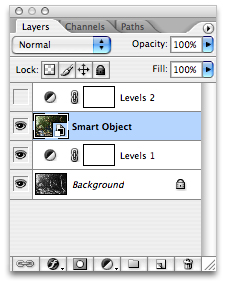
The Layers palette now lets you select multiple layers by shift-clicking, and provides improved Locking controls. Note the Smart Object layer.
The Layers palette also provides access to Photoshop’s new Smart Objects feature. A Smart Object can be a piece of vector artwork that you’ve imported into Photoshop, or any group of raster or vector layers that you’ve created within Photoshop. For example, you might select a layer containing a logo, and a layer containing some text, and then group them into a Smart Object. The two source layers disappear, and a new Smart Object layer takes their place.
Smart Objects work just like any other layer: You can move them, transform them, change their opacity and blending mode, and even apply Layer Styles. However, no matter what you do to them, you can always open them in their original state and edit them. In this way, Smart Objects allow for non-destructive editing, since none of the changes you make affect your original data. (If you’ve worked with Adobe After Effects, you can think of a Smart Object as a pre-comp.) At any time, you can rasterize your Smart Object into a normal layer, thus committing your operation.
Smart Objects are a boon for transformation operations because they don’t affect your original data. For in-process workflows, where a particular element might change later, this non-destructive approach works great. Unfortunately, you can’t apply adjustments or filters directly to Smart Objects. Photoshop users have long cried out for the ability to apply filters in a parametric, non-destructive way. Though Adjustment Layers are a good start, the inability to apply sharpen, noise, blurs, or other filters in a parametric fashion is a weak spot. You can, however, apply adjustment layers to Smart Objects, just as you would any other type of layer. Even with these complaints, though, Smart Objects are a great addition that will quickly find their way into your everyday workflow.
Photoshop’s Guide feature has received an IQ boost in the form of Smart Guides, dynamic snapping guides that pop up as you drag layers around. When the boundary of one layer gets near another, Smart Guides automatically appear to help in positioning. This is a welcome addition to any type of layout operations.

Like the guides in Illustrator, Photoshop now includes Smart Guides that automatically pop up to help you align layers.
You may be pleasantly surprised when you open Photoshop’s Font menu and discover the WYSYWIG font display. Adobe was smart about its implementation. Rather than show the font name in the actual font, which doesn’t work so well for things like symbol fonts or dingbats, Photoshop displays the font name in a generic-looking typeface, with a sample of the type off to the side.
Warp Drive
Photoshop’s Liquify tool is great for distorting an image, but because it works via a brush interface, it’s difficult to alter or tweak your distortions later. Photoshop CS2’s new Warp filter provides vector-based warping similar to the Warp Text effect, but with far more control.
You can apply Warp to layers or selections. The Warp dialog gives you several Beziér control points with which to warp and distort your image. Unlike Liquify, Warp doesn’t stretch the surrounding area, which means it’s possible to create what looks like a rip in your image. However, because it’s vector-based, you can easily change and tweak your warp vectors to get them just right.
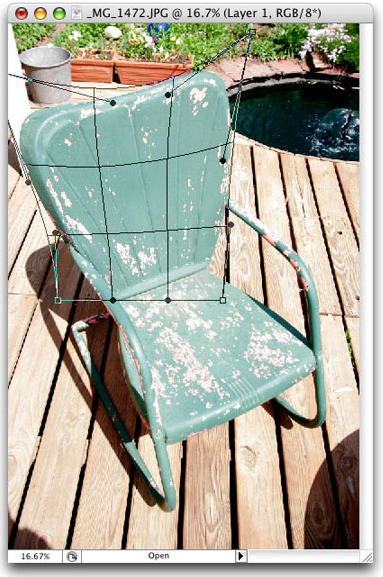
The new Warp dialog lets you create editable warps by dragging control points on a Beziér mesh.
Once you accept your change, the warping is rasterized and committed, so you can’t edit it later. I’d like the ability to add additional control points, but the current feature is extremely useful even with its limitations.
Vanishing Point
For creating precise edits and adjustments on photos, Photoshop’s new Vanishing Point tool is nothing short of amazing. You use Vanishing Point by clicking to define planes that match the planes of perspective in your image. Once they’re set up, you can copy and paste image data from one plane to another, or make several other kinds of edits, and Photoshop automatically flips, distorts, and alters your pasted data so that it matches the perspective of your destination.

The Vanishing Point tool makes it simple to copy or paint within the planes of perspective of your image.
As if this weren’t enough, Adobe included Healing technology in the Vanishing Point tool, which automatically blends pasted imagery blend into its new background.
The Vanishing Point feature is presented inside its own modal dialog box, which includes a tool palette. In addition to the plane definition tool, there’s a marquee selection tool for selecting and copying, a clone tool, and a brush tool. All of these tools are automatically constrained to the perspective that you define with the plane definition tool. With this simple toolset, you can perform edits that could take hours of meticulous painting using Photoshop’s normal tool set.
This article was last modified on January 18, 2023
This article was first published on May 3, 2005
Commenting is easier and faster when you're logged in!

Recommended for you

Knowing Your Camera: The First Step for Getting Better Results in Photoshop
Understanding the abilities of your camera and Photoshop can help you produce be...
Scanning Around with Gene: The Joke's on You
Before Hollywood brats got “Punk’d,” and before political oppo...

Heavy Metal Madness: I'm Looking Through You. Where Did You Go?
I’m a bit late in this eulogy to a couple of products from Eastman Kodak t...