


Editor’s note: This little nugget was originally an InDesign Magazine Tip of the Week, but since it’s not documented anywhere that we could find, it is the very definition of an InDesign “secret,” and thus must be shared here too. By the way, sign up now to receive the Tip of the Week, so you don’t have to go looking for cool tips—they come to you!
Ever receive a document and the text looks suspiciously squished in certain places? Suspect some rogue tracking has taken place?
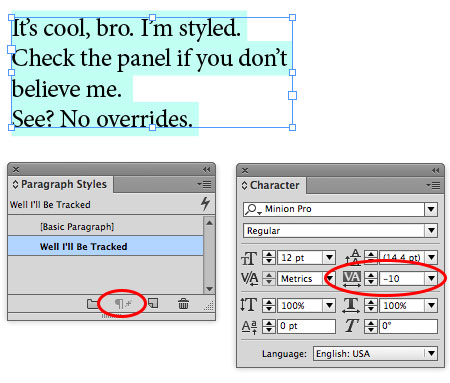
You can instantly reveal all tracking and kerning by going to Composition Preferences and choosing Highlight Custom Tracking/Kerning.

Manually applied tracking and kerning appears in dark green. That’s not news (though it can be handy).
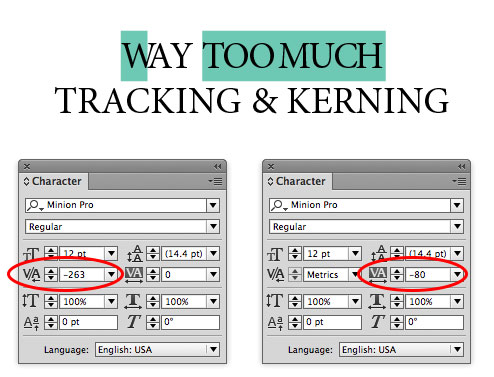
Tracking applied as part of a paragraph or character style appears in light green. This is the newer feature that’s undocumented—and very cool since it allows you to ignore tracking and kerning that were applied with styles, and are presumably to spec. It works at least as far back as CS6.
Update: Be sure to check out the comments below for a great little script that you can use to toggle this preference on and off with a keyboard shortcut of your choosing!
This article was last modified on December 30, 2021
This article was first published on May 8, 2014
Commenting is easier and faster when you're logged in!

Recommended for you

How Resolution Affects Image Proxy Quality
When working with images into your InDesign layouts, did you ever notice how som...
TypeTalk: Metrics Versus Optical Kerning
When is it better to use Optical kerning and when should you choose Metrics? Ile...

This Week in InDesign Articles, Number 131
I have to admit that this month it seems like there are fewer InDesign stories o...