
Put That iPad to Work in Your Studio
The versatile iPad can streamline your desktop workflow in many ways
This article appears in Issue 23 of CreativePro Magazine.
You might already be using Apple iPad apps for creative and production work—but maybe that’s as far as you go. When you turn to your computer to use desktop applications, your iPad becomes a silent black rectangle on your desk. It doesn’t have to! You can put it to work as a valuable studio sidekick, and I’ll show you how. Since I wrote the first edition of this article in 2016, Apple has advanced the iPad immensely. The iPad Pro now uses an Apple Silicon M2 processor and supports Thunderbolt and USB 3 through a USB-C connector for fast and versatile connectivity to hubs, external volumes, and even wired networks. iPadOS now offers deeper integration with macOS, and the Files app brings file management much closer to macOS and Windows desktops. Of course, the iPad is just one of many mobile devices you can choose from. This article focuses on the iPad because it’s popular with creative professionals, and many of the apps I use are available only on iOS or iPadOS. If you use non-Apple devices, you can read this article for ideas about similar apps that you might find for the tablet you use.
Simplify Your Desktop
A traditional iPad role is as an independent companion, running apps that complement what you’re doing on your computer. For example, I often have an iPad showing a calendar or messaging app so that I can see it in parallel with the desktop applications, without the hassle of managing windows or switching apps. And I might have a job-time-tracking app running in the background on the iPad, too. When you’re expanding your professional skill set, an iPad is perfect for playing training videos next to your computer, especially if your phone is too small for you to see video details
clearly. Dedicated iPad apps such as LinkedIn Learning and YouTube make it easy to follow the latest updates in your favorite training channels. Any time you offload tasks to a mobile device, their windows no longer complicate your computer desktop or compete with your desktop graphics apps for computer processing and memory.
Add a Tablet Display to Your Computer
Do you wish your Mac screen had more room, but you don’t own a second display? You can use an iPad as a second display using Apple Sidecar. First, on your Mac, connect to an iPad using Add Display, which is available in macOS System Settings/Displays or Screen Mirroring on the Control Center on the menu bar (Figure 1). To use the iPad as a second display, choose the option to extend (not mirror) your primary Mac display (Figure 2). You can connect the Mac and iPad wirelessly when both are signed in using the same Apple ID on the same local network. You can also connect your Mac and iPad using a USB-C cable, although the iPad will then charge from the Mac laptop battery.
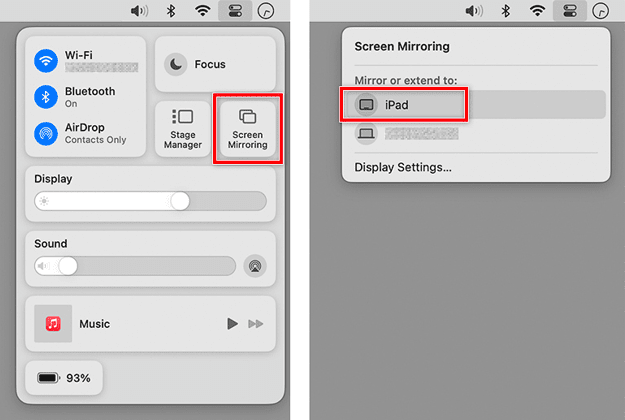
Figure 1. When listed in the Screen Mirroring section of Control Center, an iPad can be selected as a secondary display on a Mac.
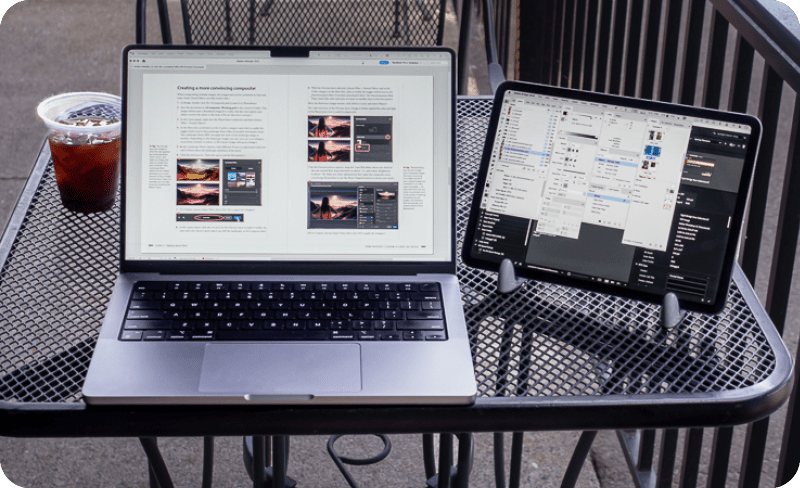
Figure 2. A 14-inch MacBook Pro laptop devoting most of its screen to an Adobe InDesign book layout, because InDesign panels were moved to an 11-inch iPad Pro that’s extending the Mac display
Remotely View and Control Your Computer
Do you often wait for your studio computer to finish some lengthy process, such as exporting hundreds of JPEG images, rendering video, or copying the entire system to a new backup drive? You don’t have to keep running in and out of the studio to check the computer’s progress bar. Instead, set up the Screen Sharing feature of your computer, and then on an iPad, use a remote access app such as Edovia Screens to connect to your computer across your network and see what’s on your computer’s screen (Figure 3). With this type of app, I use my iPad to check on my studio desktop computer from the kitchen or living room, only returning to the studio when the computer finishes the big job.
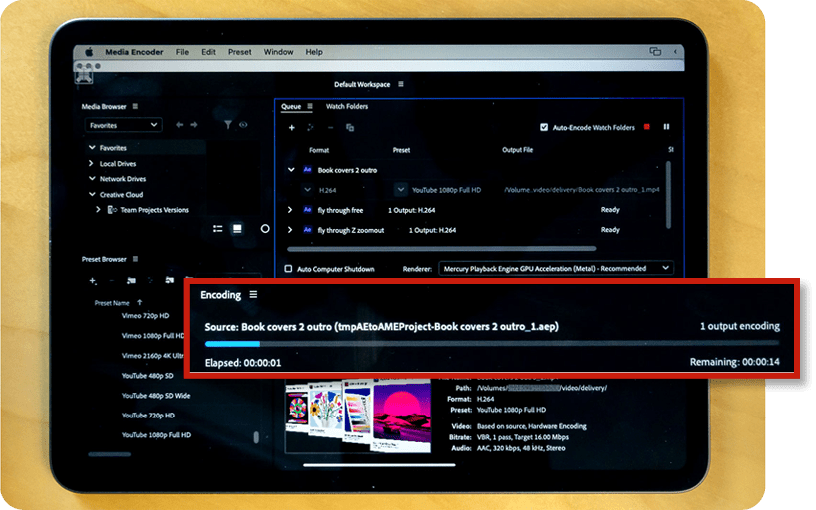
Figure 3. An iPad using remote access software to display an Adobe Media Encoder render queue that’s on a computer in a different room
Use an iPad as a terminal
The next level beyond viewing a remote computer with an iPad is controlling a remote computer, camera, or other device. Remote-access apps, such as those mentioned earlier, typically also offer remote control as well. For example, if you’re away and your computer back at the studio is running with Screen Sharing enabled, you can pull your iPad from your bag, connect to your studio computer, and use the computer’s apps through that iPad. Of course, using an iPad as a remote terminal works best if you connect a mouse and keyboard to it. Slim portable Bluetooth keyboards are available, and a compact iPad stand helps too.
Use an iPad as a control surface
Another way an iPad can assist your computer is as a custom control panel connected with an application on your computer—another input method that complements a mouse, tablet, and keyboard shortcuts. The Touch Portal application lets you design layouts of buttons and sliders that you can associate with various actions, such as switching applications and doing things inside those applications. I’ve created button layouts customized for workflows such as entering alt text in Excel for images in InDesign and entering metadata in Lightroom Classic (Figure 4). Touch Portal controls connect directly to a small set of features in Photoshop and other applications, and you can also map a Touch Portal button to a feature’s keyboard shortcut. A Touch Portal button can run a Photoshop action, if you’ve assigned a keyboard shortcut to the action.
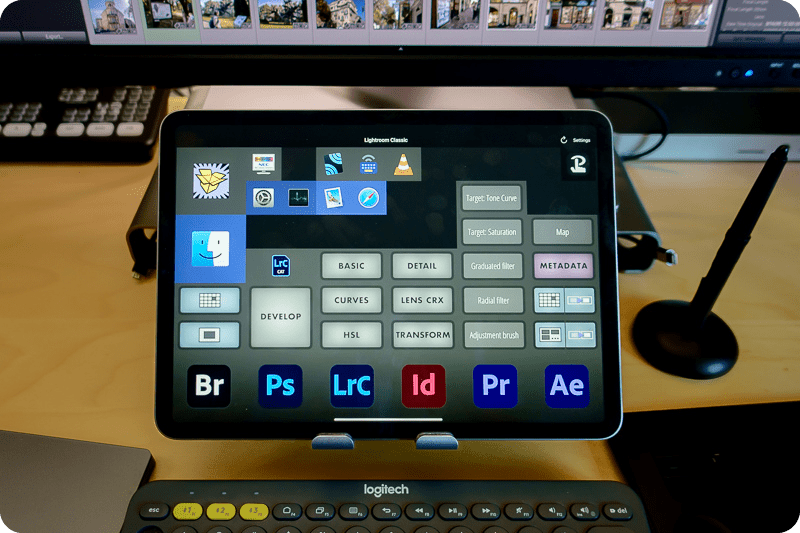
Figure 4. The Touch Portal app with a page of custom buttons I set up to support how I use Lightroom Classic
Automate Online Meetings and Live Streams
If you use specialized hardware and software to run online meetings or live streams, an iPad may be able to help.
Touch Portal (again)
If you use free OBS software to run online meetings or livestreams, you’re in luck: The Touch Portal app has many direct hooks into OBS, so you can run OBS from your iPad and free up space on the computer display. You can create a Touch Portal button layout to automate your most-used OBS video/audio sources, layouts, transitions, and graphics.
MixEffect
If you manage live video sources using ATEM Mini switcher hardware, you may find that complex switcher adjustments can be a challenge to perform live with the buttons on the switcher itself, even with its macros. MixEffect is a powerful app that transforms an iPad or iPhone into a configurable remote panel that can simplify advanced control of an ATEM Mini switcher over your local network (Figure 5). MixEffect makes it easy to set up buttons that trigger macros and switch among SuperSources (screen layouts of multiple video sources).
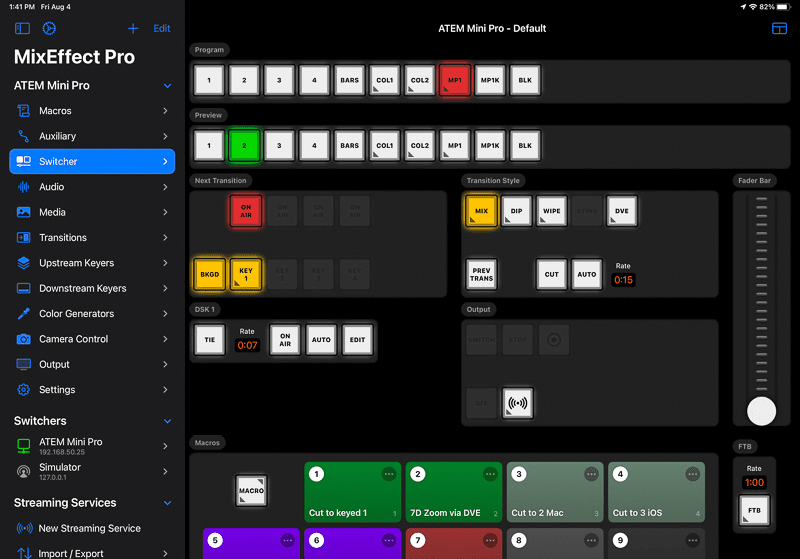
Figure 5. The MixEffect app remotely driving and running macros for an ATEM Mini Pro video switcher
Apple Shortcuts
Shortcuts is a feature in macOS, iOS, and iPadOS that lets you automate tasks using buttons and scripts. Veteran Mac users may think of Shortcuts as a modern version of AppleScript. It’s another way to create custom button panels for local or remote automation. You can use Shortcuts to tie applications and devices into a single workflow. For example, I created a Shortcuts set that helps me prepare for an online meeting or live stream (Figure 6). After opening the set on my iPad, I can tap one button to run a Shortcut that turns on studio lights to specific settings (through Apple HomeKit and HTTP), and tap another button to properly configure my ATEM Mini Pro switcher for my streaming camera (through MixEffect). Instead of opening and managing multiple proprietary apps, I set up everything through that one Shortcuts panel on my iPad.
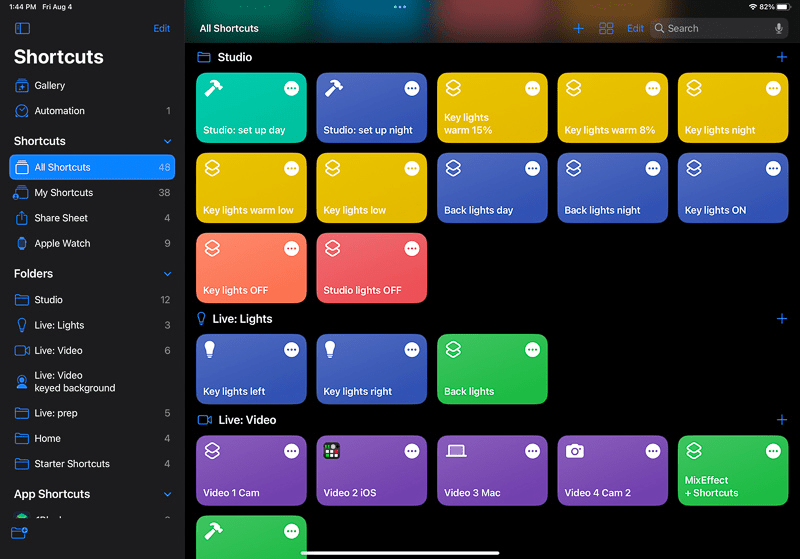
Figure 6. Custom Shortcuts I created to instantly configure lights, cameras, and video switcher to specific settings from a single iPad screen
Staying Focused
Certain features of iPadOS make it easier to customize an iPad for the job you want to do right now in your studio.
Custom Home Screen pages
You probably know that you can create multiple Home Screen pages by dragging icons around. But there are a couple more tips that are less well known, but make it easier to create Home Screen pages for specific tasks or workflows. You can add multiple instances of apps to the Home Screen. For example, if an app such as Photoshop is useful in more than one of your custom Home Screen pages, the Photoshop app icon can exist in two or more of them. To do this, switch to the Home Screen page where you want to add an instance of an app, search for the app in Spotlight, then drag its icon out of Spotlight and drop it on the current Home Screen. You can also add widgets to any Home Screen, so you can create a Home Screen that’s a custom arrangement of apps and widgets (Figure 7). For livestreaming, for instance, you could arrange a Home Screen that has only the icons for the apps and widgets that run your camera, lights, and video switcher.
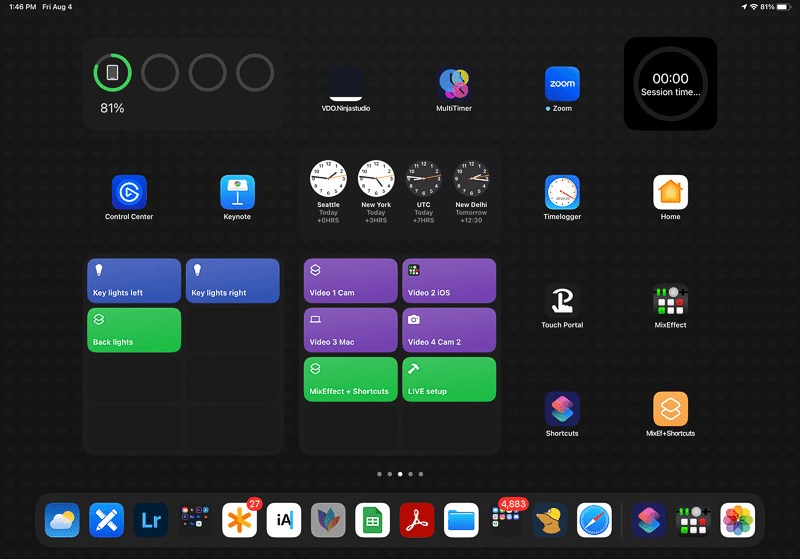
Figure 7. A custom Home Screen that includes widgets, apps, and web page shortcuts specifically combined on one page to support a specific task
Share the Shoot
If you’re a studio photographer, an iPad can be useful as an additional monitor for watching a tethered photo shoot. Instead of having clients look over your shoulder while you work, just hand them an iPad. You could equip that iPad with a dedicated solution, such as the Capture One Live service that lets you use a compatible web browser (including on a tablet or phone) to monitor a tethered photo shoot run by Capture One software, or you could creatively use some of your existing apps’ features. For example, first connect an iPad as a second display (see “Add a Tablet Display to Your Computer”). Next, in Lightroom Classic, set up the secondary display window in Loupe mode (Window > Secondary Display > Loupe – Normal) with the Secondary Display window on the iPad. Then start a tethered shoot (File > Tethered Capture > Start Tethered Capture). Each time you take a photo during Lightroom Classic tethered capture, it appears on the iPad display (Figure 8).
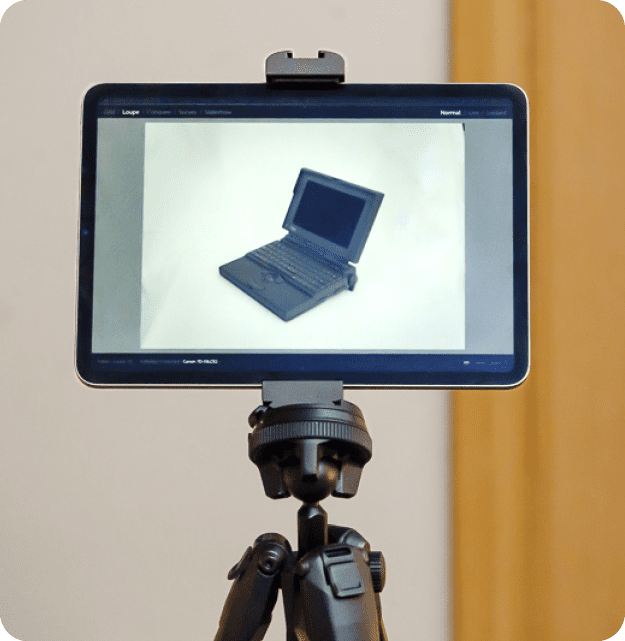
Figure 8. An iPad set up as a monitor for a tethered product photo shoot in Lightroom Classic. The iPad is set up as a second display for a Mac, and the Lightroom Classic Secondary Display is assigned to that.
Take Your Portfolio Anywhere
There are so many ways to use an iPad as a mobile portfolio of your work. Choose a method that goes best with the software and services you spend the most time using. If your best photo work is already synced to Lightroom Photos in the cloud from Lightroom or Lightroom Classic, it’s always ready to show in Lightroom on the iPad. If you’re a designer or illustrator, you can use the Behance app to show the work you publish on the Behance service of Creative Cloud. If you have a website on Adobe Portfolio, it’s mobile-friendly so that it displays easily on iPad. Even outside Creative Cloud, so many services now present images so well that you aren’t limited to the iPad apps of photo-sharing sites such as Flickr and SmugMug. For example, you can present your work from a folder in the Dropbox or Google Photos apps, or you can export images into a folder on iCloud Drive and present them full screen on the iPad using the built-in Files app.
Extending Your Studio at Home and Away
To be a valuable part of your studio, the iPad doesn’t have to do everything your computer can do. There’s enough power and flexibility in an iPad to make it serve many useful roles both inside and outside your studio. When you pack one thin and light iPad along with your laptop, you’ve got an accessory that can be a secondary computer display or graphics tablet on a table in a hotel room or on a train. With a little more configuration, it can also be a remote control center that can help your computer automate your production workflow, online meetings, and livestreams.
Commenting is easier and faster when you're logged in!

Recommended for you

Vintage Vectors: The Enduring Power of Blends in Illustrator
Take a deep dive into the amazing power of vector blends.

Resize Objects with a Keyboard Shortcut
This InDesign tip on How to Resize Objects with a Keyboard Shortcut was sent to...

InDesign CS4 Users Can Now Manage Preferences Easily
Preferences can be shared and multiple preference files stored on one machine wi...