

Five hundred years ago, it was the dream of every alchemist to turn base metals into gold. Today, with Photoshop, we can transform even plastic into the sought-after stuff. The key to this technique is to use multiple Adjustment Layers, which allow you to make endless changes that are easy to edit and adjust later.

Step 1
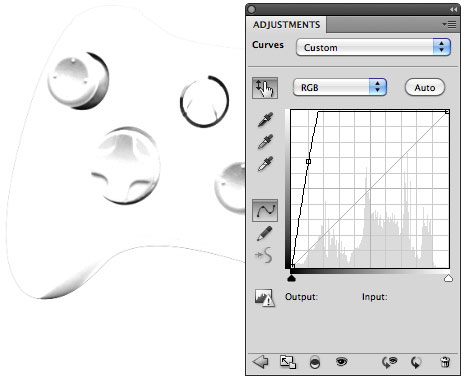
The starting image is an Xbox controller. All that dull, off-white plastic is ripe for enhancement, so let’s bling it up.

Step 2
Duplicate the layer, then knock all the color out of it by choosing Image > Adjustments > Desaturate, or using the shortcut Ctrl-Shift-U (Mac: Command-Shift-U).

Step 3
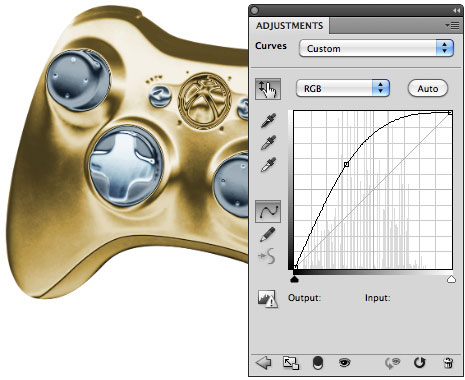
Choose Layer > New Adjustment Layer > Curves (or choose it from the pop-up menu at the bottom of the Layers Panel). Click a point about one-tenth of the way along the diagonal line, and drag straight up. The image will brighten considerably.
Step 4
Now click a point about a quarter of the way along the resulting curve and drag down. This darkens the image again, but you can see a hint of shine beginning to appear on those control knobs.

Step 5
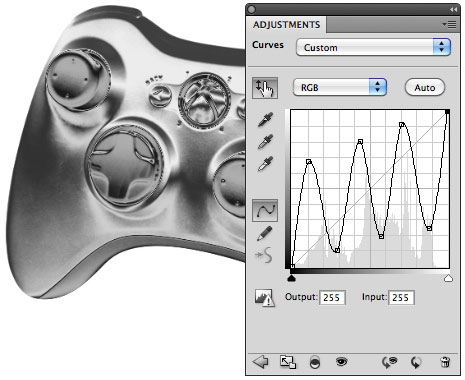
Continue clicking points on the curve, dragging alternately up and down, until you see a rising step pattern like the one in the screenshot below. Depending on the image you start with, you might have to drag the points more or less; but a shape similar to this will always create that shiny effect.
Step 6
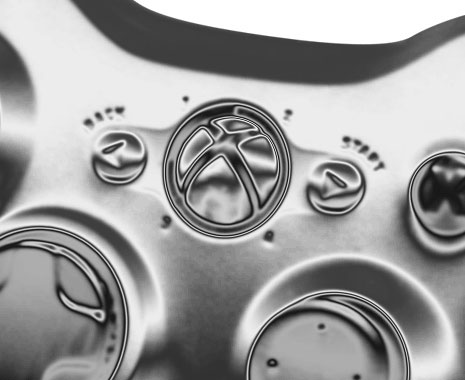
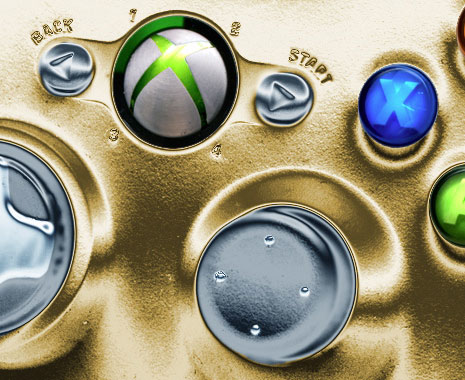
If you zoom in, you’ll see that the shiny Curves technique produces some hard edges around areas of high contrast. This is an inevitable result of applying the Curves effect. But don’t worry—you can fix it!

Step 7
Duplicate the desaturated Xbox layer again, and lock the transparency by clicking the first Lock icon at the top of the Layers Menu. Go to Filter > Blur > Gaussian Blur to apply a blur to the whole layer. The amount of blur depends on the image; try a 2-pixel radius, adjusting up or down as needed. This softens those hard edges, producing a much smoother appearance. It’s also softened the surface texture, but you’ll come back to that later.
Step 8
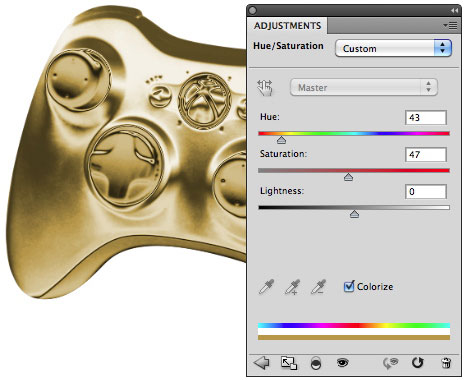
Time to add some color. Select the Curves Adjustment Layer again (so it’s the active layer), and go to Layer > New Adjustment Layer > Hue/Saturation. Check the Colorize button and drag the Hue slider into the orange area, then drag the Saturation slider until you get a strong gold effect. Note that the Hue/Saturation adjustment has to be above the Curves adjustment, or you’ll get some bizarre color effects.
Step 9
To make those knobs stand out, you need to remove the gold color from them. Here’s the clever part: Because you applied the color as an Adjustment Layer, it comes with a built-in mask. So, using a hard-edged brush, paint on this mask in black to hide the color. In the screenshot below, I’ve painted it out from the two joysticks, the four-way control, and the two left/right buttons.

Step 10
With all the color knocked out of them, those knobs look too gray. To change that, let’s use Color Balance. You’ve already selected the knobs by painting them out on the Hue/Saturation layer, so there’s no need to select them again manually. You can load that mask as a selection by holding Ctrl/Command and clicking on the mask thumbnail in the Layers panel. This will load everything except the knobs as a selection, so use Select > Inverse to select just the knobs. Now choose Layer > New Adjustment Layer > Color Balance, and when the Adjustment Layer appears it will automatically come with a mask matching the shape of the knobs. Add a little Cyan and Blue for a slightly steely appearance.

Step 11
Time to add a touch of detail to those knobs. Press Q to enter QuickMask mode. The whole image will appear with a red overlay that indicates unselected areas. Using a small, hard-edged brush, paint in white to hide the red. The screenshot below shows what it looks like when you paint the cross on the four-way controller, and the four dots on each of the joysticks. Press Q to exit QuickMask mode and the area you painted turns into a selection.

Step 12
Make yet another Adjustment Layer by choosing Curves. Once more, it opens with the selection as a mask. Drag the curve up to brighten the selected area, which brings a highlight into the buttons.
Step 13
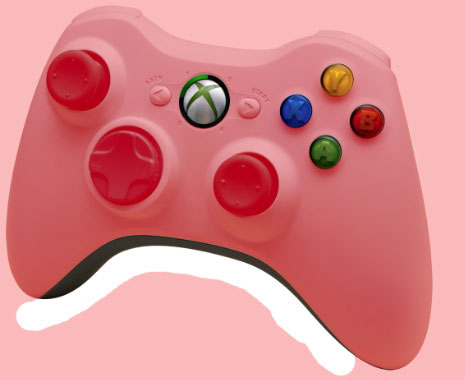
With the body of the controller more or less complete, you need to restore the colored buttons and the Xbox silver logo.
First, hide all the layers except the original controller image. A quick way to do this is to hold Alt/Option and click on the eye icon next to the layer’s name in the Layers Panel. Go into QuickMask once more and use a hard-edged brush to paint in white over the buttons. Also, paint in the dark base of the controller. You don’t need to be accurate at the bottom of this base: all you’re doing is adding a selection of the blank space outside the controller. Press Q again, and the area you painted turns into a selection.
Step 14
Hold Alt/Option and click the eye icon next to the original layer’s name to reveal the other layers. With that original layer as the active layer, use Ctrl-J/Command-J to make a new layer from the selection. Now, either drag this new layer to the top of the layer stack, or use the shortcut Ctrl-Shift-]/Command-Shift-]. Those buttons now appear above all the other layers.

Step 15
They may be at the top, but they’re a little dull. Switch to the Dodge tool (shortcut: O) and, with its mode set to Highlights, paint over the center of all the buttons to brighten them.

Step 16
You can tweak the gold appearance by adding a new Adjustment Layer—Brightness/Contrast this time, for the sake of variety—between the blurred layer and the original Curves Adjustment Layer. As you increase the Contrast setting, you vary the gold effect. It’s a lot easier to do it this way than to tinker with all the Curves points.

Step 17
Let’s add a shadow. Hold Ctrl/Command and click on the original controller layer’s thumbnail in the Layers Panel, which will load it as a selection. Make a new layer, and choose Select > Modify > Feather to soften the edges. Something around a 12-pixel feather will work well. On the new layer, make black the foreground color, and press Alt-Backspace/Option-Backspace to fill the selection with black. Note the soft edges produced by the feathering operation.

Step 18
Drag the Shadow layer to the bottom of the layer stack, and use Edit > Free Transform to make it shorter and leaning over to the side slightly. Be sure the bottom of the shadow touches the bottom of the controller so it looks like it’s resting on the surface.
Step 19
Choose Layer > Layer Mask > Reveal All to add a new mask to this layer. When you paint on here in black, the layer will be hidden, so if you choose a large, soft-edged brush, you can paint away the back of the shadow so that it appears to be fading off into the distance.

Step 20
If you zoom in on the controller, you’ll see that the blurring effect has made the whole surface too soft.

But because you worked on a copy of the original desaturated version, you can selectively hide the too-soft layer. Choose Layer > Layer Mask > Hide All to make a new Layer Mask that completely obscures the blurred layer. Now paint in white, using a small soft-edged brush, just around the areas of high contrast: those areas that were looking too ragged earlier. The result is smooth joins, but you retain all the texture.
Step 21
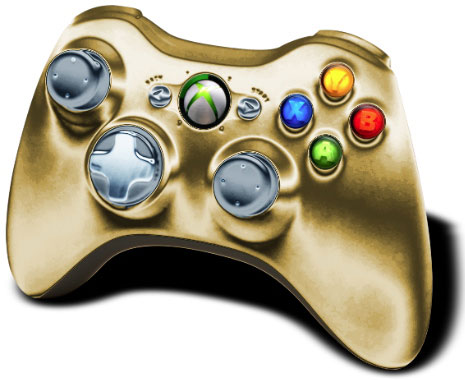
And here’s the finished result (click here for a larger version):

The beauty of being able to do all this with Adjustment Layers is that you never damage the original artwork: everything is added on top, and you can change the color, shininess, or any other feature at any time.
This article was last modified on January 6, 2023
This article was first published on April 11, 2011
Commenting is easier and faster when you're logged in!

Recommended for you

How to Make an LCD Digital Calculator Effect
You never know where you’ll find inspiration to create something. Yesterday’s Go...

Heavy Metal Madness: Of Evil Witches and Dancing Pickles
If I was marooned on an island that celebrated only one holiday, I sure hope it...

Choosing Which Graphic Design Program to Use
One of the things a lot of graphic designer struggle with is what tool to use in...