
Photoshop How-To: Easy Page Curl in Photoshop CS2

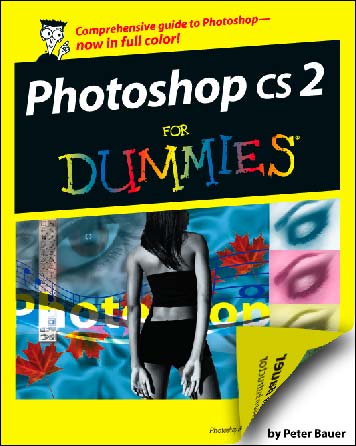
Start with a layered image. The top layer will have the corner turned back, revealing the lower layer. In this sample, we’ll use the cover of my book Photoshop CS2 for Dummies and a title page below. (Those of you who own the book may notice that the “title page” has been re-arranged, both in content and position in the book.)

Make sure the upper layer is active in the Layers palette and make a square select of the corner-to-be-curled by Shift-dragging the Rectangular Marquee tool.

From Photoshop CS2’s Edit> Transform menu, select Warp. (Earlier versions of Photoshop don’t offer this feature.)

You’ll see a four-by-four grid appear over the selected area. You click anywhere within the grid and drag to warp. In this case, you click on the corner anchor point that you want to “peel back” and drag to the center of the opposite square.
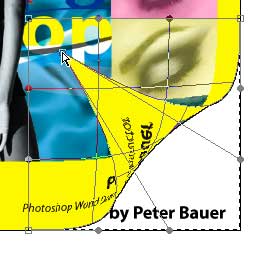
If you’ve edited paths in Photoshop, you will recognize the direction lines with their control points extending from the selected anchor point. Drag the downward-pointing direction line until it’s directly below the anchor point and aligned with the bottom of the grid.

Drag the other direction line until it extends horizontally from the anchor point and aligns with the side of the grid.
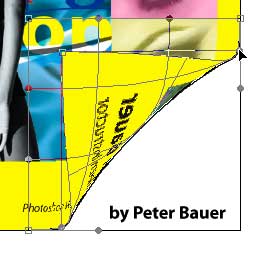
There is your basic page curl! But let’s give it a little depth. Using the Polygon Lasso tool, make a selection of the triangular curl.

Use the keyboard shortcut Command-Shift-J (Mac) or Control-Shift-J (Windows) to move the selection to a new layer. You’ll now have three layers: The curl, the original layer from whcich it came, and the layer being exposed.

Make sure ther top layer is selected in the Layers palette. Click on the second button at the bottom of the Layers palette and select Drop Shadow, or choose Drop Shadow from the Layer> Layer Style menu. Use the Spread slider to diffuse the shadow.

While in the Layer Style dialog box, click on Color Overlay. (Click directly on the name of the layer effect rather than on the checkbox.) Click on the red color swatch to open the Color Picker and change the color to Black by typing 0 in the R field and clicking OK. Reduce the opacity to about 15%.

And here’s the final product:
This article was last modified on January 3, 2023
This article was first published on September 30, 2005
Commenting is easier and faster when you're logged in!

Recommended for you
Adobe Releases Lightroom 6 and Lightroom CC
This week (April 21, 2015) Adobe Released Lightroom 6 and Lightroom CC 2015, pro...
Using Bleed for Print Design
Based on an article originally published in the DesignGeek e-zine. One of the fi...

Photoshop Blur Gallery: Tilt Shift
Editor’s Note: Don’t miss the earlier articles in the Photoshop Blur...