

People have been building ships inside bottles since around 1850 — and for a hundred years before that, they were filling bottles with all manner of figures of people and angelic characters. The process was slow, painstaking, and hard to master; many artisans cheated, blowing the bottle around the object rather than building it inside.
Thanks to Photoshop, our ship in a bottle is much easier to construct. To make it a little more challenging, I’ll start from scratch and build the bottle ourselves, using just Photoshop’s shading techniques and a single filter.
Click the image below to see a larger version of the finished product.
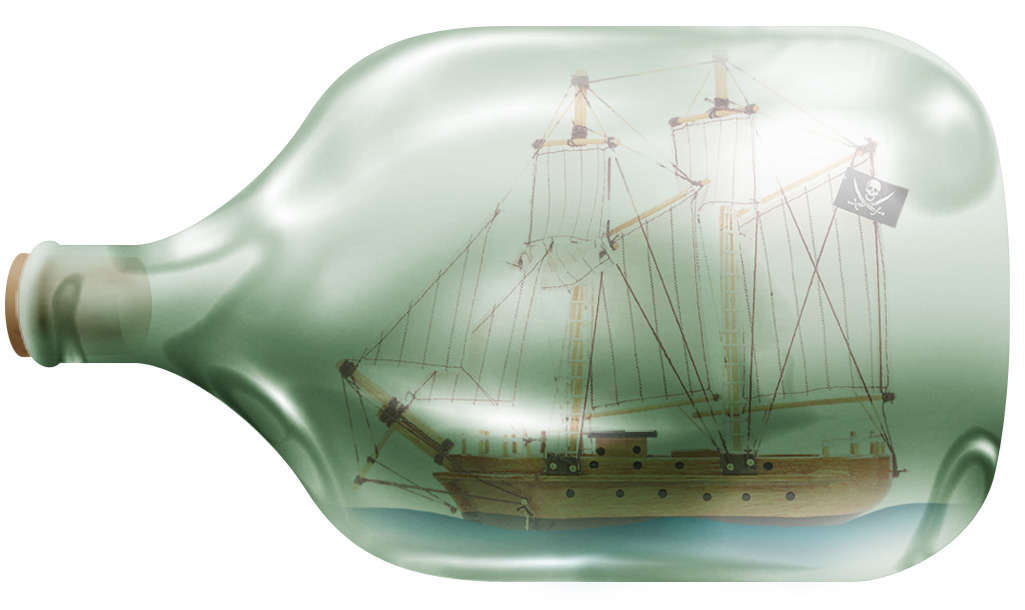
Of course, you don’t have to use a ship. Put anything you like inside. A rabbit? A photograph of your spouse? That pack of cigarettes that you promised would be your last? The choices are endless.
Step 1: Draw the outline
To begin building the bottle, first draw half a bottle. The Pen tool is the easiest way to get a smooth outline; start by drawing the top edge, holding Shift as you click the second point so it’s perfectly horizontal. Then hit Enter to make the path into a selection, and fill it with mid-gray on a new layer.

Step 2: The other half
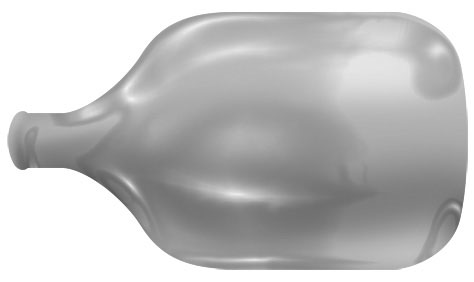
Duplicate the half-bottle layer and use Edit > Transform > Flip Vertical. Arrange the two halves to get the shape you want — you can make the bottle thinner at this stage if you like. Then merge the two layers together to create a single bottle shape.

Step 3: Start the shading
To add shading to the bottom half of the bottle, use the Burn tool set to Midtones (there’s a pop-up menu on the Options bar for this tool). A large, soft brush is best. If you’re not using a graphics tablet, then set the tool to a low pressure — about 40% — and build up the shading gradually.

Step 4: Add some Dodge
Use the Dodge tool to add highlights to the bottle, on the top and a little right at the bottom (where it’s reflected from the tabletop). Here’s a good shortcut: You don’t need to go to the Tools bar to switch from Burn to Dodge. Hold the Alt/Option key when using either tool and you’ll temporarily have access to the other one.

Step 5: Finish the shading
Use a smaller brush with the Dodge and Burn tools to put in a little more detail: a slight darkening at the very bottom, a little highlight around the neck. Then use these tools to sketch in detail to define the lip around the neck of the bottle.

Step 6: Plastic Wrap
Your bottle now has dimension, but it doesn’t look shiny like glass. The Plastic Wrap filter is the key: Go to Filter > Artistic > Plastic Wrap. You want a high Highlight Strength, but a low setting for Detail (nothing too fiddly here) and a medium setting for Smoothness (for a more glassy effect). Hit OK to apply the filter.

Step 7: Wrap refinement
The Plastic Wrap filter often has unexpected results. If it doesn’t look right, choose Undo and use Dodge and Burn to modify the shading in the problem area, then use Ctrl F (Windows) Command F (Mac) to reapply the filter. Repeat this process until you’re happy with the result.
Step 8: Add some tint
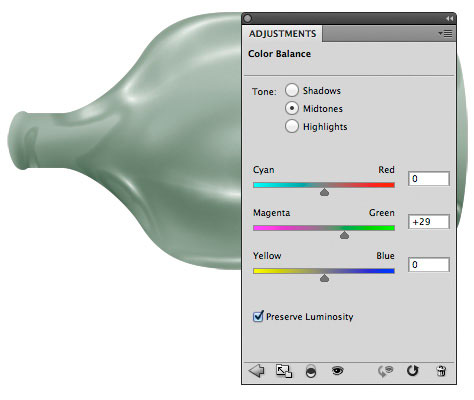
To make the bottle look even more like glass, you need to add a little color. Make a new Color Balance Adjustment Layer by choosing it from the pop-up menu at the bottom of the Layers panel. Drag the middle slider to the right to add a touch of green, then click OK. The advantage of Adjustment Layers is that you can edit them later if necessary.
Step 9: Boost the contrast
If your bottle looks dull, increase the contrast. The best way is to make a new Adjustment Layer set to Curves, and then drag the top half of the curve up and the bottom half down to increase the contrast.

Step 10: Add the ship
With the bottle now complete, you can add the ship — or any other object you choose — with a simple copy and paste. Use Free Transform to size the object so that it fits neatly inside the bottle. Don’t worry about the stand — you’ll cover it in the next few steps.

Step 11: A touch of sea
Ships in bottles are often placed on sea-colored bases, so let’s add one. You can paint this on a new layer in solid blue. No need to worry about it going over the edge of the bottle, as you can fix that later.

Step 12: Add some waves
Although you’ll barely see the sea inside the bottle, add a little texture to keep it from looking flat. Use the Dodge tool, with a small brush and at low pressure, to paint in streaky highlights. Don’t worry too much about the detail; it’s just for the suggestion of a sea base.

Step 13: Group and mask
Select both the ship and the sea layers, and choose Layer > Group Layers. By grouping the two layers together, you can mask them both at the same time. Choose Layer > Layer Mask > Reveal All. Using a soft-edged brush, paint in black on the mask to hide the area outside the bottle. Also, paint it out a little just inside the bottle’s boundary, to make the edge appear more glassy.

Step 14: Fix the appearance
Painting on the layer mask is all very well, but it doesn’t really make the ship look as if it’s inside the bottle. A simple solution is to change the Layer Mode of the entire group from Normal to Multiply. This means the boat and sea will only darken the bottle, which will make the glass look much more like it’s in front of it.

Step 15: Tone it down
To make the model look even more convincing, lower the opacity of the layer from 100% to around 80%. This places the assembly much more firmly inside the bottle for a more realistic appearance.

Step 16: Duplicate the bottle
The bottle has a lot of shine on it — but it isn’t showing up well over the bottle. So take the original bottle layer and duplicate it, then move it to the top of the Layer Panel so it’s above all the others.

Step 17: Hard Light that bottle
To make the duplicated bottle transparent, use the pop-up menu at the top of the Layers Panel to change its mode from Normal to Hard Light. Now the shine is returned at full strength, producing a glassier effect.

Step 18: Draw the cork
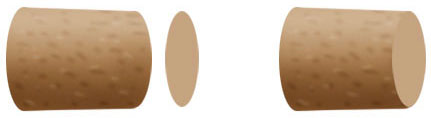
The final step is to draw a cork for this bottle. On a new layer, draw an ellipse and fill it with medium brown. Then drag a copy to the right (hold the Alt/Option key as you drag to move a copy) and make it slightly smaller using Free Transform. Then hold Alt/Option and drag another copy of this second ellipse. Fill the copy with a slightly brighter brown.

Step 19: Fill and shade
Paint in the space between the first two ellipses in the same brown as was used for their fill (left). You can use a hard-edged brush if you like, clicking at the top of the first ellipse and then Shift-clicking at the top of the second: Photoshop will draw a straight line between the two clicks. Then use Dodge and Burn to add a little shading to the top and bottom of the cork (right).

Step 20: Finish the cork
Use Dodge and Burn again, with a very small brush size, to add light and dark patches to the cork (left). Don’t worry about accuracy — it will barely be visible. Then select the third ellipse and drag it on top of the cork assembly (right).
Step 21: Put the cork in the bottle
Move the cork so it’s above the main bottle layers, but beneath the duplicated bottle (the one you set to Hard Light). Use Free Transform, if necessary, to make the cork small enough to fit inside the neck.

Step 22: Darken the cork
Use the pop-up menu at the top of the Layers Panel to change the mode of this cork from Normal to Multiply. Now it looks much more as if it’s inside the bottle.
Step 23: Mask the cork
Choose Layer > Layer Mask > Reveal All to add a new Layer Mask to the cork layer. Using a small soft-edged brush, paint in black on this mask to hide the layer. Paint it out entirely around the lip at the top of the neck, and use a larger brush to make the cork more transparent inside the bottle.

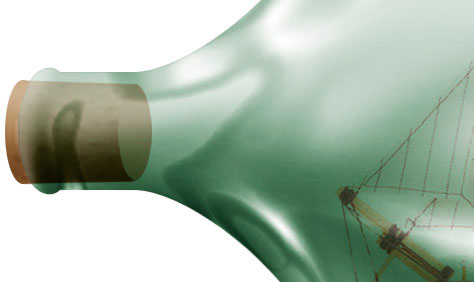
Step 24: The finished artwork
And there you have it: One ship, neatly constructed inside a bottle. And now that you have the bottle, you can easily remove the ship and replace it with any other object.
Click the image below to see a larger version of the finished product.
This article was last modified on January 6, 2023
This article was first published on September 25, 2011
Commenting is easier and faster when you're logged in!

Recommended for you

CreativePro Video: Better Auto Color Correction in Photoshop
In this week’s CreativePro video, Jesús Ramirez demos how to get better automati...

Create Reflections in Photoshop with Smart Objects
With Photoshop’s Smart Objects you can combine multiple layers into one, distort...

How to Make a Terminator Robot Effect in Photoshop
Arnold Schwarzenegger’s iconic robotic endoskeleton was a defining feature...