
Photography 101: Vacation Portrait Tricks

This tutorial is courtesy of the Photoflex Lighting School.
![]()
If you’re like most people who work for a living, you look forward to the one or two weeks of the year when you get to go on vacation. However, aside from the memories you’ll have of the trip after it’s over, what else will you have to remember this special time? If you’re lucky, you may get a few decent photos of the trip worthy of printing and showing to friends and family.
But why leave this travel element up to chance? Armed with a few simple camera and lighting techniques, you can ensure great quality photos for any trip you have planned.
Here, we’ll demonstrate how to capture professional quality images while traveling, even in the most challenging of locations. For this lesson, we documented a couple taking snapshots of themselves on a recent trip to New York City.
Topics Covered:
- Traveling Snapshots
- Snapshot Drawbacks
- Shooting With Manual Control
- Switching to Black and White Digitally
- Adjusting Exposure
- Reflecting Light To Reduce Contrast
- Diffusing Your Shoe Mount Flash
- The Group Shot
- Blue Skies On A Cloudy Day
- Final Notes
Lighting Equipment:
- Adjustable ShoeMount
- ShoeMount MultiClamp
- LiteDisc: 42-inch soft gold/white
- LiteDome extra small basic kit
- MultiDisc: 42 inch
- StarFire ShoeMount Digital Flash
- Standard camera bracket
Traveling Snapshots
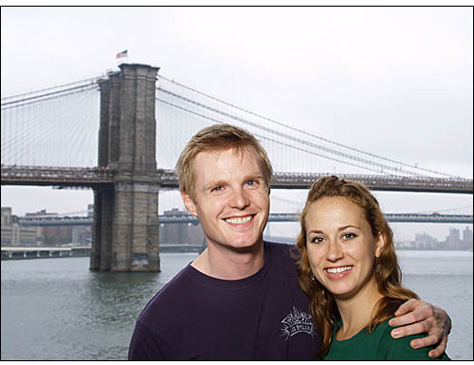
We met up with our traveling couple, Karissa and Steve, on a somewhat rainy, overcast summer day in Manhattan, New York. One of the shots they wanted to take was of themselves with the Brooklyn Bridge in the background. To get out of the drizzle, we walked up to the third floor of a public building that had an open terrace and a great view of the Brooklyn Bridge.
They first started out taking a picture of themselves the way most people would. Steve took out his point-and-shoot digital camera, set it on Program (automatic) mode with the built-in flash enabled and took a shot (Figures 1 and 2).


Snapshot Drawbacks
While the result does reveal the two of them in front of a bridge, there are a few issues that photo enthusiasts would be quick to point out. Here are the top four:
1. Exposure. Although Karissa and Steve are adequately illuminated, the background is sufficiently overexposed. Unless you set the exposure settings in your camera manually, the exposure can be significantly off the mark.
2. Light Quality. Even though Karissa and Steve are adequately illuminated, the quality of light coming from the camera flash is flat and unnatural. Nowhere in nature do you find this type of light, unless you’re shining a flashlight in someone’s eyes. Not only is it unnatural, but for most people it’s also unflattering. Karissa and Steve are a good looking couple, but this type of lighting treatment does not capture and showcase that.
3. Composition. There are a few pitfalls to holding the camera this way. First, it’s difficult to tell what the frame looks like and what is going to appear in both the foreground and background. Here, Steve’s head is blocking one of the two towers of this famous suspension bridge. Second, Steve’s body position is rendered somewhat awkwardly, as his arm is extended outward to take the shot.
4. Juxtaposition. Although Steve zoomed in with his lens to minimize lens distortion on their faces and fill the frame (typically a good thing), their close proximity to the camera ends up overshadowing where they’re shooting. The Brooklyn Bridge, although mostly obstructed, is barely noticeable in this framing.
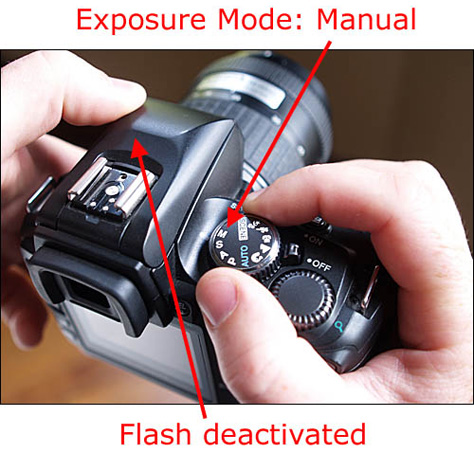
Shooting With Manual Control
Upon review of the result, they realized they wanted to try for a better shot. The first thing Steve did was put his point-and-shoot camera away and take out his digital SLR. As with most SLRs, this was a fully manual camera that allows you to configure the settings exactly where you want. Steve once again tried to shoot the two of them himself, only this time with no flash (Figures 3 and 4).

Once again, not a very compelling result. While the lighting on them is a little more natural than the built-in flash result, it is nevertheless significantly underexposed. Additionally, everything else that was wrong with the first result is also wrong here: The background is overexposed, the tower is obstructed, the body positioning is awkward, and the camera distance prevents a realistic rendering of the scene.
Switching to Black and White Digitally
Karissa also pointed out that because it was an overcast day, the background seemed very gray compared to them. So, they decided to shoot in Grayscale mode (black and white) for the next series of shots (Figure 5).

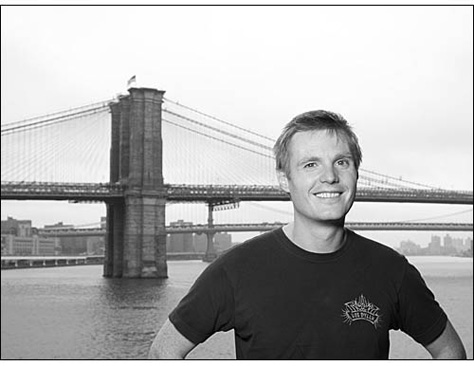
For this next shot, Karissa decided to take control of the composition by photographing Steve alone against the backdrop of the Brooklyn Bridge. She spot-metered off the bridge itself, composed the frame and took a shot (Figures 6 and 7).


In the result shot, Karissa saw that the exposure on the background was good, but that Steve was dramatically under-lit. The reason that Steve was so under-lit was because he was facing a dark wall and covered by a dark ceiling that reflected little to no light into his face.
Adjusting Exposure
To see what the shot would look like at a brighter exposure, Karissa made adjustments to the aperture and shutter speed so that Steve would be adequately exposed. In this case, she set the aperture to f/5.6, set the shutter speed to 1/30th of a second and made sure to be as steady as possible when tripping the shutter. Keep in mind that shooting handheld at a shutter speed of 1/60th of a second or slower could result in motion blur, or “camera shake.”
Now the result is overexposed in the background. And even though the light is better on Steve with this exposure, it is still very dark in the center of his face, particularly around the eyes (Figure 8).

Reflecting Light To Reduce Contrast
As an alternative to using the flash, Karissa decided she wanted to bounce some of the available light into the shadow areas of Steve’s face with a light reflector. So, she pulled a Photoflex 42 inch MultiDisc out of her backpack and asked one of our crew to hold it in place. She kept her aperture at f/5.6 and increased the shutter speed to 1/125th of second for a better overall exposure (Figures 9 and 10).
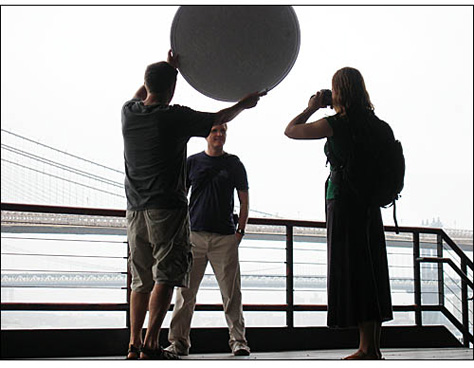

*NOTE: The MultiDisc reflector shown here folds down to 1/3 its size for portability purposes. Click the link at the beginning of the lesson for more information on the MultiDisc (“5-in-1” Discs available in 22, 32 and 42 inch sizes). Once at this page, click the Instructions link to see how the MultiDisc functions.
With just this one light reflector, we were able to cut down the contrast enough to an acceptable level.
Karissa was curious as to how her Photoflex StarFire: ShoeMount flash would work in this situation, as compared to the MultiDisc fill. So we took the MultiDisc away, she attached and powered up the flash, stepped back a little to take in more of the bridge, and took another exposure (Figures 11 and 12).


Similar to the built-in flash, the flash allows for a decent exposure of the foreground as it relates to the background, but the quality of light is still very unnatural. So, Karissa decided to try one final lighting technique: softening the camera flash with an extra-small LiteDome SoftBox (Figure 13).

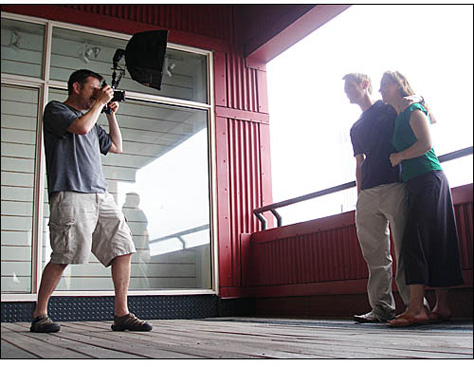
Diffusing Your ShoeMount Flash
With the Photoflex Extra Small Basic Kit, you can modify the light of your flash to create much more natural results. Here, Karissa used a common camera bracket to anchor everything in place. She first mounted the camera to the camera bracket, attached a Photoflex Extra Small LiteDome SoftBox to the bracket using the Photoflex Adjustable ShoeMount hardware, and finally used the Photoflex FlashFire: to connect both the camera and the flash.
Once this configuration was set up, she took a few shots while adjusting the power on the flash until she got an exposure she liked (Figures 14 and 15).


As you can see from the result, the lighting is much more diffused than with the previous built-in flash exposure and the shot has a much more professional look to it (Figure 16).
The Group Shot
Now that Karissa had established a good lighting solution for this scene, she then expressed that she wanted to get a shot with both Steve and her in it. Her only disappointment was that the weather was so dismal and she wished that the sky was blue so it would provide a nicely colored backdrop to their photos. After a little head scratching, we assured them both that we could help make that happen.
So, we asked Karissa to switch back to color mode in the camera and offered to step in to take a shot of the two of them at the same exposure settings.
*NOTE: If you need to ask a stranger to take a shot of you and/or your party, make sure your camera and lighting adjustments are already set and take a moment to show them the basic controls of the camera: shutter button, focus ring, zoom ring, etc. You may also want to point out what elements you want in the background as well, since most people don’t naturally consider the entire frame when taking snapshots (Figures 17 and 18).
In the result shot, the color on them looked great, but indeed the background was very gray by comparison. They looked at the result, then at us quizzically and asked how we were going to add blue sky to the image. We told them it would take about 15 minutes, but that we’d get them their blue sky.
Go to page 2 for the final Photoshop and lighting tricks!
Return to page 1.
Blue Skies On A Cloudy Day
Fortunately, we happened to have a laptop with us, into which we uploaded the images. We then opened up the last image of the two of them into Adobe Photoshop. With the image magnified to 100%, we selected the Magic Wand tool, set the tolerance to 10 and then shift-clicked around the areas of sky until every area of the sky was selected (Figure 19).

Once the sky was selected, we selected the Linear Gradient tool, set the color swatches in the Toolbar to light blue and gray, and click-dragged from the top of the image down to about the middle of the image (Figure 20).

Presto! Blue sky where there once were clouds! Now the shot has an entirely different feel to it. Steve and Karissa were amazed by how quickly the image came together and were excited to make a print of it when they got back home (Figure 21).

Final Notes
We should point out here that, while the final shot is a vast improvement over the first, it is still not perfect. The lighting on Karissa and Steve, while softer than the built-in flash shots, is still somewhat high in contrast compared to the quality of light in the background. If you compare the shadows on the bridge towers to the shadows on Karissa and Steve’s faces, you’ll see this difference in contrast. In order to match the lighting of the background, you’d simply need to use a large or extra-large SoftBox on your subjects to create more diffused, wraparound lighting.
But again, the difference in quality between the first and last result shots in this lesson are pretty substantial. Just ask yourself which photo would you rather have to remember your trip to New York City: Figure 22 or Figure 23?


Copyright © Photoflex, Inc. All Rights Reserved.
This article was last modified on January 6, 2023
This article was first published on December 23, 2010
Commenting is easier and faster when you're logged in!

Recommended for you
Create Stunning Slideshows with FotoMagico
If you’re a Mac-using photographer looking for a way to showcase your work in pr...

Creating Silhouettes in Photoshop with Remove.bg
I reviewed the revolutionary cutout tool remove.bg a couple of months back, and...

Creating a Panorama: Photoshop, Camera Raw, or Lightroom?
When a scene is wider than your widest lens, merging images into a panorama is a...