
Painter How-To: From Photo to Woodcut

People have appreciated the strong, graphic look of the woodcut — a method of relief printing — for centuries. The relief process lets you transfer solid areas of color from the cut wood block to the substrate (usually paper). Depending on the amount of ink and the pressure applied while burnishing, you can also achieve interesting textured effects. It’s a time-honored style that can be very effective today.
First, cut down a tree with branches or a trunk that are the approximate size of your final image. No, just kidding. With the versatile Woodcut effect in Corel Painter IX, you can start with a photograph and end up with a digital woodcut illustration that rivals hand-made relief prints — no ax required.

You can go from photograph (left) to woodcut (right) in Painter.
Step 1. Choose a Photo
The Woodcut effect works best on a photograph with good contrast and a strong center of interest. I chose a photograph of an ornament from Heidelberg castle that I shot while visiting Germany (Figure 1).

Figure 1. I knew this photograph would translate well to a woodcut because of the strong contrast.
Once you’ve selected an appropriate photo, open it in Painter.
Step 2. Set up Layers
You can create a woodcut directly on the image Canvas (background), but the Woodcut process is easier to control when the black elements are on a separate layer than the color elements. I created two layers, which were copies of the photo on the image Canvas. To put a duplicate of the image Canvas onto a layer, choose Select, All (Ctrl/1-A), press the Alt/Option key, and then choose Select > Float. To create a layer for the second plate, go to the Layers menu and choose Duplicate Layer. Now you should have two layers in the Layers palette (Figure 2).

Figure 2. Create two layers on top of the Canvas.
Make the uppermost layer active by clicking on its name in the Layers palette. Double-click on the layer name in the Layers palette and when the Layer Attributes dialog box appears, enter an easily identifiable name, such as Black Plate, in the correct field.
Step 3. Cut the Black Wood Block
Be sure the Black Plate layer is active. To access the Woodcut dialog box, go to Effects > Surface Control > Woodcut. In the resulting dialog box, enable Output Black and disable Color Output.
For more detailed edges, adjust the Black Edge slider to the left. I set mine to approximately 37.75. Also, I reduced the Erosion time from 4 to 2, which helped retain detail in the face of the statue (Figure 3a).

Figure 3a. Experiment with the settings until they’re right for your photograph.
My image measured 900 x 1100 pixels. If your dimensions are larger, simply increase the settings in the Woodcut dialog box proportionately to achieve the same balance between smooth edges and texture in your woodcut.
At the top of the Layers palette, set the Composite Method for the Black Plate layer to Multiply so that the white areas on the layer appear transparent (Figure 3b).

Figure 3b. In this example, the Composite method is set to Default. To make the white areas appear transparent, set the Composite Method for the Black Plate layer to Multiply.
Step 4. Clean Up the Black Wood Block
The settings that worked well for the detail in the statue left black texture on the masonry arch. To focus more attention on the statue, I removed some of the black texture from the archway.
Using the Smooth Ink Pen variant of Pens and white paint, I painted white over these areas. I chose the Smooth Ink Pen because it paints with a crisp edge, which complements the appearance of the Woodcut. I decreased the size of the brush to paint the detailed areas. Figure 4 shows the in-progress woodcut image with the underlying color layer visibility turned on.
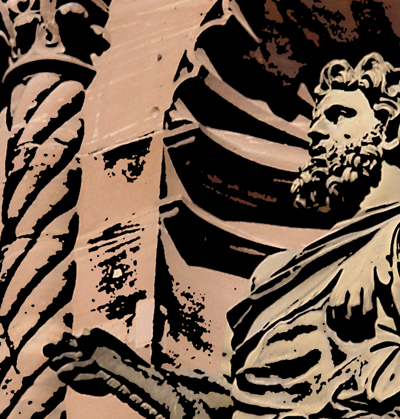
Figure 4. Here, the underlying color layer visibility is turned on.
Step 5. Cut the Color Wood Block
Now you’re ready to build your color plate. Turn off the visibility of the Black Plate layer temporarily by toggling its eye icon shut in the Layers palette. Click the underlying layer’s name to activate it for the colors. Rename this layer Color Plate. With this layer active, choose Effects, Surface Control, Woodcut. When the dialog box appears, disable the Output Black checkbox.
In the lower portion of the window, accept the default number of colors (16) and make the edges between the colors crisper by adjusting the Color Edge slider slightly to the left (Figure 5a). I set mine at 2.

Figure 5a. You can make the edges between colors more defined.
Once I liked the edges, I warmed up the colors. To select a color in the Woodcut dialog box, click on it. You’ll see a red outline appear around the color. Now that it’s selected, you can choose a new color in the Colors palette and the swatch will change to the new color. For my image, I chose a tan color swatch and made the color warmer. I also lightened the color for the highlights on the face of the statue (Figure 5b).
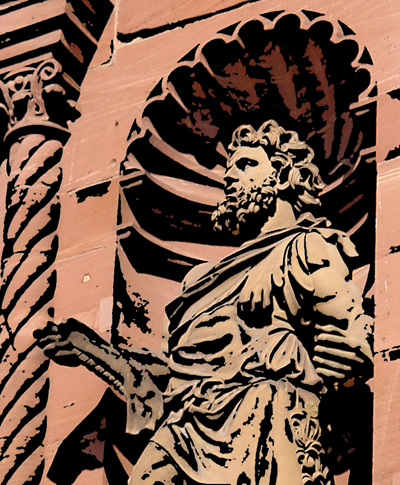
Figure 5b. This woodcut is shaping up nicely.
To see other areas of your image in the Preview window, drag with the grabber hand cursor to move around the image preview.
When you’re satisfied with the colors, click OK to accept.
Step 6. Add More Texture
For added richness and texture, I added a second black Woodcut layer. To do the same, target the Canvas and then choose Select > All (or press Ctrl/1-Cmnd-A). Press the Alt/Option key and then choose Select > Float. In the Woodcut dialog box, disable Color Output and enable Black Output. Next, move the Black Edge slider to a lower setting than you used before, for a more detailed texture in your image. (I set mine at about 30.) When you’re pleased with the image in the Preview window, click OK to accept.
In the Layers palette, set the Composite Method for the layer to Darken, and then reduce the Opacity of this new layer. (I set the Opacity of my layer to about 40%).
Finally, my woodcut was complete (Figure 6).
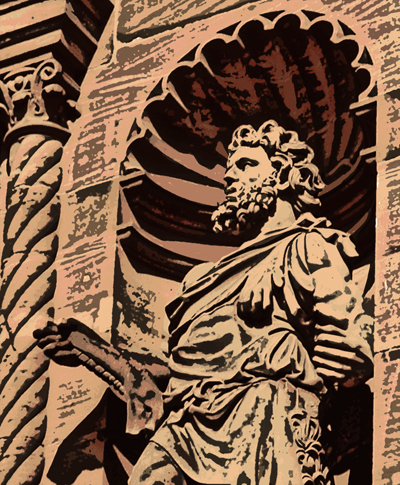
Figure 6. The final image has the bold, graphic look of a traditional woodcut.
You can save your Woodcut presets and apply them to other illustrations. To save a preset, click the Save button near the top of the Woodcut dialog box; when the Save Preset dialog box appears, name your Preset and click OK. The new Preset appears in the pop-up list at the top of the Woodcut dialog box. Click OK to apply the Woodcut effect.
An award-winning artist, author, and educator based in San Diego, California, Cher Threinen-Pendarvis has always worked with traditional art-making tools. Also a pioneer in digital art, Cher has been widely recognized for her mastery of Painter, Adobe Photoshop, and the Wacom pressure-sensitive tablet. Her most recent books are The Photoshop and Painter Tablet Book: Creative Techniques for Digital Painting, and The Painter IX Wow! Book. She is principal of the consulting firm Cher Threinen Design.
This article was last modified on October 6, 2022
This article was first published on January 16, 2006
Commenting is easier and faster when you're logged in!

Recommended for you

Mastering Photoshop Smart Objects: Blending Layers Without Masking
When it comes to mastering the art of blending layers (or any of Photoshop...

Hands-On Review of the Microsoft Surface Studio
Recently Microsoft announced their latest pieces of hardware for the Surface pro...

Three Tips for Using Illustrator’s Pattern Brushes
If you haven’t delved into making custom pattern brushes in Illustrator, y...