
PageMaker How-To: Creating a Graphics Portfolio

Placing the Graphics on the Cover Page
Placing the graphics into their respective frames is relatively easy. To do this, with the Pointer tool selected, click on the first frame in the first row and choose File > Place. In the Place Document dialog box (Place dialog box in Windows), navigate to and select the image you want to appear in that frame. Make sure the Within Frame option button is selected in the Place area and then click OK (Open in Windows). When you do, the image is placed within the frame. Repeat these steps until all 15 images are placed in their respective frames. If you place an image in the wrong frame, you can delete it by clicking on the frame with the Pointer tool and choosing Element > Frame > Delete Content.
Tip: If your images are larger than the 1_-inch frames, you can use the Cropping tool to position the image within the frame in order to show the pertinent part of the design.
Creating the Two-Page Spread
As mentioned earlier, the setup for the two-page spread is a little different than the cover-page setup. On pages 2 and 3 you’ll display 10 of the images that are shown on the cover as well as include text that describes how each image was created. With this type of information in front of you during an interview, you can talk intelligently about your work and how you approach an assignment.
Setting Up the Inside Pages
To begin, click on the Page 2 icon to display pages 2 and 3. The first step is to add ruler guides to help you set up your frames. Drag down a horizontal ruler 1_ inches from the top margin guide. Next, drag a vertical ruler 1_ inches to the right of the left margin guide. Then drag another vertical ruler _ inch to the right of the first vertical ruler guide. Page 2 should now look like the one shown in Figure 7. Now add a frame for your first graphic in the upper-left corner that was created by the ruler guides.
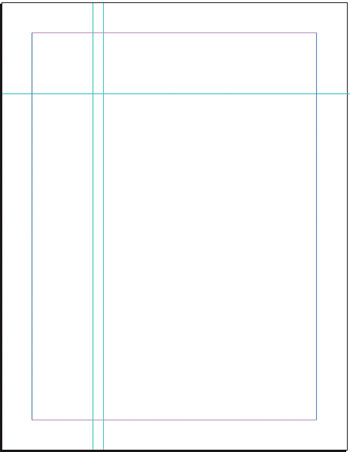
Figure 7: You can use ruler guides to help set up the two-page spread.
To add the graphical information that you want listed along with each image, you’ll use threaded frames. The number of frames you use depends on how you want the information to look. For our portfolio, we want to add three frames in which the first two are threaded together and the last frame stands alone-in a sense creating a three-column frame. To do this, add three 1_-inch frames _ inch apart, starting at the farthest-right vertical ruler guide.
Now thread the first two information frames together by selecting the Pointer tool and clicking on the second frame from the left, as shown on the top in Figure 8. Next, click on the bottom window-shade handle of this frame and then click on the next frame to the right, as shown on the bottom in Figure 8. The plus sign (+) in the top handle of the third frame indicates that the two frames are now threaded together.
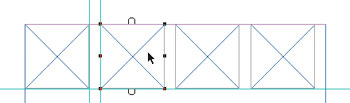
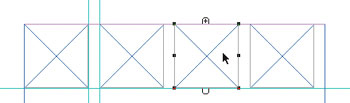 Figure 8: By threading two frames together you can create a “two-column” text frame.
To create four more rows of this frame setup, simultaneously select the four frames, press [command]G ([Ctrl]G in Windows) to group them and then press [command]C ([Ctrl]C in Windows) to copy them. Choose Edit > Paste Multiple and enter 4 in the Paste x Copies text box, 0 in the Horizontal Offset text box and 2 in the Vertical Offset text box. When you click OK, page 2 should resemble the one shown in Figure 9. Repeat this process on page 3 so the frames mirror the left page; that is, the frame that will contain the graphic should be on the outer edge.
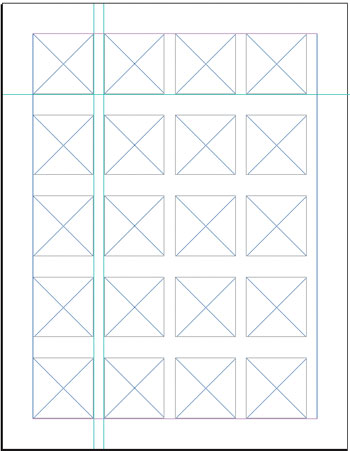
Figure 9: Like the cover page, you can use the Paste Multiple command to quickly set up the two-page spread.
This article was last modified on January 3, 2023
This article was first published on August 16, 2002
Commenting is easier and faster when you're logged in!

Recommended for you

Add Undo to Your Script
Your first script runs just fine; but what if you run it by accident? Find out h...

Acrobat How-to: Softproofing PDFs with Acrobat's Preflight Tools
While preflight is usually the bailiwick of prepress houses sending files to pri...

Paper Tips: Uncoated Speaks Softer
This story courtesy of PaperSpecs.com. Traditionally, coated paper has been the...