
PageMaker How-To: Creating a Graphics Portfolio

by Katherine McCray and Suzanne Thomas
This story is taken from “Inside PageMaker” (Element K Journals).

Creativepro.com readers can subscribe to Element K Journals at a discount. Click here to learn more.
One aspect of a designer’s life that never seems to change is the constant need to update your portfolio. As if you’re not busy enough learning new applications and software versions, as well as creating both print and digital renderings of the same design, every now and then you also need to interview for a new job or try to win over a new client. With all you have to do, you may not recall the process behind creating a piece of work, or perhaps you have to send digital copies of your designs via email or floppy disk and won’t be able to explain in person how the designs were created.
To help solve these problems, you can create a sort of “cheat sheet,” or graphics portfolio, a sample cover of which is shown in Figure 1. A graphics portfolio displays your most prominent work as well as a brief explanation of how each piece was accomplished. You can make a graphics portfolio in almost any application, but it’s nice to stick with familiar tools. In this article, we’ll show you how you can set up a graphics portfolio in PageMaker that can be easily updated, printed, or viewed onscreen. (To see how to accomplish this same task in QuarkXPress, see “QuarkXPress How-To: Creating a Graphics Portfolio.”)
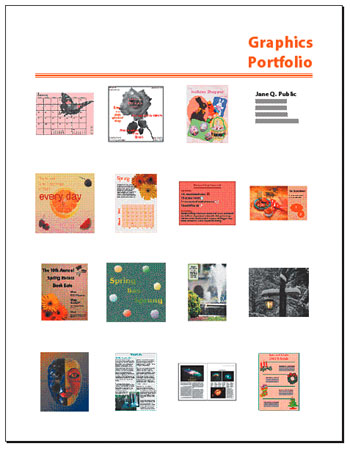
Figure 1: Creating a graphics portfolio in PageMaker gives you the ability to quickly update it as well as have it available in print or onscreen versions.
Before we show you how to create a graphics portfolio, we’ll first discuss its strong points and the reasons why it’s a good idea to create one. Then we’ll go over how to prepare the images you wish to include in the portfolio. Next, we’ll show you how to set up the cover page. Finally, we’ll show you how to set up the inside pages and how you can copy these pages to a new spread in order to easily expand the portfolio as needed.
The Principle Behind It
With most portfolios, all the interviewer or client sees is the finished product. However, our graphics portfolio not only showcases your designs, but it also displays your graphical knowledge by including text that explains how each piece was created-the tools used, the problems encountered, how you solved them, and so on, as shown in Figure 2. This type of portfolio is designed to be a companion to the portfolio you already have that contains the actual copies of your work; it isn’t meant to be a replacement.
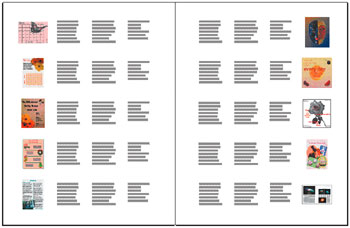
Figure 2: A graphics portfolio such as this allows you to include graphical information about the designs you created.
The graphics portfolio is also helpful during interviews when you may be too nervous to remember how you created a piece of art, or when you send your work digitally via the Internet or on disk through the mail and won’t be around to explain the circumstances behind your creations. As your work evolves, or if you need to emphasize a particular style of artwork for a specific interview, you’ll easily be able to expand and tailor your portfolio as needed.
Preparing the Graphics
The first step to creating a graphics portfolio is to gather the designs you wish to showcase, as well as the text that explains how each piece was created. Since you’ll only be placing thumbnail views (1_-inches square) of the original artwork, it’s a good idea to resize them in the originating graphics application. Otherwise, the file size of the PageMaker document will become unnecessarily large. However, you’ll want to keep a copy of the larger file, so make a duplicate of every design file you plan to use in your portfolio and save the copies in the same folder in which you’ll save the PageMaker document.
Also, you should save your designs as EPS or TIFF (CMYK) files for print and GIF or JPEG (RGB) files for onscreen. If you intend to use the same document for both print and onscreen, save the images in both CMYK and RGB formats and then replace the CMYK images with the RGB images before exporting the document to a PDF file.
This article was last modified on January 3, 2023
This article was first published on August 16, 2002
Commenting is easier and faster when you're logged in!

Recommended for you

Introducing Peristyle by Hoefler&Co.
Jonathan Hoefler of Hoefler&Co. is at it again! He and his enthusiastic and...

Tip of the Week: Take the Shortcut to the Bridge
Sign up for the InDesign tip of the week to get a new tip, roundups of new artic...
What’s the difference between RGB and CMYK printing?
Artists and designers are taught the conventional wisdom that design for digital...