


In the days before color management, all applications displayed RGB files by simply sending the color values in the file straight to the monitor. With CMYK files, applications would do a one-size-fits-all conversion to RGB for display, since monitors have to be fed RGB signals. In either case, this made consistent color display just about impossible, because everyone’s monitor is different. We tried to compensate for this by calibrating all our monitors to the same standard, but as a veteran user of just about every monitor calibration tool ever made, I can say with some confidence that no matter how carefully one calibrates one’s monitors, it’s simply impossible to get them to match. Monitor phosphors are quite inconsistent even within a single batch from a single vendor. When you factor in the effects of aging equipment, of user brightness and contrast settings, and of the huge variety of ambient lighting conditions, you quickly realize that it’s highly unlikely you’ll be able to get two monitors to look the same even on opposite sides of your own studio, let alone on opposite sides of the country.
In the early days of color management, we tried to work around the problem by attaching our monitor profile to the color data — the idea being that when we sent it to someone else, they could transform it from our monitor RGB to their monitor RGB, and hence see the same color on their monitor as we did on ours. This worked up to a point. Sending a file through one or two such conversions didn’t really do much harm, but any color conversion entails some loss, and after five or six such conversions we’d quickly find we had a lot less of the image left than we did when we started. And from a workflow standard, having to convert the image each time we opened it wasn’t much of a productivity enhancer.
When Adobe came out with Photoshop 5, they introduced the idea of an RGB working space -an arbitrary definition of RGB color that didn’t reflect the quirks of any particular monitor. To get the color to display correctly, Photoshop adjusts the data that gets sent to the monitor, using the ICC profile for that specific monitor to arrive at the correct display values-the numbers that get sent to the screen are different from the numbers in the file, tailored to the quirks of each individual monitor. (That’s what the “Display using monitor compensation” checkbox in Photoshop’s RGB Setup dialog does.) This way, as long as each monitor is accurately described by a profile, we can make an image appear identical on many different monitors without forcing the color data through multiple conversions. It’s a big step forward, and an all-round good idea. (Color-managed page layout applications like QuarkXPress 4 and PageMaker 6.5 have always worked this way, using the monitor profile to display both non-monitor RGB and profiled CMYK correctly.)
But the fly in the ointment is that most scanning software hasn’t yet caught up to the new color architecture. With a few notable exceptions, scanner drivers simply throw the scanner RGB values straight at the display, with the result that an image you’ve painstakingly corrected with the scanner software looks totally different when it lands in Photoshop. This is a big problem, as we can see in Figure 1,

Figure 1
which shows the image as it appears in the scanner software, and Figure 2, which shows the image in Photoshop.

Figure 2
We’ve always taught that, wherever possible, you should make your major edits using the scanner software, because most scanners capture more than 8 bits per channel internally, and you’ll get much better results editing the high-bit data than you will working on an image that’s already been downsampled to 24-bit RGB. When you make tone or color corrections on a 24-bit RGB image (or a 32-bit CMYK image), some levels that were formerly adjacent get stretched apart. If they get stretched too far apart, you start to see obvious jumps instead of smooth gradations-this is called posterization. Similarly, some levels that were formerly different get squashed together, so you lose detail. Instead of the image containing 256 shades per channel, it may only have 220, or 200, or even fewer if massive corrections are required. If you edit the high-bit data instead, you still end up with a full 256 shades per channel when you downsample to 24 bits.
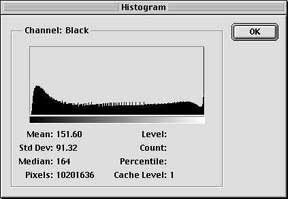
Figure 3
Figure 3 shows the Histogram of a high-bit image after a major contrast move. It still contains a full 256 shades. Figure 4 shows the histogram that results when the same contrast move is applied to the image after it has already been reduced to 8 bits per channel, showing that it has now lost a considerable number of the possible 256 shades.

Figure 4
Clearly, it’s better to edit the high-bit image. But if the scanner software displays the image differently from Photoshop, you’ll wind up with an image that looks beautiful in the scanning software’s prescan display, but looks awful once it’s in Photoshop.
Fortunately, there are several ways to work around the problem. Which one you choose will likely depend on the capabilities of your scanner’s software.
Scanning to Working Space RGB
If you’re lucky enough to have a scanner whose software lets you scan to a specific output profile (Heidelberg’s LinoColor, Imacon’s ColorFlex, LaserSoft’s SilverFast and Second Glance’s Scantastic all allow this), then you can simply load your Photoshop RGB working space profile as the output profile for the scanner. That way, the image will look the same in Photoshop as it did when you worked on it in the scanning package, with no conversion required. Eventually, we hope that all scanning packages will offer this feature, but until they do, you may need to use a workaround if your scanner doesn’t let you scan to a profile.
Scan Raw and correct in Photoshop
If your scanner allows you to capture raw high-bit data, you can bring the raw scan into Photoshop as a 48-bit file, then make all your corrections in Photoshop. (Photoshop treats all high-bit images as 16 bits per channel-48-bit RGB or 64-bit CMYK-even if the scanner captures only 10, 12, or 14 bits per channel.) This is functionally equivalent to making the corrections on the high-bit data in the scanner software. It even has a few advantages. Scanning becomes a largely automatic process-you simply set crop and resolution, then scan. You get to use a fairly complete set of global image editing tools in Photoshop, and you can see every pixel in the image rather than making all your judgements on a prescan that’s often little bigger than a postage stamp. (If you have a profile for your scanner’s raw state, you can use Photoshop’s Profile-to-Profile to convert the image from raw scanner RGB to your working space RGB before you make any corrections-doing so will get the raw image closer to the appearance of the original, so you’ll have fewer corrections to make.) The downside to this approach is that your file is twice as big as a 24-bit RGB file, so it takes up twice as much space on disk and in RAM until you downsample it to 24 bits.
Converting 24-bit scans
If your scanner allows neither scanning to a profiled space nor capturing raw high-bit data, your options are more limited. If you have a profile for your scanner, you can convert your image from the scanner profile to Photoshop’s working space either when you open the file, or afterwards using Profile-to-Profile. Since a scanner profile is only valid for specific scanner settings, you need to scan all your images using the same settings, which means you lose most of the benefit of a high-bit scanner. A second approach is to make your corrections in the scanning software until the image looks the way you want it to in the prescan. Then, when you open the final scan in Photoshop, convert it from your monitor profile to the Photoshop working space. The limitation to this approach is that it loses any colors in the original that lie outside the gamut of your monitor. You do, however, reap the benefit of making corrections on the high-bit data.
Eventually, we hope that all the people who make scanner drivers will get with the program, and allow us to color-manage both the prescan and the final scan seamlessly. Of course, they’re much more likely to do so if their users request it, so if you’re forced to use one of these workarounds, let your scanner vendor know it, and encourage them to make your life easier by letting you scan into something other than monitor RGB.
This article was last modified on March 12, 2022
This article was first published on December 8, 1999
Commenting is easier and faster when you're logged in!

Recommended for you

How to Create Lithopanes in Photoshop
The introduction of 3D printing direct from Photoshop opened new gateways for ma...
A Photoshop Script to Delete Empty Layers
As a Photoshop user, one of the kindest things you can do for anyone who has to...

How to Create Trees in Photoshop, Part 2
In part 1 of this tutorial, we saw how to use the new Tree feature in the 14.2 u...