


Cheap Trick 5: Making Custom Ranges for Hue/Saturation.
Hue/Saturation is a powerful tool, but if you’ve been limiting yourself to the preset hue ranges — Reds, Greens, Blues, Cyans, Magentas, and Yellows — you’re leaving a lot of its power untapped. When you use any of the individual color ranges (anything other than the Master setting) you’ll see that between the two rainbow stripes at the bottom of the dialog box, there’s a dark gray bar, with lighter gray bars on either side that end in white triangles. This is the control that lets you select the exact range of hues you want to affect. The dark gray bar indicates the hues that will be fully selected; the lighter gray bars show the “feather” — the range of hues that will be partially selected.
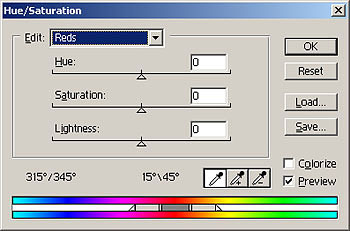
Figure 9: The gray sliders in the Photoshop Hue/Saturation command help provide extensive control over the ranges of hues being adjusted.
To use this control:
- Choose a hue from the drop-down list.
- Click in the image to center the hue range on the pixel you clicked.
- Dragging the gray bar moves the entire range, centering it on a different hue.
- To expand or contract the range of hues, drag the white uprights at either end of the dark gray bar.
- Dragging the white triangles changes the feather.
Remember: The point of these steps is to adjust the range of hues that will be affected by the Hue, Saturation, and Lightness adjustments you make. Unfortunately, it’s often difficult to see exactly which colors in the image are being changed. Here’s a simple way to make your selection obvious while you fine-tune it: Grab the Hue slider and drag it all the way to the right or left. This will produce a radical hue shift in the selected colors, making the selection very obvious. Then drag the selection controls to fine-tune your selection, and return the Hue slider to zero and begin making your Hue, Saturation, and Lightness adjustments.
An example should help clarify the process. I want to make the water bluer, so I start by opening Hue/Saturation, choosing Blues, and clicking on the blue water. (The name of the selection range changes to Cyans2, as shown in Figure 10).
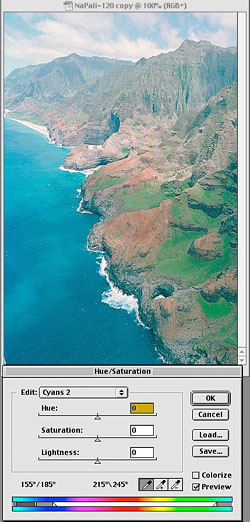
Figure 10: We begin with rough selection of blue hues, by choosing the blue channel and clicking on the blue water.
Next, I drag the Hue slider all the way to the left. It’s very obvious which pixels are affected, as shown in Figure 11.
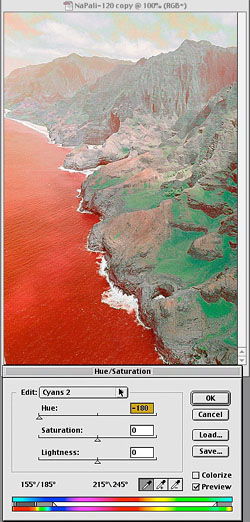
Figure 11: Setting Hue all the way to the left makes it obvious which pixels are being affected.
Using this feedback, I fine-tune the color range, as shown in Figure 12.
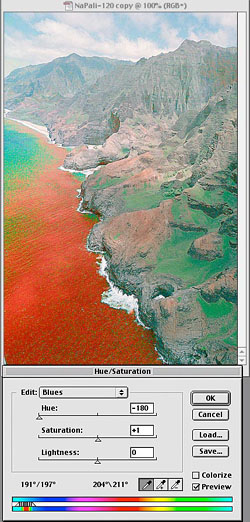
Figure 12: The fine-tuned color range.
Finally, I make the edit, as shown in Figure 13.

Figure 13: The final image, after the Hue/Saturation adjustment.
Again, it’s a technique that takes longer to explain than to execute. Once you understand how to tweak color ranges in Hue/Saturation, you can often avoid the tedious process of making selections or masks to make selective edits on color ranges.
If you master these five cheap tricks, you’ll accelerate the most significant component in your Photoshop system, which is you, the person driving it!
This article was last modified on July 18, 2023
This article was first published on July 11, 2001
Commenting is easier and faster when you're logged in!

Recommended for you
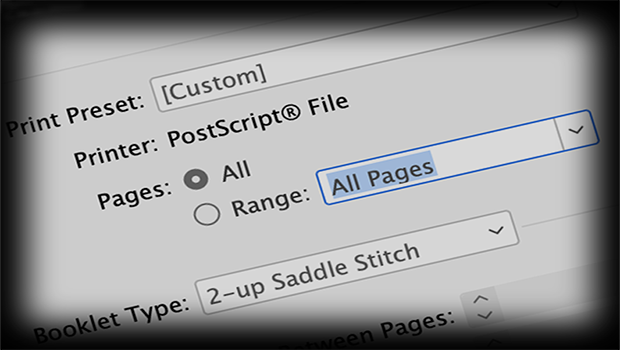
Creating a PDF from InDesign’s Print Booklet Feature
A step-by-step guide to creating a PDF of printers spreads with Print Booklet.
Creating Backward Bullets in InDesign
Did you ever wish you could put a bullet at the end of paragraph instead of at t...

InDesign Eye Candy, part 1: In Gravity’s Shadow
Why should all the Photoshop and Illustrator kids have all the fun, when you can...