


Throw it a Curve
Photoshop offers many different ways to fix this problem of too much blue, but my tool of choice is always Curves. However, if I’m working on a high-bit file, I can only apply the Curves adjustment to the actual image data as Adjustment Layers are unavailable (for more on this topic, read “The High-Bit Advantage“). For 8-bit-per-channel images, I always use a Curves Adjustment layer, both because it’s more flexible, and because when you use Adjustment Layers to edit the image, all the edits are calculated at the same time when you flatten the image. This approach degrades the image much less than burning successive rounds of corrections into the image one by one. (You can create an Adjustment Layer either by choosing New Adjustment Layer from the Layers menu, then choosing the type of Adjustment Layer you want from the New Adjustment Layer submenu, or by clicking the Adjustment Layer icon in the Layers palette and choosing the layer type from the icon’s popup menu.) But no matter whether you apply Curves directly, or through an Adjustment Layer, once the Curves dialog box appears the procedure is identical.
The Curves dialog box contains a tool that’s very often overlooked — the gray eyedropper. The gray eyedropper behaves very differently from its better-known black and white siblings. The black and white eyedroppers simply force the pixel on which you click to the target value set for the tool (you set target values by double clicking the eyedropper to open the Color Picker), and adjusts the rest of the image by the same amount. The gray eyedropper, however, moves the color of pixel on which you click towards the target value while retaining its native brightness and some of its color, again adjusting the rest of the image by the same amount. It’s very useful in fixing neutrals. Sometimes it’s all you need, and most of the time it gives you a good starting point for further work.
The easiest way to learn the gray eyedropper is to experiment with it. Figure 3 shows what happens when we click the gray eyedropper (set to its default target value of RGB 127) on different pixels in the image. The first image (at left) produces a result that’s too yellow (it takes out too much blue), and the middle image produces a result that’s too magenta (it’s taken out too much green as well as blue). The third image (at right) produces a result that’s pretty reasonable, so we’ll go with that.
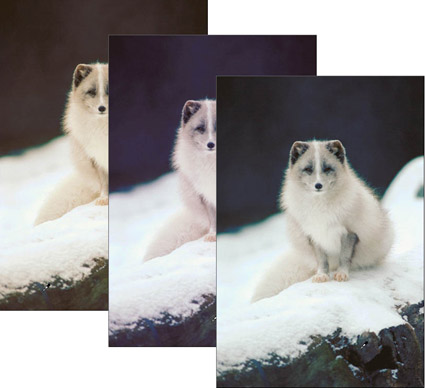
Figure 3: Experiment with the gray eyedropper, which adjusts the neutral value.
As a general rule, if I don’t get something useful by the fifth or sixth click of the eyedropper, I abandon it and start working the curves directly, but in about 80 percent of cases, the eyedropper gets me very close to where I want to be. If we examine the individual channel curves shown in Figure 4, we can see what the eyedropper has actually done. It’s adjusted the mid-tone to remove rather a lot of blue, added a very little green, and added rather more red than green.
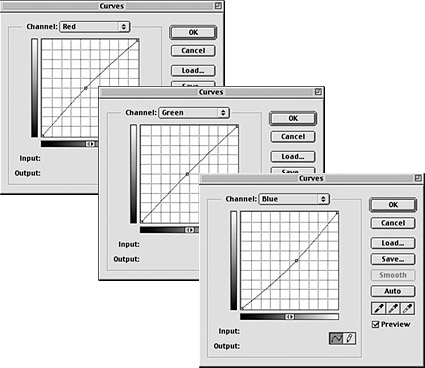
Figure 4: The red, green, and blue channel curves for the first image above.
This article was last modified on January 3, 2023
This article was first published on June 6, 2001
Commenting is easier and faster when you're logged in!

Recommended for you

A Great Script Lets You Add Measurements in InDesign or Illustrator
A script for InDesign or Illustrator takes the pain out of measuring and marking...
InType: Know Your Small Caps
Add sophistication and polish to your type by understanding the different kinds...

For Position Only: Is Quark the Underdog?
Epic battles always have an underdog. And the longer the war goes on, the more t...