
Nikon D100: Everything Old is New Again

Ready, Aim, Shoot
After using small point-and-shoot cameras with useless optical viewfinders, the D100 was a revelation. Rather than relying on the LCD’s screen fuzzy image and the slow, unpredictable autofocus, the D100 lets you aim and shoot through its excellent optical viewfinder, and rely on its lightning-fast and pinpoint-accurate autofocus system.
One feature I particularly like is the capability to manually move the focusing target with the Game-Boy-style joystick. For example, you can focus on a feature in a corner of a room, while keeping the camera framed around the room’s center. My only complaint is the position and size of the joystick, it’s an awkward reach and too small for a big thumb.
After suffering through other cameras’ point-and-shoot focus and exposure delays, and the long waits between shots while data is written to memory, it’s incredibly refreshing to be able to photograph my young children in their hyperkinetic motion, and actually keep up with them while the action unfolds.
Metering with the D100, as with the company’s other SLRs, is a delight. You can choose the 10-segment 3D matrix, center-weighted, or spot metering (see figures 2-4). The switch for these is well positioned, so it’s easy to switch modes to keep up with rapidly changing shooting conditions. The D100 also offers standard exposure compensation for situations where you need to push or pull the camera’s meter, and a Bracketing mode lets you easily grab several shots at predetermined stops above and below the metered exposure.
 Figure 2: The D100 offers a full spectrum of features that can be used to make well-balanced, natural-looking exposures that compare favorably to 35mm film. Matrix metering yielded a great exposure for this image dominated by middle tones.
 Figure 3: Like all Nikon SLRs, the metering and exposure control in the D100 is outstanding. Spot metering and manual exposure allowed me to finely control the highlights and shadows to stay true to the lighting in this shot. Being able to instantly view an exposure, histogram and gamut warning screen on the LCD makes on-the-fly exposure adjustments far easier than with film cameras.
 Figure 4: Center-weighted metering was used in this shot to compensate for the contrast between the extreme brightness of the background and the boy’s sharply contrasting black sweater.
Quick Review
After you’ve taken a shot, you can hit a “review” button to quickly take a look at what you’ve just shot, whenever you want to check on your work. You can also set the camera to automatically review images, but this setting tends to interfere with rapid camera adjustments, such as changing the focusing spot, while shooting, so I usually leave automatic review turned off. Because the D100 spends so much less time displaying images on the LCD than a point-and-shoot digital, you can easily expect to shoot 300 or more images on a single battery charge, rather than the 30 to 50 shots typical of a Nikon Coolpix, for example. I have yet to drain two of the D100’s batteries in single day of shooting. By swapping out the Microdrive for Compact Flash cards, the number of shots you can take on a single battery charge increases to 600 or more, but the cost per megabyte for Flash memory is about three times as high.
The D100’s controls are familiar if you’ve used Nikon’s high-end film SLRs, but daunting to the uninitiated. There are 12 electronic buttons and 6 multi-position switches, two control dials and a jog-shuttle controller, not to mention the aperture preview button and shutter release. Gaining full mastery of the D100 means getting familiar with 20-odd controls, some of which are used to set up the camera for various types of shooting, and some of which are used in combination for fine-tuning exposures while you shoot.
Of course, you can just stick the camera in “P” for program, and start shooting, but then why bother with an SLR? Actually, there’s at least one good reason to do just that. The D100 uses what Nikon calls a Flexible Program. In ordinary Program shooting the camera automatically balances aperture and shutter speeds based on the metered exposure and the current focal length of the lens. Flexible Program does the same, but allows you to cycle quickly through aperture and shutter speed combinations by simply spinning the thumb and forefinger dials.
For even more control, Aperture- and Shutter-priority and Manual modes are also readily available (see figure 5).
 Figure 5: Shutter-priority mode lets you spin a dial to set the shutter speed — the camera automatically adjusts the aperture based on the metered exposure. Here, it was used to slow down the shutter to enhance the effect of motion in the background. Aperture priority puts the emphasis on depth of field.
This article was last modified on January 18, 2023
This article was first published on January 28, 2003
Commenting is easier and faster when you're logged in!

Recommended for you

How to Make a Rippling Flag in Photoshop
How to make a realistic flag on any background with the design of your choice.
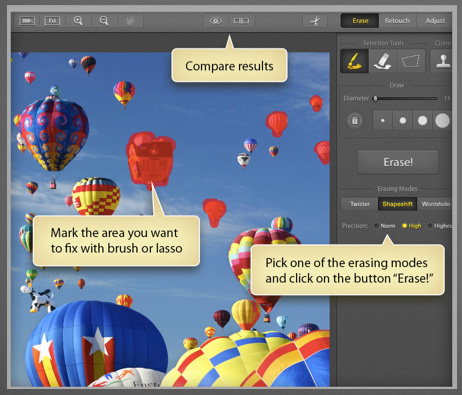
Snapheal Deal
From now through January 7, 2014 you can get Snapheal, a photo editing applicati...

Know Your Photoshop File Sizes
How can one Photoshop image grow and shrink dramatically during production, even...