

While some InDesign users focus on getting great-looking graphics into their layouts, my focus is on words or, more precisely, bringing properly formatted text into InDesign. As a book designer and typesetter, I spend most of my time wrangling with other people’s words. And while InDesign’s style sheets are great, editors don’t submit text in InDesign . . . they give me pages of copy as Microsoft Word files. After spending too many hours applying InDesign styles to imported Word files, I decided there had to be a better way.
I developed a method for synchronizing styles between Word and InDesign, so that when you place a properly formatted Word file in InDesign, the correct styles are automatically applied. Because the actual styling takes place in InDesign, you do your basic text grunt-work in Word, taking advantage of all its text-handling capabilities. This technique takes a bit of set up, but once you create the template in Word, you’ll be able to use it again and again.
Create Your InDesign Template
You begin by creating your InDesign template’s Paragraph Styles. Set up your template to include all the paragraph styles and their assortment of options used for your project. For example, a common chapter to a book might include the following elements (with their Paragraph Style name in parenthesis):
- The chapter number (Ch. Number)
- The chapter’s title (Ch. Title)
- A unique first paragraph of text which uses a drop cap (Text- Start)
- Indented paragraphs (Text- Indented)
- Non-indent paragraphs (Text- No Indent)
- Quoted material (Extract)
- One level of subheads (Heading- A)
Pay particular attention to the spelling of your style names, as they have to exactly match the name of the styles you will be creating in Microsoft Word. (Figure 1)
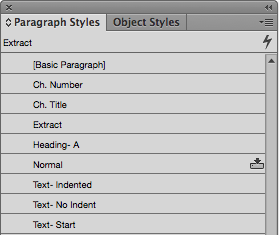
Figure 1: A short list of styles for a typical chapter to be set in InDesign.
Word on Templates
Every time you open a Microsoft Word document, you are opening it up into a wrapper of sorts, called a template. The template stores information such as Toolbars and their items, Palettes and their items, Styles, Keyboard Shortcuts, Macros, etc. If you customize any of these settings, that information is saved so that the next time you open a document, all those settings are ready at your fingertips. The default template is a file called “Normal,” which can be found in user/Library/Application Support/Microsoft/Office/User Templates.
You should make sure you don’t have any old settings or styles to mess with your text, so navigate to the location of your Normal template and move it to another location. When you fire up Word, the program will create a new “Normal” template and default back to its “factory settings.” Any changes you make to the Normal template are automatically saved, although you can turn on a Preference to have Word ask if you want to save any changes made to the default settings by checking on the “Prompt to save Normal template” option under the Save settings. Once you close out of Word, feel free to rename this template whatever you like, such as “ChapterStyles.”
Seeing Red
It’s a fair bet that when you open an author/editor’s document for the first time, the local formatting (bold and italic—applied by hitting the “B” and “I” in the Formatting Ribbon) is exactly the way that author intended, but as soon as you start deleting or changing the paragraph styles that come with the document, all bets are off. For instance, I’ve run into cases where deleting a style that came with the document will change italic text to roman. Should that happen when you’re setting 50 pages of a book without catching it, you’re going to have your client hot on your heels!
To guard against this, the very first thing I do when I open a document is run a Find/Replace routine, looking for italic, and changing the color of all italic text to, say, red. That way, should anything strange happen when deleting styles, you’ll still know that any red text should be italic text.
To do this, open the Advanced Find and Replace dialog box (Edit > Find > Advanced Find and Replace), switch to the Replace section, and click on the expander triangle next to the “Replace All” button to show more options. Remove any characters in the “Find what:” field and hit the “No Formatting” button at the bottom of the dialog box to clear any formatting options that may be registered from the last Find. Next, select “Font” from the Format drop down menu at the bottom of the dialog box. (Figure 2).

Figure 2: As in InDesign, you can Find/Replace formatting attributes as well as text.
This will bring up the Find Font dialog box, which will allow you to select different font-related attributes. Select “Italic” from the “Font style:” list and press “OK.” (Figure 3)
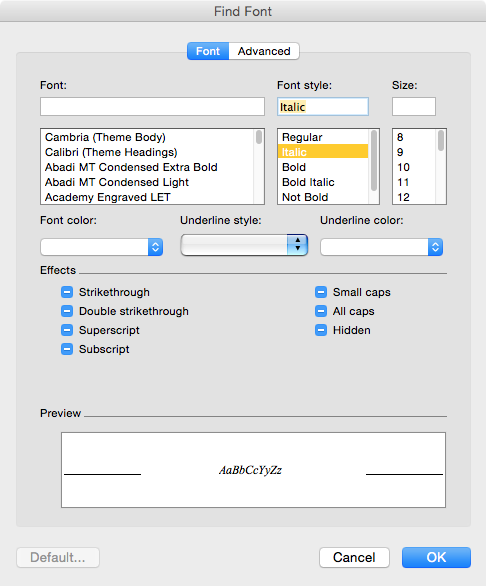
Figure 3: Select “Italic” from the “Font style:” list to find all italic local formatting.
Tab to the “Replace with:” field, clear any characters that may be in the field, and remove any formatting options by hitting the “No Formatting” button again.
Select “Font” from the Format drop down menu at the bottom of the dialog box again. From the “Font color:” palette, select a color to apply to your italic text. (Figure 4)
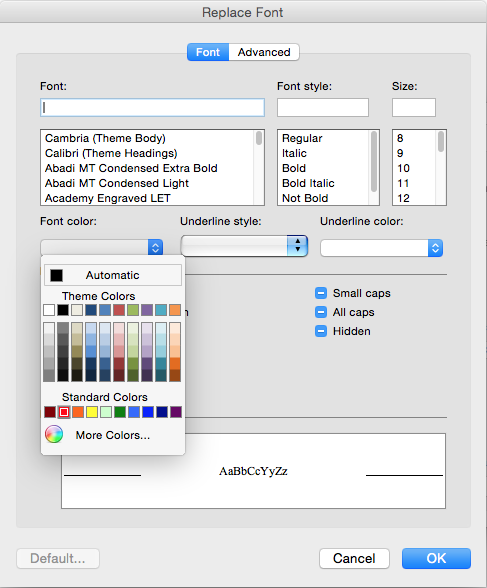
Figure 4: Pick a color from the “Font color:” palette to easily identify your local formatting.
With all your options now set, go ahead and hit the “Replace All” button. The result will be that any text that was locally formatted as italic will now also be colored. If your document uses a lot of bold or bolditalic throughout, you could run this routine for these instances too, making sure to use different colors. If you do, make sure you run the routine for bolditalic last, otherwise you’ll end up changing the color of your bolditalic text to one of the other colors you use, seeing as it has both bold and italic applied to it. (As most book chapters only use bold/bolditalic in the title and subheads [which I can easily spot], I forgo coloring them, and only color my italic text).
It’s All in the Styles
With your font styling colored, it’s now time to create the styles in Word to assign to each paragraph. Select Style from Word’s Format Menu (Format > Style), which will bring up a window that lists all the styles currently in your document on the left and a description of the selected style on the right. (Figure 5)
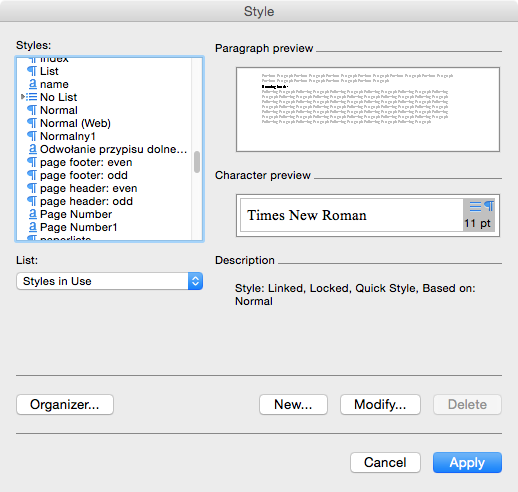
Figure 5: Styles in Word. Paragraph Styles are signified with a pilcrow (paragraph symbol “¶”); Character Styles with an underlined lowercase “a”.
As you can tell from the screen shot, this document came from the author with a bunch of styles already established, though none are the ones that need to be applied. To fix this, click on the “Organizer” button, which brings up a dialog box that lists all the styles in the document on the left, and all the styles contained in your template on the right. (Figure 6)

Figure 6: The Organizer Pane. Here you can delete all the styles that came with the document you’re working on, as well as add to it the styles saved in your template.
First, you need to delete all the styles that came with the document, so if it isn’t selected already, select the first style of your document in the list on the left, scroll down and, while holding the shift key, select the last style. Pressing the “Delete” button between the two lists will bring up a dialog box asking if you want to delete the first style in the list. You can press “Yes” to each one, or simply press “Yes to all.” You’ll then get an alert message warning you that certain styles cannot be deleted from the document. While an annoyance, it’s not really a problem, as any style that isn’t applied to text in Word won’t transfer to your InDesign document when you place the text. Just hit “OK” and then “Close” out of the Organizer window.
You’ve now just eliminated every style that came with your document (except for those few that Word refuses to let you delete). While this is good, it can cause the font styling problems I mentioned earlier. Look over your document to make sure that all the text that is colored red is still italic. If it’s red but roman, you know you’ve been bitten by Word’s strange behavior. (Be sure to check your bold and bolditalic text too if you colored it). In fact, to be on the safe side, you could simply run another Find/Replace routine, finding all text that’s red and changing it to italic, making sure to do the same with bold and bolditalic text too.
Obviously, none of the Paragraph Styles you need to assign to your text exist yet, so you will need to create them. Bring up the Style box again by selecting it from the Format Menu (Format > Style) and select the “New” button, which will bring up the New Style window, where you can name your style and give it attributes (Figure 7).

Figure 7: Word’s New Style window, where you can define Paragraph and Character Styles.
However, you don’t need to recreate every aspect of the style. The only part of the style that has to be the same as your InDesign style is the name and style type (paragraph or character style). This allows you to keep the text in Word at a readable 11-point Times New Roman (Word’s default), even though the InDesign version of that style may call for anything, even 8-point Ironwood (but let’s hope not!)
This example uses the seven Paragraph Styles listed above, so go ahead and create them, making certain that 1.) each style is named exactly as the style in your InDesign template; 2.) each is a Paragraph Style, and 3.) each style is based on the built-in style “Normal.” By basing these styles on “Normal,” you can change the look of all of them by changing the settings of just the Normal style. Don’t like having to stare at 11-point Times New Roman? No problem . . . just modify the Normal style to your preference (10-point Georgia, perhaps) and all the other styles will change accordingly. Hit “OK” after you’ve set each style. If you make a mistake, hit the “Modify” button to correct it. You’re almost done, but there are two very important things you must do first.
Before you can start applying your paragraph styles, you have to create and apply Character Styles to the local formatting (the italic, bold, and bolditalic). This is because if you apply a Paragraph Style to a paragraph that has local formatting in it (some italicized words, for example), the local formatting is overwritten. The only way to preserve this local formatting is to first apply a Character Style to it before applying the Paragraph Style. So, hit the “New” button to create a new style. Name the style “Italic,” and select “Character” from the “Style type:” pop-up list. You’ll notice that once you make it a Character Style, the font and font size options go blank, and this is expected. Finally, hit the italic button (“I”), which will make this style nothing but italic formatting, and hit “OK” to create the style. Go ahead and create Character Styles for both Bold and BoldItalic as well. (Figure 8)
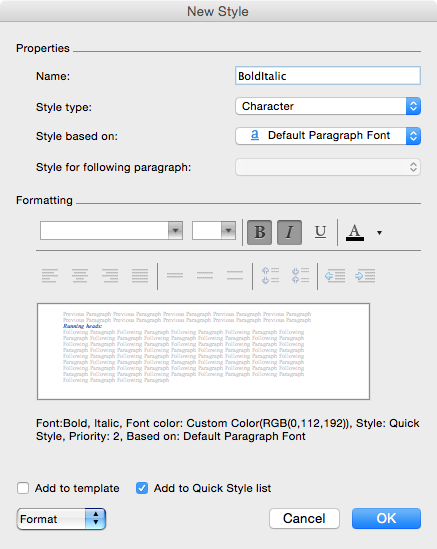
Figure 8: Creating the “BoldItalic” Character Style in Word.
At this point, you’ve only added new paragraph and character styles to the currently open document. Before you close Word’s Style box, you need to add all the styles you’ve just created to your template, so you can re-use these styles for the next book that comes your way. After all, every book has these same paragraph style elements, and since only the name of the styles matter (because the real definitions occur in your InDesign file) you won’t have to re-create them.
To add the styles to your template, hit the “Organizer” button again. This time however, select all the styles you’ve just created in the list on the left, and “Copy” them to your template on the right. Go ahead and close the Organizer box. If you’ve turned on the “Prompt to save Normal template” setting in Word’s Save Preferences, when you close Word, you’ll be asked whether to save the changes you’ve just made to your template (otherwise, Word automatically saves the Normal template without prompting you first.) When your next project comes along, you won’t have to recreate these styles again—simply open the Organizer, delete the styles that originally came with the document (the list on the left), select the styles that are part of your template (the list on the right), and “Copy” them over to the currently open document.
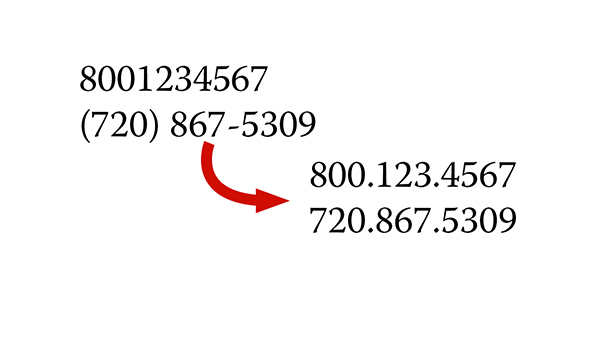
Clean Up Time
It’s at this point that you should clean up your text. I use Macros I’ve created that run a multitude of Find/Replace routines, performing actions such as removing any tab characters, setting the left and right indents of paragraphs to 0, setting the space before and after paragraphs to 0, removing double returns, removing double spaces, removing trailing spaces at the end of paragraphs, changing hyphens between inclusive numbers to en-dashes, etc. There’s a multitude of text-cleaning options you may have to do to your file, and now is the best time to do them.
Applying the Styles
Once you have your text cleaned up and ready to go, it’s time to apply your styles. Before you can apply the paragraph styles though, you need to apply the character styles to your text as a way to preserve local formatting. This requires another trip to the Advanced Find/Replace dialog box. Open the Advanced Find/Replace dialog box (Edit > Find > Advanced Find and Replace) and click on the expander triangle next to the “Replace All” button to show more options. As you did when you colored your local formatting, remove any characters in the “Find what:” field and hit the “No Formatting” button at the bottom of the dialog box to clear any formatting options that may be registered from the last Find.
Next, select “Font” from the Format drop down menu at the bottom of the dialog box. Select “Italic” from the “Font style:” list and press “OK.” Tab to the “Replace with:” field, clear any characters that may be in the field, and remove any formatting options by hitting the “No Formatting” button again.
This time, you need to select your “Italic” character style you created earlier. You’ll notice that the Format drop down box will let you search for or replace lots of attributes, including styles. Select “Style” from the Format list and scroll down until you find your “Italic” character style, keeping in mind that character styles are indicated by an underlined lowercase “a.”
With all our options now set, go ahead and hit the “Replace All” button. The result will be that any text that was locally formatted as italic will now have the “Italic” Character Style applied to it as well. Now go back and run the same routines for your bold and bolditalic text as well.
InDesign’s Story Editor includes a margin to the left of the text that lists the paragraph style applied to each paragraph. In Draft View (View > Draft), Word has this ability too, but it is turned off by default. To turn it on, open Word’s preferences, select the View option, and in the Window section, type a measurement in the box that says “Style area width:” such as 1 or 2 inches. In previous versions of Word, (like the Story Editor in the venerable PageMaker, though unfortunately, not like InDesign), clicking on this style name in the now viewable Style area margin would select the whole paragraph, making it much easier to apply your paragraph styles to one or multiple paragraphs. You can still accomplish this in Word 2011 however, by double-clicking on the small area between the vertical line of the Style area and the paragraph of text.
In order to apply your styles to the text, you will need an easy way to select them. You could select them from the Quick Style List in the Home Tab of the Ribbon, but an easier way is to show your styles in the Styles Toolbox, by selecting Styles from the Toolbox section of the View Menu (View > Styles). You can even make your own palettes populated with just the styles you need. Whichever method you choose, select your paragraph(s) and apply the appropriate paragraph styles to them by clicking on the style’s name in the list. (Figure 9)

Figure 9: Applying styles in Word is a snap when using the Style margin. To apply styles, you can use the Quick Style List, shown descending from the Home Tab on the Ribbon. Or, use the Styles Toolbar. Select “In Current Document” from the List at the bottom to only show Styles in the current document. To adjust the length of the Styles Toolbar, drag the 3 dots below the list of styles.
Time to Place
You did it! Your text is ready to flow into place in your InDesign document, and it will be correctly formatted. Save your Word file in either .docx or .rtf format before switching back to InDesign. While InDesign has the ability to import native Word files (.doc), in my experience this process seems to be less than reliable when styles cross over between the two programs. When you place your text, study your Paragraph Styles and Character Styles Panels carefully. (Figure 10)
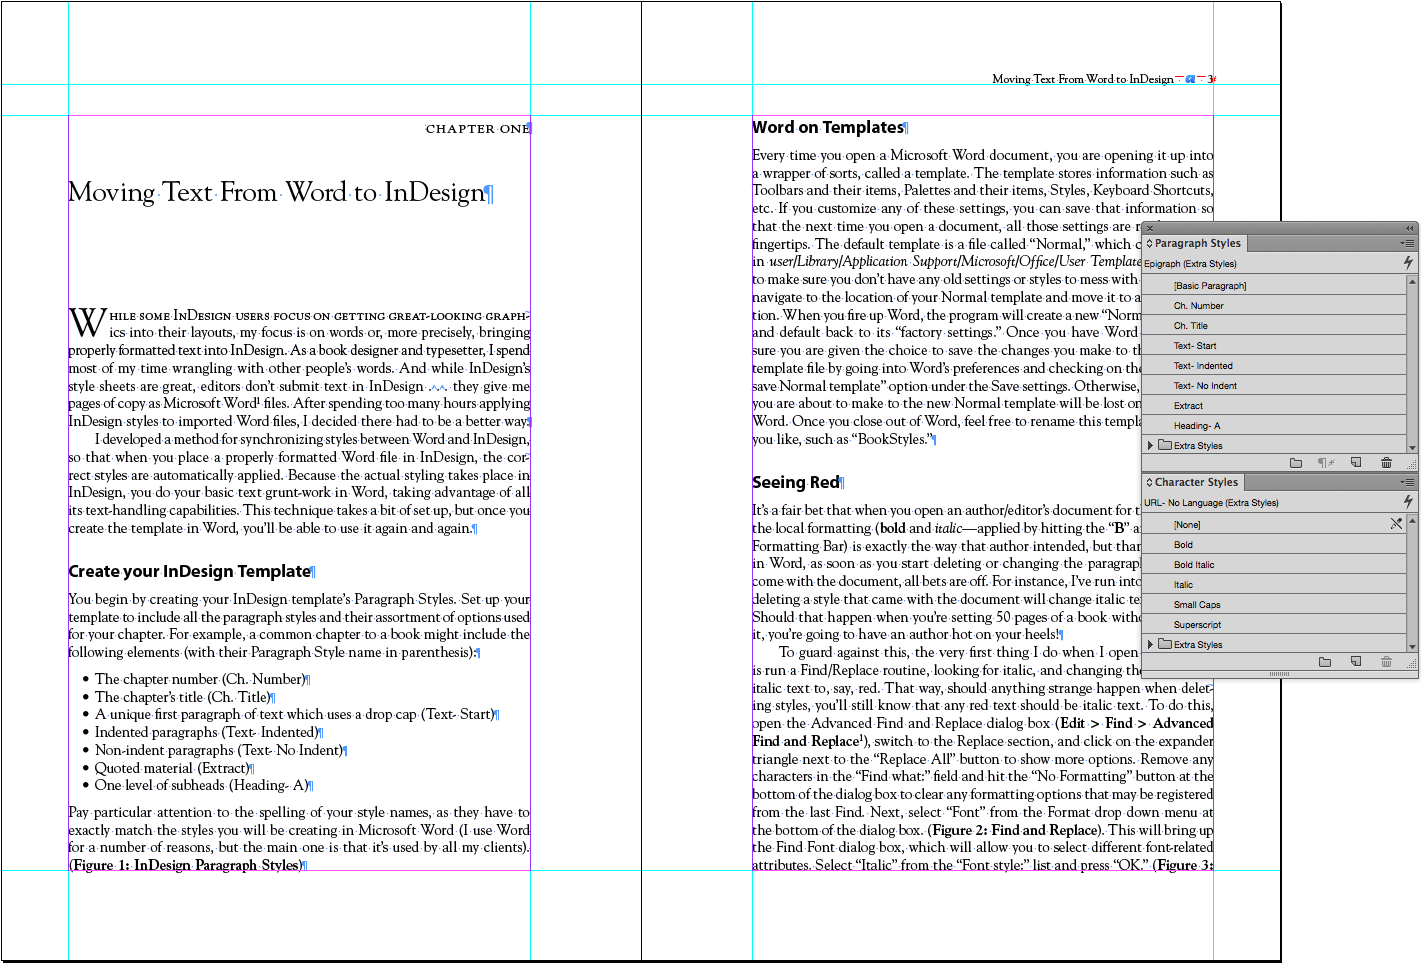
Figure 10: The styled text placed in the InDesign Template. All the styling is done, leaving only the fine tuning to be finished in InDesign.
If you see the disk icon in the name of the style for any style other than “Normal,” you either didn’t match up the names of your styles exactly, or you are using a style in Word that you are not using in your InDesign document. Also, study your text. It’s very possible that there are overrides within the text. Clearing those overrides is simple: with the Text Tool, select all your text and then check the “Clear overrides in selection” indicator at the bottom of the Paragraph Styles Panel. If it’s highlighted, you know that somewhere in the text there are overrides. You can click the indicator to clear all the overrides; Command+Click to clear character overrides only; or Command+Shift+click to clear paragraph-level overrides only. (Figure 11)
Figure 11: The Clear overrides in selection indicator, at the bottom of the Paragraph Styles Panel.
Final Thoughts
The process outlined above may seem lengthy and complicated, but that’s only because you are setting it up for the first time. It’s also important to remember that many of the actions described above can be recorded into a Macro that can be triggered by the press of a button . . . all without knowing a lick of code! In fact, Word will let you make palettes full of your Macros, as well as palettes listing your Styles. (Figure 12)
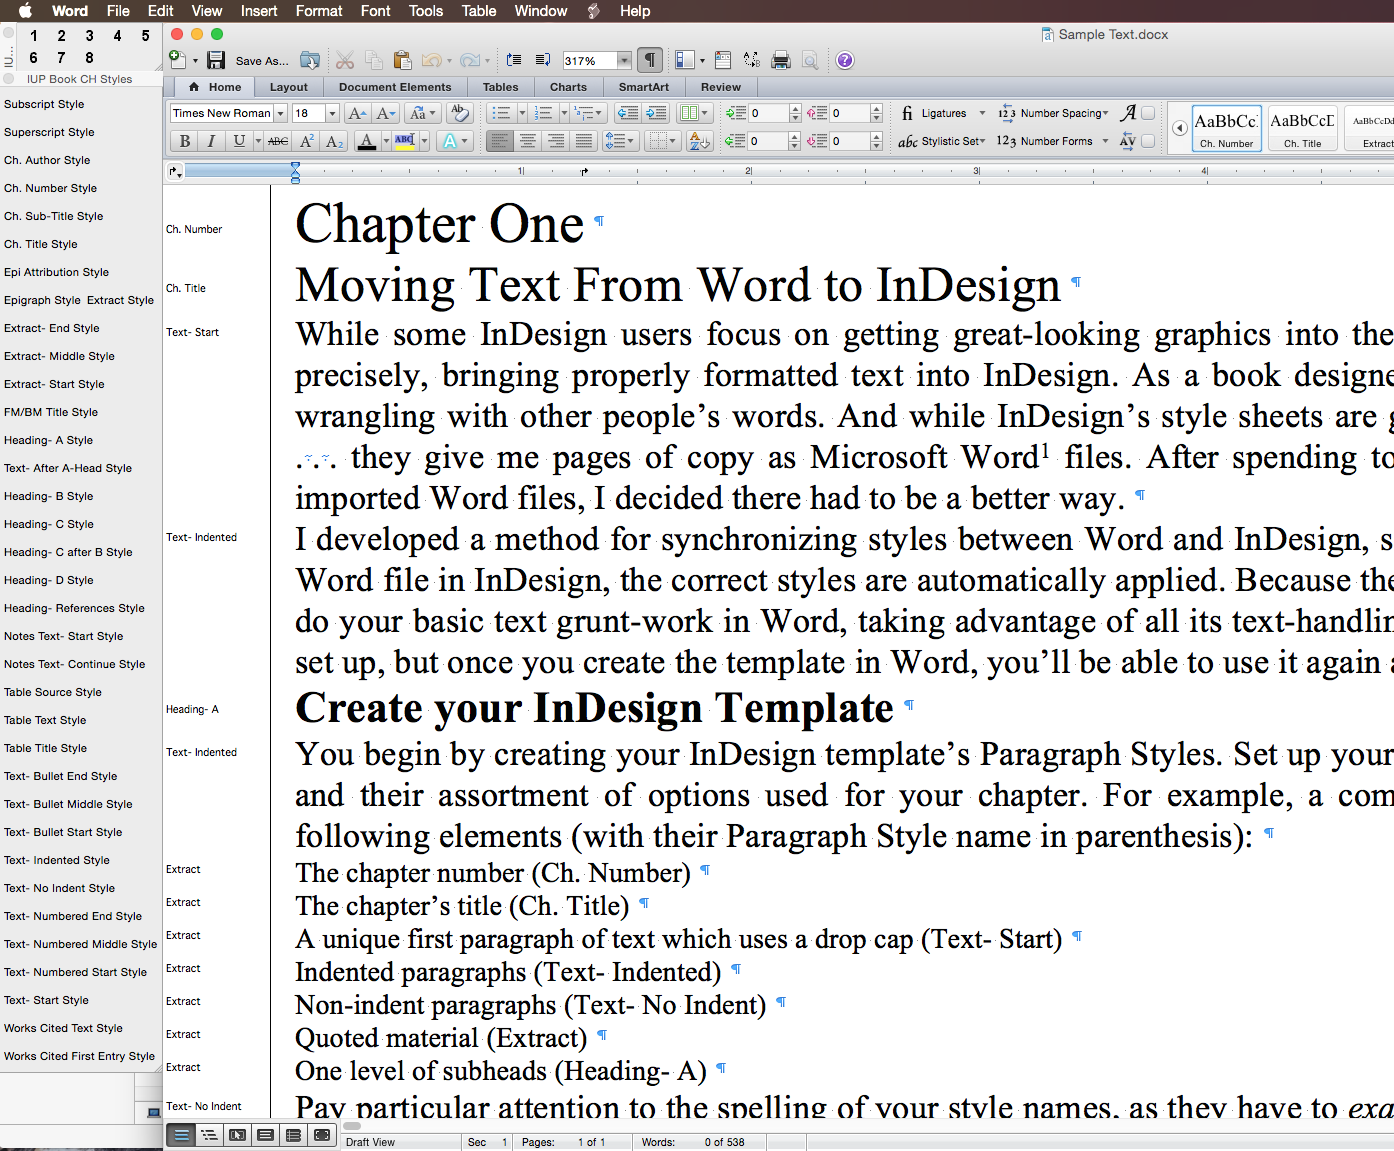
Figure 12: You can create your own palettes in Word and populate them however you wish. The bottom left palette is my list of Styles. The palette above it is my list of Macros.
Once you get the hang of it, you can knock out a 50-page chapter of text in less than ten minutes.
P.S.
I first began thinking about this process back when InDesign had no Story Editor. I was an early adopter of InDesign, starting with version 1.0, which I thought showed a lot of promise, but did not actually use it for “production work.” When Adobe released version 1.5, I made the switch from PageMaker. PageMaker used a Story Editor, which I was so used to, I had to come up with a replacement for it. After much trial and error, I developed this method of using Word as my “Story Editor.” When InDesign CS gained a Story Editor, I was elated, but ultimately, I thought “if it ain’t broke, don’t fix it.” Thus, I still use Word to clean up and style my text.
There’s a lot to my method, and undoubtedly, if you try to replicate it, you’re sure to have questions. I’m happy to share what knowledge I have, so feel free to as away in the comments! Finally, I welcome any and all criticism, both positive and negative, to this article, the method, or its design.
This article was last modified on May 11, 2015
This article was first published on May 11, 2015
Commenting is easier and faster when you're logged in!

Recommended for you

Find and Change in Book Files
You’re working on a text that’s contained in several chapters, which...
InDesign GREP Essentials: What GREP Is and What It Does
Part 1 in a series of posts on using GREP in InDesign for beginners GREP is scar...

Create a Flat-Bottomed Stroke, Part 2
In Part 2, Kelly shows a variation of her clever flat-bottomed stroke effect, us...