Monochrome Magic
How to get the best results when converting photos from color to black and white.

This article appears in Issue 4 of CreativePro Magazine.
I grew up in a small Cape on Long Island, where my father, who was a voracious reader, loved to surround himself with a fortress of books. Most of my dad’s books were kept in his study on the second floor of our home, across a very tiny hall from the room I shared with my brother. The only other room on the second floor was a tiny bathroom, with a toilet, sink, and shower. At some point during my junior high school years, that second-floor bathtub was no longer used for showers. Instead, it had become a repository for books, the overflow from my dad’s study! Now, you might be asking yourself, “Why is the writer telling me about where his dad kept books by Edmund Wilson, W. H. Auden, and Vladimir Nabokov? I thought this was an article about converting images into black-and-white photos.” Because in this tub, in addition to books by those well-known literary names, he also amassed countless photography books, monographs, and anthologies, which meant I was able to spend hours thumbing through some wonderful black-and-white photography books. I’d giggle looking through my father’s copy of Elliott Erwitt’s Museum Watching and then be brought to tears looking through one of his Life magazine anthologies and see Bill Eppridge’s super contrasty black-and-white photo of the mortally wounded Senator Robert Kennedy in 1968, lying in a pool of his own blood while a busboy tried to comfort him. I’d want to capture muscular-looking vegetables using very small apertures after seeing one of Edward Weston’s still lifes in another book on great photographers. I’d wince (yet still keep looking) at Diane Arbus’ “Tattooed man at a carnival, Md. 1970,” as I thumbed through one of her retrospective books. And then I’d stare long and hard at
the photos in Walker Evans’ American Photographs and Robert Frank’s The Americans, and ask myself what these black-and-white images actually meant. What these books did for me, at first subconsciously, and then overtly, was to show me the incredibly broad range of photographic possibilities available to an artist or photographer using only black and white tones. Today, that range is even wider, more accessible, and easier to create, because we can use digital imaging to tap into that heritage of black-and-white photography. Okay, now on to the more practical part of the article.
Converting Color Photos to Black and White
There are countless methods for converting color digital photos to black-and-white images and many additional ways to produce black-and-white photos right from the start of your process. For this article, I’m going to use Photoshop for my conversions, although you can also use Adobe Lightroom, which provides you with many useful ways to convert. To demonstrate how to make these conversions, I’ll use two photos: one shot in outdoors in New York City around Astor Place a few years ago and a more recent photo, shot indoors of my daughter petting her cat (Figure 1).

Figure 1. Here are the two original photos without any adjustments or edits. (All images © Terry Sullivan)

Figure 2. For both images, I simply selected Desaturate from the Adjustments menu. Both the painted wall and the kitten’s fur look more interesting in the color version.
- Presets: Choose from several presets, including Green, Darker, High Contrast Blue, Infrared, Lighter, and more. Once you select the preset, you’ll see the color sliders below change position (Figure 3).

Figure 3. In this composite photo, I used the same three presets in the Properties panel to create vivid black-and-white versions of both images. Specifically, here are the I filters used: Green (top two photos), High Contrast Blue (middle two photos), and Infrared (bottom two photos).
- Color sliders: If you want to tweak one of the presets, you can produce a customized monochrome image by adjusting the sliders, moving them left to darken or right to lighten the gray tones (Figure 4).

Figure 4. For these images, I moved the sliders to produce a custom black-and-white image.
- Tint: You can also apply a color tone to a preset or custom setting by clicking the Tint box, or you can change the color of the tint by clicking the color swatch (and selecting from the Color Picker).
If you want to start over, click the Reset button below the color sliders to reset the properties to the default setting.
Using Third-Party Plug-ins to Convert to Black and White
Another method of converting color images into black and white is to use a plug-in. For this article, I used DxO’s Nik Collection 3 (which has since been updated to Nik Collection 4), but there are several others worth checking out, including Skylum LuminarAI?, On1 Effects, BorisFX Optics, and Topaz B&W Effects, to name a few. The Nik Collection plug-in is composed of several modules that give you lots of presets to choose from, but the interface is still intuitive and easy to use. Several of the modules include black-and-white presets, but the Silver Efex module is specifically for converting your images to black-and-white photos, which is why I used that one to convert both my photos (Figure 5).

Figure 5. To convert this New York City street scene, I decided to use a plug-in, in this case, Nik Collection 3’s Silver Efex Pro 3 module, which is specifically designed to produce black-and-white as well as monochrome images.

Figure 6. In some cases, you can achieve some very nice antique or sepia-tone effects using Nik Collection 3’s Silver Efex Pro 3 module. For this image, which looks like a faded sepia-tones image, I used Nik Collection’s Antique Plate II to not only turn the shot into a monochrome, but also add a touch of brown and a light-toned vignette around the perimeter of the photo for an antique look.
Using a Mobile App to Convert to Black and White
Because many of us have mobile devices on hand almost everywhere we go, we can also use mobile apps to change a color image into a monochrome photo. As you might expect, Adobe offers some nice mobile apps. For instance, you can make lots of traditional types of black-and-white images with Adobe’s Lightroom mobile app (available for both iOS and Android devices), which has very intuitive controls that are easy to use (Figure 7). However, there are some very nice third-party mobile apps, too (available for both iOS and Android platforms), which have some impressive features.

Figure 7. B&W controls in the Adobe Lightroom mobile app

Figure 8. Snapseed’s Looks give you one-click access to various black-and-white effects.

Figure 9. Snapseed’s Tools offer a host of options.

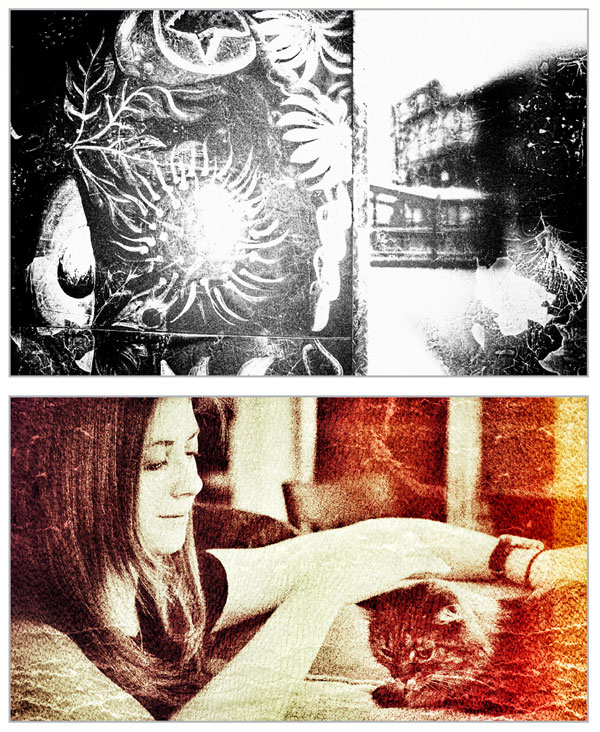
Figure 10. To change both of my demo images into black-and-white or monochrome photos, I used a mobile app on my iPhone 12. Specifically, I also used Snapseed’s Grunge tool to give each image a very textured look that mimicked both a fine-art monoprint (for the New York City image) and a fine-art pastel painting (for the photo of my daughter and her cat).
The Many Colors of Black and White
Whether you end up using Photoshop, Lightroom, third-party plug-ins, or mobile apps, I hope this article has demonstrated that you have all sorts of interesting options for converting a color image into black and white, both in terms of the software you use and the creative possibilities you can realize. To paraphrase Henry Ford, you can have any color you like, so long as it’s black (and white).
A Black-and-White Bonanza
Check out these articles for more black-and-white photo tips and techniques. Photography How-to: Learning to See in Black and White Lightroom in Black and White Turning an Image to Pure Black and White in Photoshop Free Scripts to Convert Color Images to Grayscale How to Perceive Brightness More Accurately
Commenting is easier and faster when you're logged in!
Recommended for you

InDesign How-to Video: Move Layers From InDesign to Photoshop
In this week’s InDesignSecrets video, David Blatner shows off a script to send a...

The One-Hour Ad Deadline
The phone call and the email arrived together. “We’ve reserved a full page ad in...

Photoshop Automation
A basic introduction using actions, scripts, and data driven graphics to make yo...


