
Mastering InDesign’s Editorial Workflow Tools
Whether your role as an InDesign user is that of a designer or an editor, taking advantage of these seven tools can make you more productive.


This article appears in Issue 93 of InDesign Magazine.
If you’re like most InDesign users, you have almost entirely overlooked InDesign’s amazing editorial tools. I say this not because I feel like people intentionally overlook these features, but because when I consult with and train clients, I see their habits and behaviors and immediately notice that they’re not using some of the tools and features that could speed up their everyday workflow.
Let’s start by talking about what exactly I mean by “editorial workflow” tools. A lot of work that is done in InDesign is focused on the appearance of a project, such as adding graphics and photos, applying color, formatting text, and otherwise tweaking and finessing other page elements. But when I talk about the editorial tools, I’m referring to the tools that we use for the text content of a project—tools that help us to ensure the accuracy of that content and that make it easier to work directly with words and stories in Adobe InDesign.
1. Importing Options
Let’s begin at the beginning: bringing text into your layout. InDesign has the ability to import text from a variety of formats including plain text, RTF, and Microsoft Word. To import a file, simply choose File > Place in InDesign and select the file that you wish to import. The default behavior in InDesign when placing a text file is to preserve any formatting from the selected file. This means that InDesign will honor all of the formatting defined in the file (which you may or may not want). To change the settings, choose File > Place, select the file that you want to import, and click the Show Import Options checkbox at the bottom of the Place dialog box. Note: You may need to click an Options button to see this checkbox. Alternatively,
hold down the Shift key on your keyboard when you click the Open button (Figure 1).
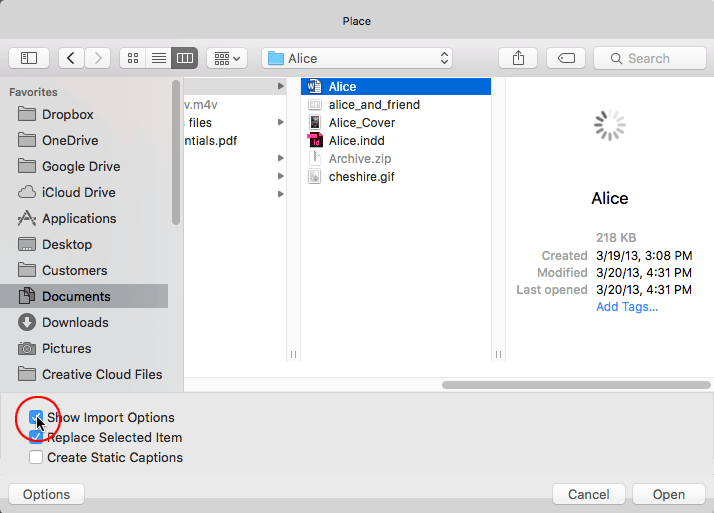
Figure 1: Holding down the Shift key while you press Open is a nice alternative to selecting Show Import Options in the Place dialog box.
The Import Options dialog box provides several useful options when importing text files, including retaining any Table of Contents text, Index text, footnotes, and endnotes (Figure 2).
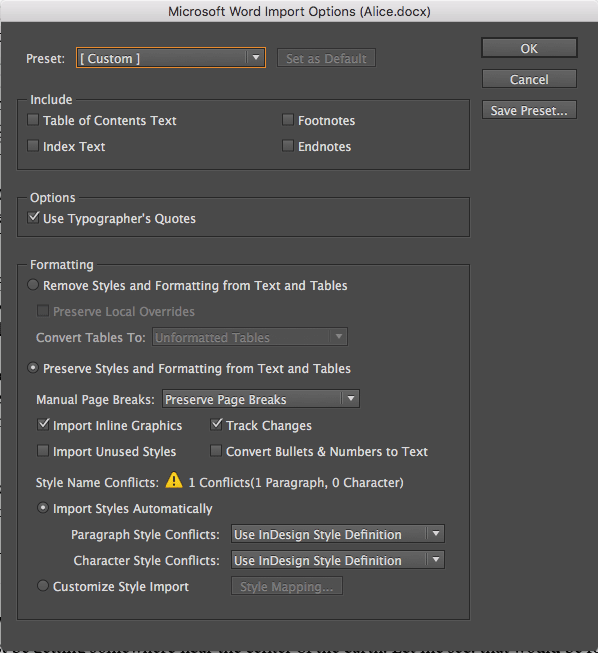
Figure 2: The selections you make in this dialog box will determine what content comes into InDesign from your Word document, and how that content is formatted.
You’ll also see formatting options for controlling the appearance of the imported text. Or if you turn on the “Remove Styles and Formatting from Text and Tables” checkbox, InDesign will strip out all the formatting and import the file using the default text appearance in the InDesign document.
Mapping Styles
As I mentioned earlier, the default setting (“Preserve Styles and Formatting from Text and Tables”) retains any formatting applied in the source document. But wait, there’s more! Beneath this section in the Import Options dialog box, you’ll notice two additional options to further refine how text formatting will be preserved.
The first option, Import Styles Automatically, imports all styles used in the source document and retains them in your InDesign document. As you probably know, if the InDesign document has the same-named paragraph and character styles as the source file, the text will automatically map to those same-named styles. This is an incredibly powerful feature if the author of a Word document has used styles to format the text, as it can significantly speed up the process (and reduce the possibility of style-application errors) when importing into Adobe InDesign.
The second option, Customize Style Import, makes a Style Mapping button available that, when clicked, allows the mapping of the incoming styles to styles of your choice in the InDesign document (Figure 3).
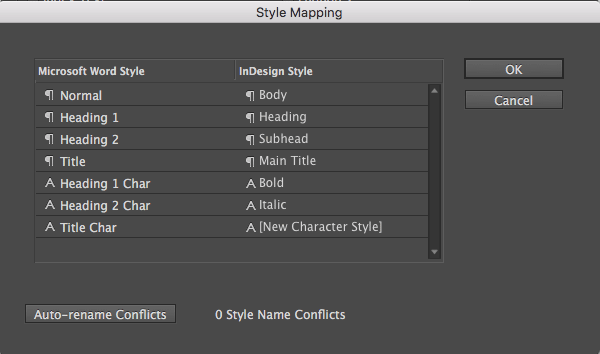
Figure 3: If your Word document is not well-styled, you can correct some of the formatting before placing the text, with the options in this dialog box.
This provides the maximum control over the import process.
Creating Links to Imported Files
InDesign won’t normally link to placed text and spreadsheet files—that is, when a change is made to the source file, you can’t update the content in the InDesign layout, like you can with an image. However, this is an option! To enable this, go to Preferences > File Handling. In the Links section at the bottom of the dialog box, you’ll see a checkbox labeled “Create Links When Placing Text and Spreadsheet files.” Once you turn on this checkbox, all text and spreadsheet files you place will become linked, and they’ll appear in the Links panel alongside your images.
OK, now for the bad news… As great as this feature is, there’s one huge drawback: If you make any changes to the document in InDesign (for example, edits to the text for formatting), those changes are lost when you update a linked document. So, linking text files is terrific if you have mapped your styles perfectly and you don’t need to make any changes to the text or formatting in InDesign. Don’t say we didn’t warn you.
2. Story Editor
The Story Editor (Figure 4) is one of my most frequently used tools in InDesign.
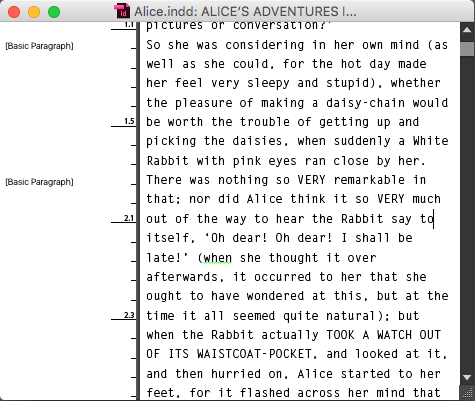
Figure 4: InDesign’s Story Editor
It’s a separate window that displays the contents of the current story in a (more or less) unformatted fashion. Open the Story Editor by choosing Edit > Edit in Story Editor, or press Cmd+Y (Mac) or Ctrl+Y (Windows). All of the text in the Story Editor window is editable, and any changes that you make within the Story Editor will be immediately applied to the InDesign layout as well. Along the left side of the Story Editor window, you’ll see any paragraph styles that have been applied to the text in each paragraph, as well as a depth ruler indicating how much vertical space the text occupies.
Although the Story Editor opens in a separate window, you can dock it as a tab at the top of your screen like any other window. (To do this, drag the Story Editor title bar up to the document tab area, and let go when you see a light blue bar.) This mode makes it easy to switch back and forth between your layout and the Story Editor view via the tabbed interface (Figure 5).
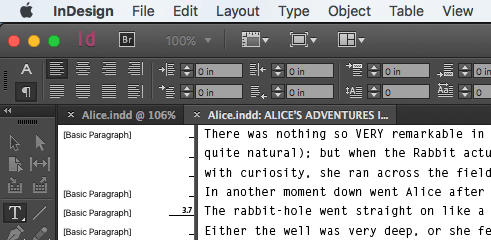
Figure 5: Switching back and forth between the layout and the Story Editor is made much easier when you view windows as tabs.
The Story Editor may not be particularly helpful for InDesign documents with many little stories, but it’s fantastic for long documents.
Customizing the Story Editor
Users who are tasked with editing, proofreading, and other text-heavy duties appreciate the Story Editor’s simplicity and its ability to display text in any font they prefer. That’s right: you can adjust which font, size, spacing, text color, and background color is used to display text in the Story Editor. Choose Preferences > Story Editor Display to see and adjust the look and feel of the Story Editor window (Figure 6).

Figure 6: Don’t like the default Story Editor display? You can change it!
Be sure to choose a font that contains both a bold and italic face so it will be able to render those formats in the Story Editor window.
You can also choose from among four preset themes that will display different text and background color combinations. Go ahead, I dare you to give “Terminal” a try! You can also choose between four different cursor options that change the appearance and behavior of your cursor when working with text in the Story Editor. (My favorite is Barbell, which makes it really easy to see the cursor position on screen.)
Overset Text
When laying out a design, both designers and editorial staff often work painstakingly to copyfit textual content. There’s typically a lot of massaging that happens before everything fits within a given area. During that process, there’s usually a period where text frames on a page become overset. Too often InDesign users link the overset text frame to a frame on the pasteboard to see and edit the overset text. Although this may seem like a reasonable solution, it is also error-prone. I’ve seen many cases where text remained linked to those frames on the pasteboard and a last-minute edit forced text into that pasteboard frame, resulting in text on the page ending abruptly. InDesign doesn’t detect this as an error like it does with overset text.
Because of that, one of my favorite Story Editor features is that it can display overset text without having to enlarge the text frame or link it to another frame. Simply open the Story Editor and scroll down to the end of the text. First, you’ll see a red vertical line appear where the text is overset in the current frame (Figure 7).
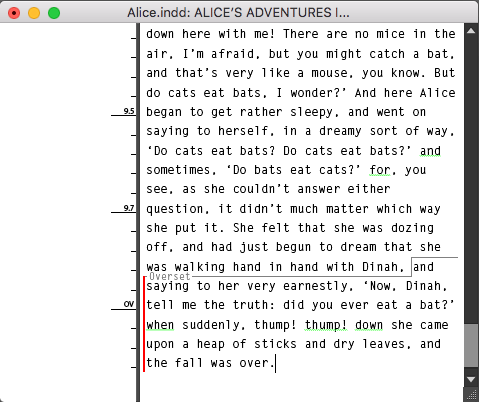
Figure 7: It’s easy to see all overset text (and edit it), via the Story Editor.
You’ll also notice the letters “OV” in the vertical depth ruler, indicating that text from this point down is overset. As you edit the text in this window, the amount of overset text is updated immediately.
Exactly How Much Text is Overset? I’ll Show You!
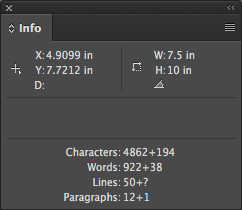
While we’re talking about overset text, there’s another incredibly helpful tool that I like to use: the Info panel (choose Window > Info). This unassuming little panel displays information about the currently selected item. If you have a frame or object selected, it’ll show you the X and Y coordinates of the object as well as the dimensions. But if you click inside a text frame with the Type tool, you’ll see a ton of useful information about the text in the current frame, including the total number of characters, words, lines, and paragraphs. What’s even more amazing, though, is that if the current text frame contains overset text, it will show you a “+” sign and a number after each value that indicates the number of characters, words, and paragraphs that are overset in that frame.
3. Track Changes
In many workflows, it’s important that users be able to track any changes that are made to text throughout a project. Fortunately, InDesign gives us the ability to track changes in a story so you can see the changes that have been made, and other important information as well. By default, track changes is disabled in any new text story that is created in InDesign. So, to enable track changes, choose Type > Track Changes > Track Changes in Current Story—or you can enable track changes in all the stories in a document by choosing Enable Tracking in All Stories. From this point forward, any changes made to the text in enabled stories will be recorded and displayed… but will show up only in the Story Editor window (Figure 8)!
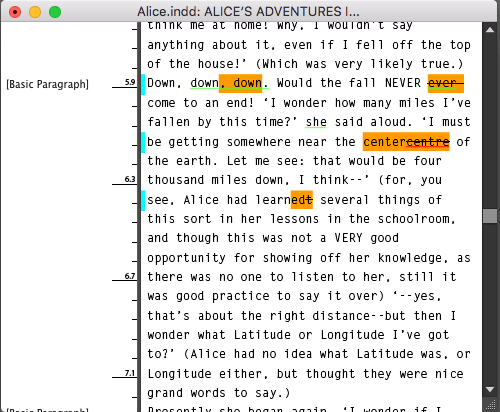
Figure 8: Tracked changes are easy to see in the Story Editor with a different color highlight for each participant (see the sidebar “Define Yourself!”).
This important aspect of this feature can be confusing. If any changes are made in the Layout view, those changes will not be displayed there, but if you switch to the Story Editor, all content changes (not formatting changes) are displayed.
You can find even more information about the changes that have been made by opening the Track Changes panel (choose Window > Editorial > Track Changes). When you click within one of the changes, the Track Changes panel displays the following information:
- Who made the change
- The date and time when the change was made
- What change was made
At the top of the Track Changes panel, you’ll also see left and right arrows that allow you to navigate forward and backward through the story’s changes, as well as options to accept or reject the changes (Figure 9).
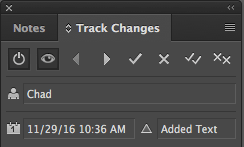
Figure 9: Use the buttons in the Track Changes panel to navigate through changes and accept or reject them.
When you accept a change, the tracked change is removed in the Story Editor, and the layout remains unchanged. When you reject a change, the tracked change is removed in the Story Editor, and the change reverts back to the original text in the layout. It’s not mandatory that changes are accepted or rejected at all. You can leave the changes intact indefinitely; however, accepting or rejecting changes could be part of your specific workflow.
Editor’s note: We use Track Changes extensively in InDesign Magazine, and we rarely bother to clean up the changes before exporting to PDF. After all, who would know?!
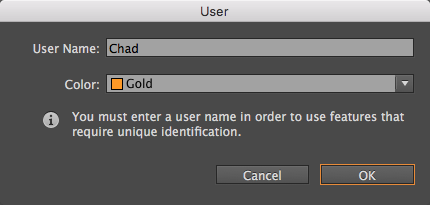
Define Yourself!
Before you use Track Changes, you owe it to yourself and your colleagues to set up your User definition first. Otherwise the Track Changes panel will display your changes as having been made by “unknown user!” To define the user, choose File > User, and then enter a username and choose a color. The color will be used when displaying any changes that the user has made in the Story Editor. I typically encourage organizations to make sure that each person uses a unique username and color for easy identification of changes. Some companies like to use the first part of the user’s e-mail address. Although the default behavior for Track Changes is to display the user color, this is actually defined by the Track Changes preferences. Choose Preferences > Track Changes to see the options available. By default, the user color is used for any changes, but you can override this and choose a custom color to use for all changes applied.
4. Notes
A typical editorial workflow involves a lot of users, and the need for communication among those users is vital. InDesign has a notes feature for just this purpose that allows users to write notes in text stories to communicate information to one another. To create a new note, place your text cursor anywhere within a story—in either the document layout or the Story Editor—and choose Type > Note > New Note. This creates a note at your cursor location. Anything you type at this point becomes the contents of the note. Easy!
Depending on which view you are in, notes will appear in one of two different ways (Figure 10).
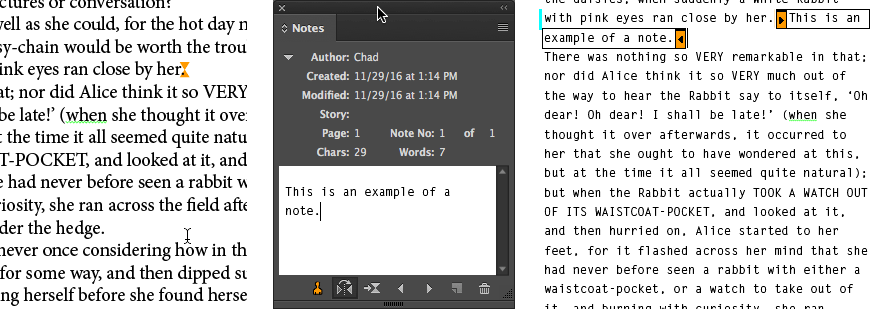
Figure 10: The appearance of notes in the layout view (left) and the Story Editor (right)
In the document layout, you’ll see an icon appear that looks a bit like an hour glass, and InDesign automatically opens the Notes panel. Anything that you type at this point will appear in the Notes panel. On the other hand, if you have the Story Editor open when you create the note, the contents of the note appears between the bookend indicators of the note itself. The default color of the note is defined by the user color, although this can be changed by adjusting the options in Preferences > Notes.
If you select text in an InDesign document, and choose Type > Notes, you’ll see several options for working with notes, including one to convert any selected text to a note, as well as the ability to split a note. If you select the text of a note, you can convert the note to text, and you can navigate from one note to the next in this submenu as well. There’s also a Notes Mode here that is a shortcut to the Notes features that were previously described and that performs different functions depending on where your cursor is located. All of the options in the Type > Notes submenu can also be accessed in the Notes panel menu.
One of the challenges with notes in InDesign is that the notes can be difficult to see when in layout view. Although notes are displayed by default, they can be hidden by choosing View > Extras > Hide Notes. And if you’re in preview mode, they simply won’t appear at all. So if you’re relying on the notes feature to communicate with a designer or another user who prefers to use the layout view, it’s imperative that the user makes notes visible and makes use of the Notes panel so that they can see and navigate the notes in the document. To do this, make sure that notes are visible and that the user is not in preview mode. Next, make sure to display the Notes panel. At the bottom of the panel, the user can click the Go to Previous Note and Go to Next Note buttons to navigate between notes and display the location of the note. The Notes panel allows any user to see who created the note as well as when the note was created and other pertinent information.
In fact, if you’re concerned that your colleagues may not see your comments, you might even want to put a visible, non-printing “Post-it®” type note on the first page of your document that says “There are notes in this document—be sure to find them using the Notes panel!” (You can find a short tutorial in making Post-it type notes here, on InDesignSecrets.)
5. Check Spelling
Nearly every text program has a feature to check spelling, and InDesign is no exception. But some of InDesign’s powerful spelling tools are hidden under the hood and not immediately obvious. To check the spelling in a document, choose Edit > Spelling > Check Spelling. This walks you through any words that InDesign considers misspelled and provides suggested corrections for the word in the Change To field. You can change a flagged word or you can skip it; you can even ignore all instances of a word.
The bottom of this dialog box is where you’ll find some powerful features. If Check Spelling finds a word that is unique to your work or your documents, you can click the Add button to add the word to the User Dictionary. This is a dictionary of words specific to documents that you work with on your computer. Once a word is added to the User Dictionary, it will no longer be flagged as incorrect in the future.
If at any point you’d like to view the words that have been added to the dictionary, click the Dictionary button in the Check Spelling dialog box to display the User Dictionary (or choose Edit > Spelling > User Dictionary). This is where you can add or remove any words and even control how those words hyphenate. You can also import a list of words from a text file or export your list of words to share with other users or other programs.
At the very bottom of the Check Spelling dialog box, you’ll find a Search drop-down menu for controlling what part of a document (or multiple documents) you want to check. You can choose Selection (selected text), To End of Story (cursor location to the end of the story), Story (current story), Document (current document), or All Documents (all open documents).
Dynamic Spelling
Dynamic Spelling gives you a real-time view of any misspelled words in the document as you type. To enable Dynamic Spelling, choose Edit > Spelling > Dynamic Spelling. Any words that InDesign considers misspelled will appear with a red squiggly underline. Select any underlined word, and right-click on it to see a list of suggestions for the misspelled word (Figure 11).
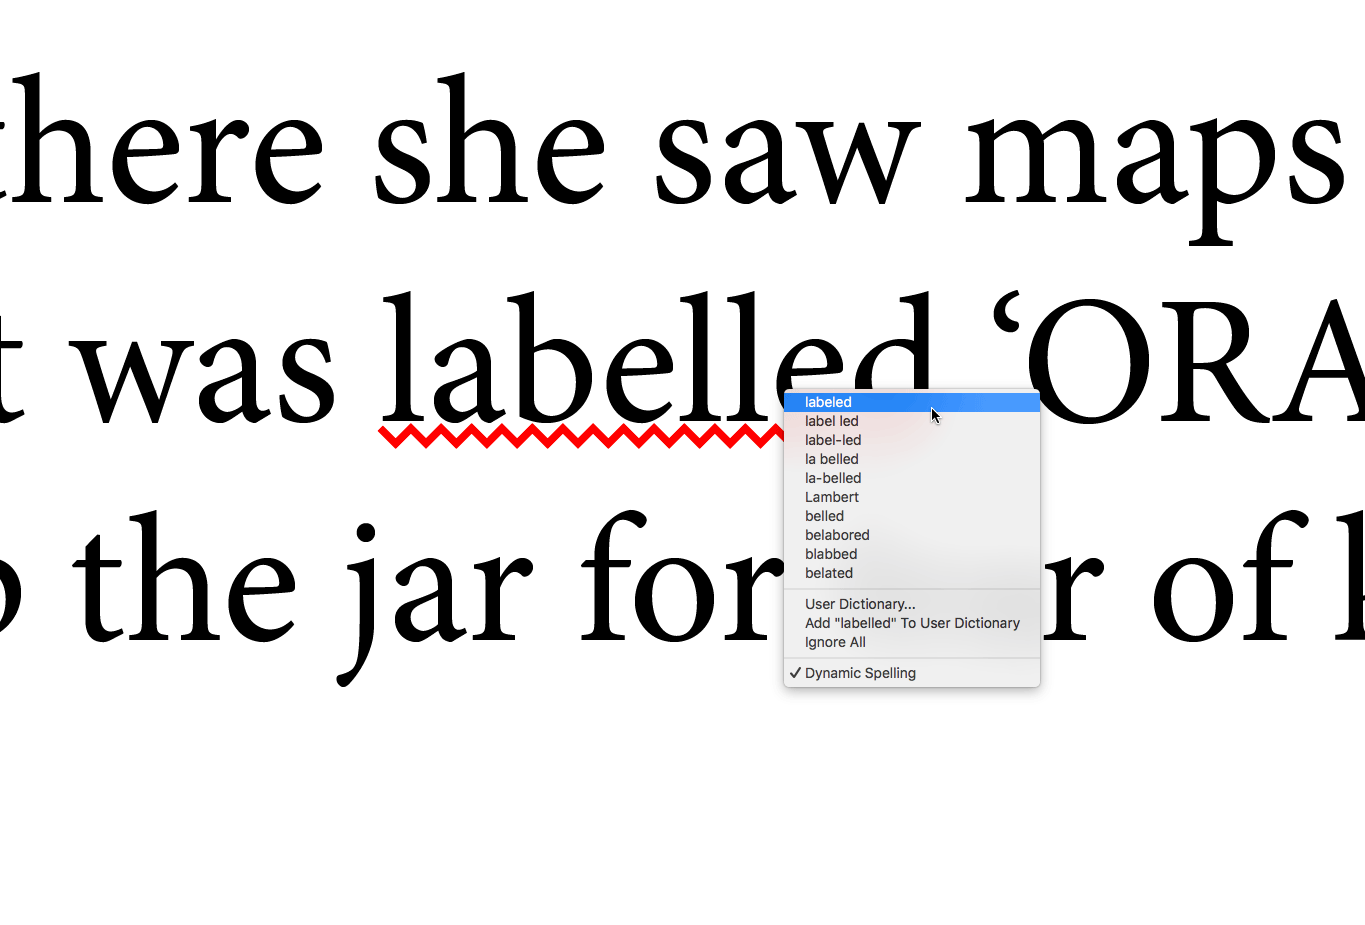
Figure 11: Right-clicking on a flagged word reveals suggested corrections that you can choose from.
Choosing one of the suggestions will replace the current word with the chosen word.
You can adjust the behavior of the Check Spelling and Dynamic Spelling features by choosing Preferences > Spelling.
Autocorrect
There are some words that my fingers just don’t like to type; the letters always come out in the wrong order. The cure for this is the Autocorrect feature, which can automatically correct commonly mistyped words as you type. To enable the Autocorrect feature, choose Edit > Spelling > Autocorrect. For example, if you type the word “teh,” followed by a space, InDesign automatically changes it to “the.”
To see a list of corrections that InDesign looks for, choose Preferences > Autocorrect. You’ll see the misspelled word on the left and the correction for the word on the right. You can also click the Add button at the bottom of the dialog box to add your own words that you’d like corrected if (mis)typed.
You can also save time and prevent mistakes by using Autocorrect to insert long and unique names and phrases into text instead of typing them out with a simple technique.
- In the Autocorrect Preferences dialog box, click the Add button.
- For the misspelled word or lengthy phrase, come up with a character combination that you’d never type except for this particular instance, for example, “iiox.”
- For the correction, type the name that you would like InDesign to insert when you type the character combination. We used International InDesign Organization (Figure 12).
- Click OK.

Figure 12: Adding common phrases to your Autocorrect preferences can save you a lot of typing.
6. The Glyphs Panel
There’s nothing more frustrating than trying to figure out how to insert some character that you need but don’t know how to type. Whether it be a degree symbol, a trademark symbol, or a Euro sign, it can be frustrating and time consuming. Have no fear, the Glyphs panel is here! The job of the Glyphs panel is to display every available character within a font. To access the Glyphs panel, choose Type > Glyphs. By default, this panel tends to open up at a fairly small size, so feel free to grab the lower-right corner and enlarge it to see what’s available. There are also two buttons in the lower-right corner of the panel that allow you to reduce or enlarge the size of the characters displayed. If the glyph you are looking for isn’t available in the current font, you can choose a different font from the menu at the bottom of the panel.
At first glance, this panel can be a bit daunting. Sure, you can see every character, but how do you find the one that you need? For that, click in the search field at the top of the panel, and type the name of the character that you are looking for. (Note that this Search field was a new feature in InDesign version CC 2015.) For example, if you type the word “Euro,” InDesign filters the displayed results to only characters that match that name (Figure 13).
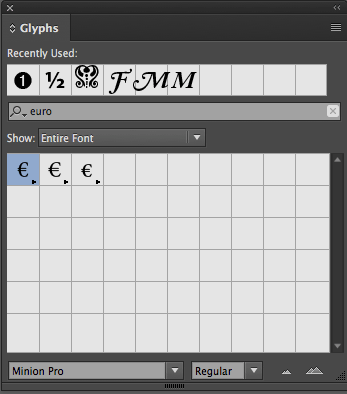
Figure 13: Finding specific glyphs is easier in recent versions of InDesign, thanks to the search field in the Glyphs panel.
Try other words, such as “degree” or “trade mark;” they’ll instantly show up.
You can also filter the glyphs by categories. In the Show drop-down menu, you’ll see numerous categories by which to filter your results to help you find the character that you’re looking for.
To use a glyph, double-click it; it will be inserted at your cursor location, and it is added to the Recently Used section at the top of the panel.
Another fairly recent addition to the Glyphs panel is the display of alternate characters when you select them with the Type tool. When a character is highlighted, you can hover over the blue bar at the bottom of the character to display alternate glyphs for the current selection (Figure 14).
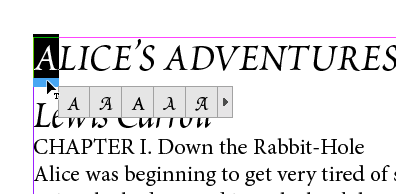
Figure 14: Use the contextual controls to apply alternate glyphs in your text.
This also provides a fast and convenient way to access glyphs.
7. Find/Change
When it comes to replacing and formatting text globally in a document, InDesign’s Find/Change command is a lifesaver. Choose Edit > Find/Change to open the Find/Change dialog box. At the top of the dialog box, you’ll find four buttons—one for each type of search.
Text: For performing standard text find/change queries. Find this, change to that.
GREP: A powerful method for searching text that uses Regular Expressions to intelligently find and change text not possible with a standard text find/change. For example you could find any text that appears in parentheses or any prices found in text.
Glyph: Used for finding and changing specific characters in text.
Object: Used for finding object attributes in a document such as all objects with a fill of blue and a stroke of black.
Any searches defined in the Find/Change dialog box can be saved by clicking on the Save Query button at the top of the dialog box. This alleviates the need to manually enter your search parameters each time you want to use them. Clicking More Options displays a Find Format and Change Format section where you can find text based on its formatting attributes and change text formatting attributes as well.
Find/Change by List
If you need to run a series of find/change queries regularly, take a look at the FindChangeByList script that ships with InDesign. You can find it in the Scripts panel in Application > Samples > JavaScript. The job of the FindChangeByList.jsx script is to run a set of find/change queries defined in the FindChangeList.txt file found in the FindChangeSupport folder in the same location as the script. To open the file, right-click on the FindChangeList.txt file in the Scripts panel and choose Reveal in Finder (Mac) or Reveal in Explorer (Windows). Open the file in a text editor; then you can define all of the find change queries that you’d like to include when the script is run. The text file explains how it works and provides examples as well.
Editor’s Note: There are several articles on using the Find/ChangeByList script at InDesignSecrets.
If the idea of working with scripts and editing text files is not your cup of tea, then check out Multi-Find/Change by Automatication. Multi-Find/Change provides an intuitive interface for running multiple find/change queries in your InDesign documents. No scripting or text editing required!
What About InCopy?
As many of you know, I’m a huge advocate of Adobe InCopy, and I think that it can be a great benefit to many organizations. But there have been many InDesign Magazine articles written on InCopy already*, so I wanted to focus in this article exclusively on the editorial features found in InDesign. Start by taking advantage of these tools to improve your workflow and to decrease turnaround time for your projects. Then you can begin thinking about adding tools like InCopy to take things to the next level.
*See my article in issue 68, and Bob Levine’s InQuestion in this issue.
Textual Dexterity
Regardless of what role you play when working with Adobe InDesign files, I hope that you’ve learned some helpful tips for working with text. Taking full advantage of these tools will help you to work faster and more efficiently, so you can focus your creative energies and end up with better finished products.
Commenting is easier and faster when you're logged in!

Recommended for you

InDesign Magazine Issue 66: Workarounds
We’re happy to announce that InDesign Magazine Issue 66 (October, 2014) is...

Italic and the Many Types of Emphasis in Text
Should you use italic in your text? What about bold? Bold italic? Underline? How...
Rotating Text and Text Frames Independently
One of the most important things to master when you’re first learning InDe...