


![]()

Version: 4
Operating systems: Macintosh, Windows
Picture management is an important part of every project. Since the images inside your QuarkXPress documents are just low-resolution placeholders, as illustrated in Figure A, knowing the location of the real images is crucial to getting good output. When it’s time to print the document, QuarkXPress locates the original image and uses it instead of the low-resolution version. If QuarkXPress can’t find the high-resolution image, it prints the low-resolution preview, which will most likely look terrible.
Figure A: Each image in QuarkXPress is a placeholder for the real image on your system.

Organizational Skills
If you’re like most designers, organization is not your forté. QuarkXPress has several features to help you manage all the pieces related to your document, but there are still things you should avoid doing. First, don’t rename image files after you import them. Also, try not to move images; instead keep them in one folder. And, above all, don’t throw any images away thinking that you don’t need them now that you’ve imported them into QuarkXPress. As you bring pictures into your document with the Get Picture command, QuarkXPress places a preview and begins to keep a tally of the images and where they’re located. You can view this information by choosing Utilities > Usage and clicking on the Pictures tab in the resulting dialog box, as shown in Figure B.
Figure B: The Usage dialog box tells you the status and location of every image in your document.
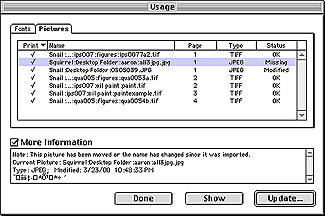
As you can see, we have several issues with this document. One of the images is missing entirely, and another one has been modified. To fix the situation, select the affected image and then click the Update button. You can then navigate through your system and locate the missing image or update the modified image.
This dialog box also shows you where the image is located in your document, which can be useful if your document is large or has many images. If you have the More Information option enabled, you will see the full path to your images, physical dimensions, resolutions, and other information. If you have several images in your document, it may take a minute for this dialog box to open, because QuarkXPress has to check the status of each one.
Automatic Updates
Instead of doing it yourself, you can also let QuarkXPress update images for you. To do this, turn on Auto Picture Import. With this feature on, every time you open a document QuarkXPress will check and see if any of the linked images have been modified. If they have, the new version will be imported immediately without you doing a thing. To set up Auto Picture Import, choose Edit > Preferences > Document. In the resulting dialog box, click on the General tab. Then, choose On from the Auto Picture Import pulldown menu, as shown in Figure C, and click OK. If the idea of QuarkXPress automatically doing things without you knowing about it makes you uncomfortable, you can still derive the benefits of this feature by choosing the On (Verify) option instead. This way QuarkXPress checks over the document for you and will alert you if it finds any problems.
Figure C: By enabling the Auto Picture Import option, you’ll give QuarkXPress the task of keeping track of your images.

Collecting for Output
Before you ship your document off to the printer, you want to make sure all of your image files are included. You can make the process of getting all your odds and ends together easier if you use the Collect For Output command. This will gather your document and related files into one folder. It will also generate a report file that tells you what fonts and images you’ve used. To gather your files, choose File > Collect For Output. In the resulting dialog box, select a folder in which to copy your document and images. Then, name your report and click Collect. Unfortunately, you need this assistance the most with large projects and that’s probably the worst time to use it. This process can take a long time and will use up a lot of space, because QuarkXPress is going to search for and then duplicate each file that it puts in the folder. In this case, you’ll probably want to gather all your documents yourself, but you may still want to print a report to keep you on track.
Evading Trouble
A missing image spells trouble at output time. In this article, we’ve given you some strategies to keep up with your images and make sure you get them all to the printer. With the help of QuarkXPress, you can be an organized person (at least on some levels).

Copyright © 2000, Element K Content LLC. All rights reserved. Reproduction in whole or in part in any form or medium without express written permission of Element K Content LLC is prohibited. Element K is a service mark of Element K LLC.
This article was last modified on March 12, 2022
This article was first published on July 26, 2000
Commenting is easier and faster when you're logged in!

Recommended for you

Where Is My Text? Text Disappears When Over Background Object
Here's an InDesign "feature" that frequently bites new users: text disappears wh...

Tip of the Week: Creating Automatic Run-in Headings with Numbered Paragraph Styles
This InDesign tip on creating run-in headings with numbered paragraph styles was...

Editing Highlights and Shadows in Adobe Lightroom and Camera Raw
Adobe Photoshop Lightroom and Adobe Camera Raw have two sets of controls for mak...