
Making Side Heads in InDesign
How to place headings in the margin-to the left or right of the main text column in InDesign.
This article appears in Issue 25 of InDesign Magazine.
Placing your headings in the margin—to the left or right of the main text column—can make for a good design. Rotating those headings sideways can be even better. However, these can be difficult to create—and a nightmare to manage—without a clever technique.
There are several ways to get vertical side heads. Many people are familiar with the table method, wherein you use a two-column table to hold headings in column one and the main body content in column two. Column one is set to rotate its content 90 degrees, making the heading vertical. If you’re creating a simple single-sided document, the table method is a relatively easy solution. However, if you want to use multiple vertical side heads on a long document with facing pages, or want heads that follow their assigned content through reflow, the table method is not your best choice as it tends to get messy—fast.
Here’s a technique for building vertical-text side heads that flow with body text, staying connected to specific points in the story, and that swap sides of the page automatically between recto and verso, left- and right-read, pages.
Setup Basic Styles
First, lay out and style your body copy. So far, this section of my document contains three paragraph styles—the heading style, and then one each for body copy and for the first paragraph in a new section (Figure 1). The last style is optional, of course, but for some documents I like omitting the indent on the first paragraph after a header.
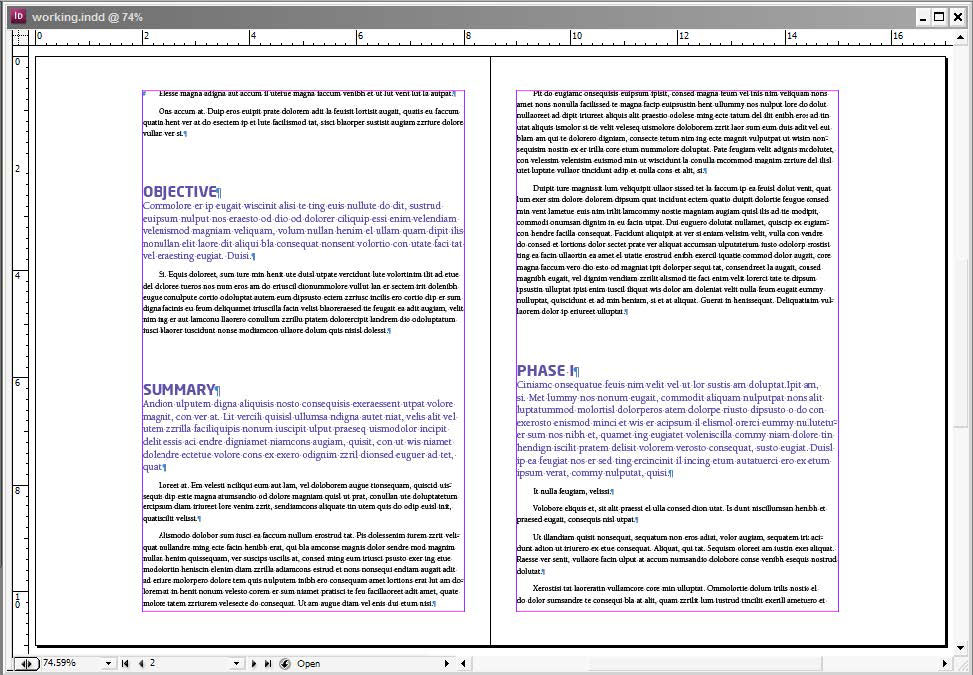
Figure 1
Create the First Side Head Frame
Now it’s time to create a frame that will act as the template object for all the
vertical side heads.
Using the Type tool, create a new text frame roughly the width of your longest heading.
Select Type > Show Hidden Characters if they aren’t already visible to you.
Copy and paste a single heading from the main story into the new text frame. When selecting and copying be careful not to include the ¶ at the end of the heading line.
Style the heading as desired. Insert any embellishments or additional glyphs you might like. In my list, for example, I’ve added arrows from the Marlett font after each heading item (Figure 2). If your headings are numbered or bulleted, convert the numbers or bullets to standard, selectable, styleable text with the Type > Bulleted & Numbered Lists > Convert Bullets and Numbering to Text command.

Figure 2
When you’re done formatting, create a new paragraph style called Sidehead as well as any character styles you might need.
Now, apply to the frame and/or its contents any formatting options you didn’t apply to the type, such as a background color on the frame, or transparency effects on the fill.
Select the frame and rotate it plus or minus 90 degrees using the Rotation Angle field on the Control panel or Transform panel. Your result should look something like mine in Figure 3.

Figure 3
Build the Side Head Object Style
The key to making vertical side heads work is configuring the correct object style. Let’s put the first side head object where it needs to go, and then build the object style visually from it.
Select the side head frame with the Selection tool and then press Cmd+X/ Cmd+X to cut the frame to the clipboard.
Switch to the Type tool and locate the matching heading in the main story. Place the Type tool cursor directly before the heading, at the very beginning of the line, and press Cmd+V/Ctrl+V to paste the frame into the text flow as an anchored object. Don’t worry if the result looks strange.
Once again, select the side head frame with the black arrow, and, on the Object Styles panel, click the Create New Style button at the bottom to create a new object style based on the selected object. A new style—probably named Object Style 1—will appear in the panel’s list. Click Object Style 1 once to apply it to the frame, and then double-click it to open the Object Style Options dialog.
Change the Style Name at the top to Sidehead Box and select the Preview checkbox in the bottom left so you can see the effect changes to the object style have on the side head frame.
Choose the Anchored Object Options pane and change the Position field from its default of Inline or Above Line to Custom, which will radically alter the options available below (Figure 4). For a full explanation of all the Anchored Object Options, check out “Drop Anchor: Anchored Objects,” my tutorial in InDesign Magazine Issue #8.
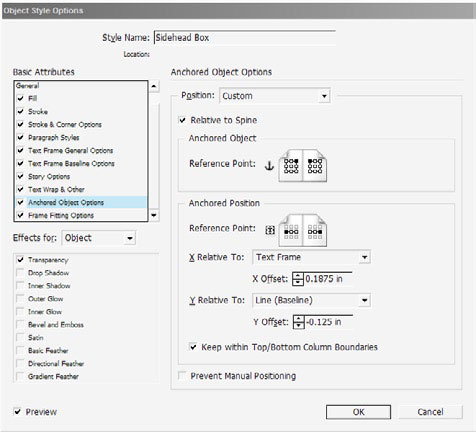
Figure 4
Duplicate the settings in Figure 4 except the X and Y Offset values. Adjust the Y Offset until your side head frame is precisely aligned to the beginning of the paragraph following the header, and then tweak the X Offset field until the frame is horizontally far enough away for your taste.
Set any desired options in the other Object Style Options panes and click OK to commit the style changes. Are you happy with your side head frame? I am with mine (Figure 5).
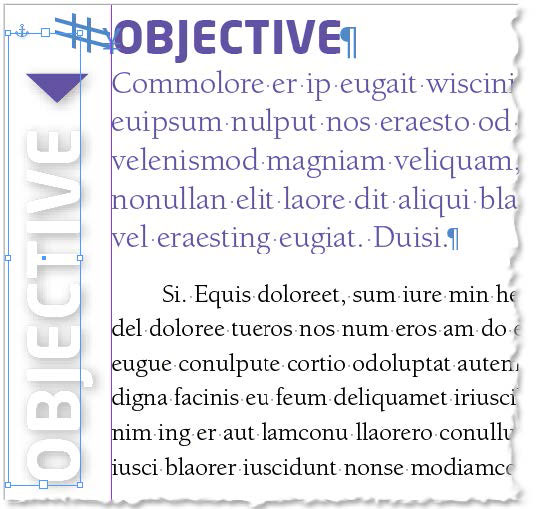
Figure 5
Note: If you begin this technique on page 1, you’ll end up with a sidehead on the right; mine appears on the left because I’m using the page 2 and 3 spread in my figures.
Add Remaining Side Head Frames
With Show Hidden Characters enabled, you should see the Yen symbol at the insertion point, indicating that there is now an object (the side head frame) anchored to that location in the text flow (Figure 6). InDesign treats the anchored object symbol like a regular character, though it won’t print and has no width. If you delete that symbol, the side head frame disappears as well. And if you copy and paste the anchored object symbol, you’ll copy and paste the frame, too, which is the next step.

Figure 6
With the Type tool, select the anchored object symbol—and only that symbol. Be careful not to get bits of the heading text, or, even more slippery, the carriage return preceding the anchored object symbol.
Go to the next heading in the story and, before the first character in the heading, paste (Command/Ctrl+V) a duplicate of the first side head frame.
Move to the next heading in the story and do the same thing. Keep moving through the story until you have anchored side head frames in all the places they belong (it’s often easier to work with longer stories in Story Editor). Note that, because of the anchored object settings we chose, the location of the side head frames reverses from left- to right-read pages, always remaining in the outside margin, away from the spine.
Return to the second side head frame and change the text to match the heading to which it’s attached. You can do that either by re-typing it, or copying the horizontal heading and then applying the Sidehead paragraph style.
After setting the vertical text, right-click (or Ctrl-click if you’ve a single-button Mac mouse) on the frame and choose Fitting > Fit Frame to Content from the context menu (or press Cmd+Opt+C/Ctrl+Alt+C) to make the frame shrink up to fit the heading.
Keep moving through the document setting the text and fitting on each side head. If you need to make adjustments, avoid making them on the side head frames themselves. If possible, change the Sidehead object style to affect all side head frames in fell swoop.
Clean Up
You still have two headings for each section—the new vertical headings as well as the original horizontal ones. You could get rid of the old headings. by deleting them, as long as you don’t remove the anchored object markers. However, I prefer to hide them with a simple paragraph style trick, which means they’re still available should I choose to go back to horizontal headers, if I need to reorder sections in the Story Editor, or even if I want an easy way to verify that I correctly matched vertical side heads with their corresponding sections.
Hiding them is easy: Just edit the paragraph style for those headings, changing their Fill and Stroke colors to None (Figure 7). If you also want to remove the vertical space that those heads were taking up, set the leading and paragraph before and after spacing values to 0 (zero).

Figure 7
Voila! Headings disappear, but they still exist—and you can still see them in Story Editor.
You now have vertical side heads that, because of their properties as anchored text frames, will automatically flow with the story regardless of pagination and reflow. Moreover, they’ll even swap sides when their tether points jump from one side of the spine to the other (Figure 8).
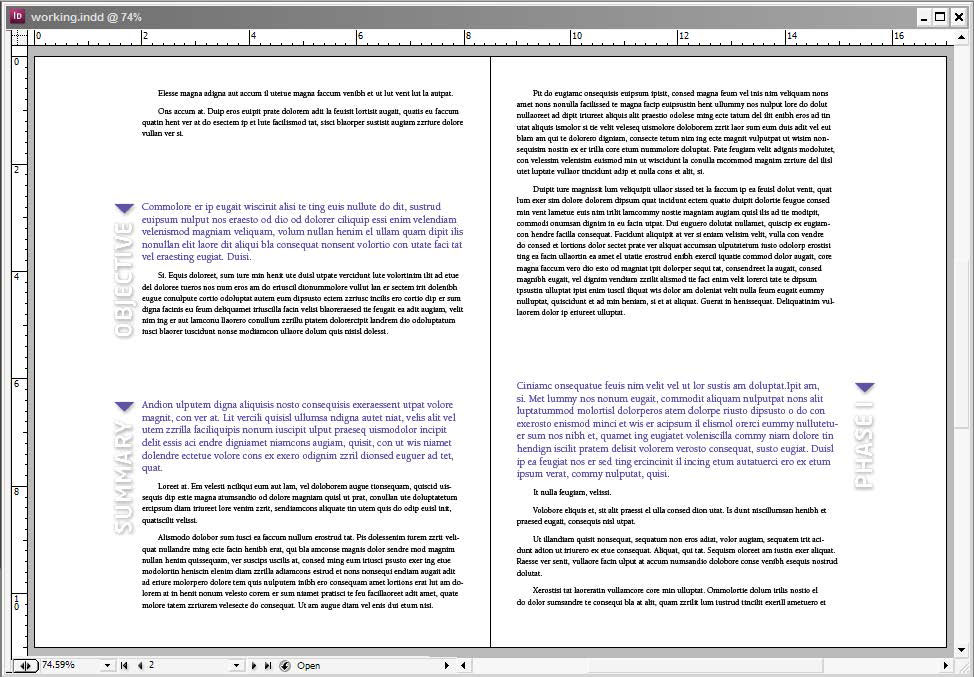
Figure 8
Commenting is easier and faster when you're logged in!

Recommended for you

Free Photoshop and Lightroom Webinar
As part of their ongoing Create Now: Ask A Pro webinar series, Adobe is offering...

CreativePro Video: Freeform Gradients in Illustrator
In this week’s CreativePro video, Laura Coyle shows off the new Freeform Gradien...
Scanning Around with Gene: The Joke's on You
Before Hollywood brats got “Punk’d,” and before political oppo...