
Making a DVD Video Portfolio: Putting It All Together
In the first article in this series, we talked about DVD basics – how DVDs work and the hardware and software you need to make your own DVD demo reel. In the second article, we showed you how to use Adobe Photoshop to create interface elements – menus and buttons – for your DVD. In this final article, we’ll show you how to prepare your project samples for the DVD and help you put it all together so that you end up with a polished DVD video portfolio to send out to potential clients and employers.
Splash, Grab, and Tease
All DVDs begin with a menu, still image, or video clip that plays as soon as the DVD is launched in a DVD player; this is known as the startup action or first play event. When you watch a film on DVD, usually the startup action is a logo for the movie studio or the FBI copyright warning. For a DVD video portfolio, the startup action is a great opportunity to give potential clients and employers a little taste of what’s to come. Designers might want to create a splash page that introduces their work, motion graphics artists will certainly want to create some sort of animated opening, and others will want to show a short montage. Whatever your needs, it’s best to keep the startup action fairly short – 30 seconds is a good length. Remember that it’s going to play every time someone launches the DVD. If a prospective client or employer has to sit through it several times, they may get tired of it if it’s too long.
Preparing Your Media
For all still graphics – splash screens, menus, or slideshow elements – use the same specs detailed in part two of this series and summarized here:
- 720 x 480 pixels
- 72 dpi
- Beware of TV safe guidelines (download the Photoshop template here).
- Check for NTSC safe colors.
- Set white levels at 75-80%.
- Avoid lines smaller than one pixel in width.
If you’re an animator, a video editor, or a motion graphics designer, you’ll need to render your work in the proper format that conforms to both the limitations of a TV monitor and the DVD video specifications. If your work was designed for videotape, it probably already conforms to these specs, but if you’ve been working on Web graphics or multimedia animations – where you aren’t constrained by all the limitations of a television monitor – you may need to spend a little more time getting your samples ready.
Preparing Animated Graphics for DVD
Unlike other digital interactive formats, such as Flash and HTML, DVDs were designed to play high-quality, full-size, full-motion video. In fact, DVDs do not support vector-based animations. Animators need to convert their work to a standard digital video format by exporting or rendering a QuickTime or Video for Windows movie of each sample piece. As with still graphics, the standard size for video display in the U.S. is 720×480 pixels, with a resolution of 72 dpi and 29.97 frames per second. If, for example, your graphics were created for the web, it’s likely that they’ll have a different aspect ratio and also a different frame rate. You’ll need to either reduce or enlarge your animation to fill the screen appropriately or add a background to fill the areas of the standard video screen that fall outside your animation. On a video monitor, the color “black” reads as nothingness, so a black background is a good idea for animations that don’t conform to the standard 3:4 screen ratio. Also, be aware that all of the NTSC color limitations we talked about in part two of this series hold true for motion graphics as well as stills.
When you save a QuickTime or Video for Windows movie, you need to tell it which codec to use when creating the new file. Ideally, you should use a high-resolution uncompressed codec, such as the QuickTime Animation compressor. Later, you’ll use special encoding software to convert this file to the MPEG2 format required for DVD video. If the native frame rate of your animation isn’t 29.97, be sure to convert the frame rate when you export or render.
If there’s audio attached to your piece(s), be sure to export it at the highest quality available as well – usually 48 kHz, 16-bit stereo. DVDs are capable of playing back very high quality audio and audio files are relatively small, so don’t skimp here. Some applications may only offer 44.1 kHz audio – if so, you’ll have to convert it to 48 kHz later on.
Video Basics
If your video portfolio samples are on videotape, you’ll have to capture them in a nonlinear editing application like Adobe Premiere or Apple iMovie. For standard North American video, set your capture settings to match the following specs:
- 720 x 480 pixels
- 72 dpi
- 29.97 frames per second
- 4:3 aspect ratio
- 48 kHz, 16 bit, stereo audio
The figure below shows the Adobe Premiere New Project Settings dialogue box configured appropriately. If you need to create a widescreen DVD, choose an aspect ratio of 16:9, but remember that for a widescreen DVD all your samples and graphics must be in the widescreen format as well. If your project requires PAL video playback (most European and Asian TV sets), set the pixel resolution at 720×576 and the frames per second at 25.

These New Project settings in Adobe Premiere 6.0 are configured correctly for standard North American video (NTSC).
Advanced Video Techniques
DVD authoring applications aren’t designed to edit video, so if you want to go beyond the basics, you’ll have to use video editing software, like Avid Xpress DV or Apple Final Cut Pro.
Create a sequence for each clip and edit it into the timeline. There, you can make sure the beginning and end of each clip is clean. It’s also a good idea to add a second or two of black before and after each clip, so that there’s a tiny pause before the clip starts to play on the DVD. Depending on the nature of your clips, you may also want to add dissolves to and from black as well.
If your startup action is a video clip or montage, you can create a graceful transition into your main menu by importing your main menu graphic into the editing application. (Some editing applications may require that you flatten Photoshop files into PICT, JPG, or BMP documents.) Edit the main menu graphic into the timeline after your startup clip and add a dissolve, as in the image below. Later, your splash screen or tease will appear to dissolve into the main menu.

Use an editing application like Final Cut Pro to add dissolves and edit your clips…
Finally, when you’re done editing and preparing each clip for your reel, you can select them all and perform a batch export to create a new set of QuickTime source files that are ready for MPEG2 encoding.
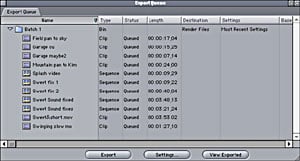
…and then batch export the clips to QuickTime.
This article was last modified on January 6, 2023
This article was first published on April 29, 2002
Commenting is easier and faster when you're logged in!

Recommended for you

Find-Change Scripting Goodness
FindChangeByList is a great script that can save you a lot of time and trouble w...

dot-font: Putting OpenType Through its Paces
dot-font was a collection of short articles written by editor and typographer Jo...
Quark Names Raymond Schiavone President and CEO
Quark Inc. today announced that Raymond Schiavone, a veteran software company CE...