
Making a DVD Video Portfolio: Onscreen Menus
Safety First!
TV monitors hide the edges of the video image, a process called overscan. That may sound strange but there’s a good reason for this – sometimes video footage has junk around the edges, like the black areas in the video frame (see figure 3). Unfortunately, the amount of overscanning varies from on TV set to another. As a result, people who work with video that’s destined for a TV monitor use a set of TV-safe guidelines when shooting and also when creating titles. As you can see in the figure below, the smaller, inner rectangle delineates the area that is safe for titles. All on-screen text should stay within this rectangle. The larger rectangle shows the area that is considered safe for action – there’s no guarantee that anything outside this line will be visible on a TV monitor.
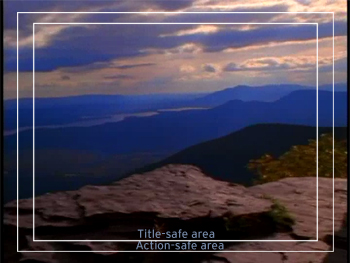
Figure 3: When designing text that will play on a TV monitor, be sure to keep it within the Title-safe area shown above.
- Windows users can download a Photoshop file containing the guidelines in the above image by right-clicking the above image and choosing “Save Target As…”.
- Mac users can right-click/control+click the above image and select “Download Link to Disk…”.Once you get the save dialog, name the file with a “.psd” extension before opening it in Photoshop. Open the downloaded file (TVsafe.psd) and paste the guides layer into a new layer in your Menu.psd document. Name this layer TV safe guides. Make sure the TV safe guides layer is the top layer in your document and keep it visible as you work.
The Layered Look
Now it’s time to design your DVD interface using Photoshop layers. Create a new Layer and call it Main menu. This layer will contain the background image for the main menu on your DVD.
When you’re done designing the menus, you may have 20 or more layers, so it’s important to name them appropriately, like in the figure 4. DVD authoring applications like Apple DVD Studio Pro and Sonic Solutions’ DVDit! import Photoshop files with layers directly, conveniently saving each layer as a separate element.
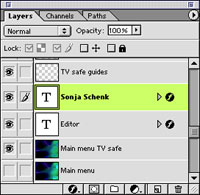
Figure 4: With 20 or more layers in a menus document, it’s important to label them clearly.
Next, add text that will always be visible in your main menu. As you create text and other graphic elements, be sure to avoid lines that are smaller than two pixels in width and small, delicate typefaces – fine horizontal lines tend to flicker on video monitors. For my reel, I decided to keep things simple the only text is my name and my title as shown below (see figure 5), along with four text-based buttons.
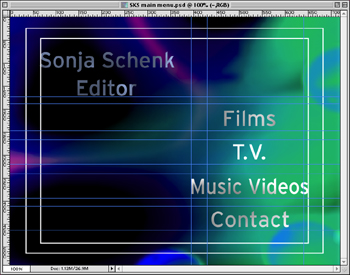
Figure 5: This simple layout is TV-safe and has four text-based buttons.
This article was last modified on January 6, 2023
This article was first published on April 15, 2002
Commenting is easier and faster when you're logged in!

Recommended for you
TypeTalk: Mark Jamra, TypeCulture
Mark Jamra, noted type designer and educator, had a vision of combining his pass...

Warping Artwork in Affinity Designer
How to fit artwork to any surface, or add perspective, while leaving the content...

How-to: Add Multiple Strokes to Editable Text in Photoshop
Have you ever tried to add more than one stroke to text using Photoshop’s Layer...