

After reading some of the comments on David’s post about Building an Org Chart or Flowchart in InDesign, I thought I’d offer up a quick tip on how to force objects to align the way you want. Basically, I just wanted to draw more attention to Anne-Marie’s comment that locking an object is the key to making it, well, the key object.
It’s true that InDesign’s aligning abilities aren’t quite as convenient as Illustrator?s; you can’t simply click on an object to make it the one others align to. But in most cases, it’s still quite easy to align objects to any other object on a spread. The trick is to temporarily lock the position of the object you want to align to. When the position of an object is fixed, other objects have no choice but to align to it. After you do your aligning, you can unlock the object and go about your business. The whole operation takes only a couple seconds.
You have to be able to select an object in order to force others into alignment with it. So if you’re using CS5, open Preferences and in the General Preferences panel uncheck Prevent Selection of Locked Objects. This makes CS5’s Lock command behave more like the Lock Position command of earlier versions of InDesign. If you’re using an earlier version, you can skip this trip to Preferences.

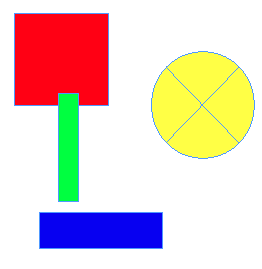
In the example below, say you wanted to align the right edges of the red and blue objects to the right edge of the green one.
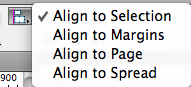
First, make sure Align to Selection is chosen in the Control panel.
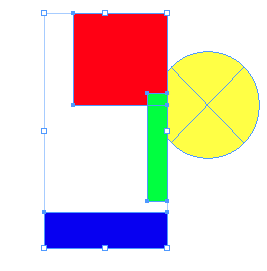
By default, if you now select all three and click on the Align right edges button, all three objects will right align on the right-most edge. In this case, that belongs to the blue object.
But if you lock the green object (command-l), it becomes immovable.
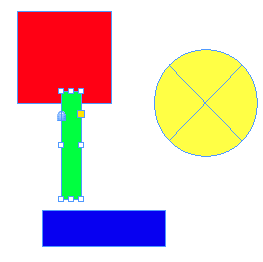
Now when you click the Align right edges button, the red and blue objects will right align to the right edge of the green one.

If you have no further need for the green object to be locked, unlock it by choosing Object > Unlock All On Spread, or pressing command-option-l. If you’re using CS4 or earlier, make sure the green object is selected and choose Unlock Position (also command-option-l).
This article was last modified on December 20, 2021
This article was first published on November 2, 2010
Commenting is easier and faster when you're logged in!

Recommended for you

Making a Table with Transparent Strokes
When table formatting fails, sometimes you have to take matters into your own ha...
This Week in InDesign Articles, Number 57
Some articles, some tips, some videos... a smorgasbord of InDesign info!
Less is more for the Control panel
I learned something yesterday. There is a Control panel menu widget that opens t...