Learning After Effects
How to create attention-grabbing content with After Effects and InDesign

This article appears in Issue 132 of InDesign Magazine.
As humans, we’re hardwired to notice objects in motion. Things that move instantly become interesting to us. Eons ago this trait helped our early ancestors avoid danger and stay alive. Today, designers are using motion graphics to promote the latest products, trends, and politics on social media. In this article you’ll learn how to use After Effects to put your InDesign assets in motion as you walk through creating a compelling promotional ad for a social media channel.
Plan Your Animation: Answering the Essential Questions
As with any design project, planning is a necessary step before jumping into the software. You need to develop a clear idea of the message you want to convey, the assets you’ll need to create or acquire, and the workflow you’ll employ.
What’s the story?
Many designers sketch out their ideas for branding or layouts before opening a design application. This step can be even more important when it comes to designing motion graphics, depending on the type of animation you want to create (Figure 1).

Figure 1. Draw out your story in a series of sketches that will help inform the content and flow of your animation.
For this project, we’ll be creating an animation that includes text, video, and branding graphics to promote the new glass blowing and sculpting courses available from FOCI, the Minnesota Center for Glass Arts located in Minneapolis. You can view a sample of the finished product here. Much like with interactive design, animation sketches are referred to as storyboards, and they provide you with an idea of the type of material you will need for your project.
Creating a storyboard gives you a general idea
of the materials you’ll need to prepare, as well as a framework in which your animation will exist. The storyboard for the example project starts with interesting imagery, poses a question, then dissolves into a personal interview that answers the question. Because this will be posted to social media, there’s a good chance the video will be watched without audio. With this in mind, you can see why animated typography is as important as motion graphics and video for online ads.
What assets will I need?
After evaluating the storyboard, make a list of the things you’ll need to create (or gather) for the project. Part of the example animation will include an interview, for instance, so we’ll need video of the main subject. We’ll also need video of the artist’s work and of her performing her craft. The remaining assets will be the same as for other design projects, including logos, the course catalog cover, and the corporate fonts.
How do I prepare the material?
Fortunately, After Effects is as versatile as InDesign when it comes to supported file formats. You can import native Illustrator and Photoshop files, as well as a myriad of graphic formats, including PDF, JPG, TIFF, and EPS. This means the same assets you are already using for your print- and web-based projects are ready for use within After Effects.
Although it is not necessary to shoot video for your animation, it can add a more dramatic aspect to your project. And it doesn’t add significant effort or expense—most of us already have an amazing video camera in our pockets! The video quality on your phone is more than sufficient to capture video for use in your project (Figure 2).

Figure 2. Use your phone to shoot video that supports your storyboard. Be sure to shoot extra footage, including the environment and different angles of the same subject matter. If possible, set your phone to 4K video mode, which will give you more pixels to work with.
There are a few different ways you can shoot video for your project. You can hold the phone as your subject is speaking or set the phone on a tripod. You can also walk around, slow and steady, with your phone as you record. For the shots in Figure 2, I used a tripod for the interview, but I held the phone to shoot the performance and portfolio showcase. Mixing video styles can also add interest to an animation.
Can I use content from InDesign?
One of the items we’d like to promote in the example video is the new course catalog. The catalog, including the cover design, was created in InDesign using type, branding graphics, and photography. Although After Effects cannot import a native InDesign file, it does support formats that InDesign can export.
InDesign can render hi-res JPEG files of any element created or composed within your layout. In this regard, you can use InDesign as a graphics production tool to feed After Effects. To convert the cover design from InDesign to a format suitable for After Effects, I recommend using the File > Export feature and choosing JPEG format (Figure 3). Set Quality to High and the resolution to 300 ppi or higher. This will result in a crisp image with enough pixels to look great in a video.

Figure 3. Export the catalog cover design from InDesign to a hi-res JPEG file for use in the After Effects animation project.
Get Comfortable with After Effects
You’ve undoubtedly heard about the amazing capabilities of After Effects. It won an Academy Award along with Photoshop in 2019, and every major visual effects artist uses it for television, motion pictures, and video projects across the globe. But what you don’t hear as much is how quickly you can learn After Effects—especially if you already know Photoshop.
Simplifying the workspace
When you first fire up After Effects, the sight of the interface may overwhelm you. Because this application can handle everything from video, typography and vector shapes, to imported artwork, animation and audio, you can easily lose sight of its basic design capabilities. To help After Effects beginners get more comfortable, I recommend enabling the Small Screen workspace: Click the Small Screen item in the top right of the window, or select Small Screen from the Window > Workspace menu. Even on a large screen, this will pare down the interface to the most basic design panels, including the Project, Timeline, and Composition panels. Next, close the Info, Preview, and Libraries panels on the right side of the window. Finally, add one more panel named Effect Controls from the Window menu. By default, this will appear behind the Project panel, but you can drag it to a new location if you wish. I prefer to have the panel next to the Effects & Presets panel (Figure 4).

Figure 4. The Small Screen workspace in After Effects simplifies the interface down to its most basic panels. In this example, I also added the Effect Controls panel and positioned it to the right of the Composition panel.
After Effects is a full-fledged design application, and as such, it includes many of the same panels you use in other design applications. These panels allow you to define layers, set properties for type, import assets, create reusable elements, and visually design elements on a canvas area—which mimics the workflow within Illustrator, Photoshop, and InDesign (Figure 5).

Figure 5. After Effects is part of the core design tools in Creative Cloud, and as such, it contains the same types of panels, albeit with different names.
Although other panels may have unfamiliar names, they can be used like panels you already know. The Project panel shows you all of the files that are linked into your project, much like the Links panel in Illustrator and InDesign. The Timeline displays the layers in your project, and the Composition panel provides the canvas in which you can create and modify your layouts. The Effects & Presets panel provides an organized list of available effects that you can apply to your layers, providing the same functionality as the Filter menu in Photoshop. The Effect Controls panel works like the Layer Options dialog box in Photoshop, allowing you to adjust the effects that are applied to layers in your project.
InDesign Layers to After Effects
If you want to animate individual objects on your InDesign page, you cannot export the entire page as a JPEG or PNG file. Instead, you’ll need to create a native PSD or AI file with layers. To create an AI file, you can export your InDesign page as a PDF, then open that PDF in Illustrator. Next, create new layers in Illustrator’s Layers panel and place the objects on those layers. (Illustrator doesn’t see the layers inside a PDF file, so you have to do this step manually.) After you save the file as a native AI document, you can import it into After Effects as a composition. Double-click the composition in After Effects’ Project panel, and you’ll find you can animate each layer separately.
Getting a layered PSD out of InDesign can be a little more difficult. If you use a Mac, however, the PageToPSLayers AppleScript makes it easier (to learn more, see this article). Again, when you import the PSD file into After Effects, be sure to select Composition and Editable Layer Styles.
Create an After Effects Project
Now that you’ve sketched the storyboards, gathered the assets, and set up the workspace, it’s time to get this party, er, project started!
Choosing new project settings
In After Effects, first choose File > New Project to create a new project named Untitled. Now to create a canvas to work within, choose Composition > New Composition. The Composition Settings dialog box opens, which is where you can set the properties for the animation you want to create (Figure 6).

Figure 6. Set the properties for your animation in the Composition Settings dialog box, including the dimensions and a name.
Since the example animation will appear on social media channels, I used some settings that will work across Twitter, Facebook, and Instagram. Instagram has the lowest recommended width dimensions of 1080 pixels, so I set the dimensions of the composition to 1080 × 608 (conforming to a standard 16:9 ratio). To finish up in the Composition Settings dialog box, I set the Frame Rate to 30, named the composition “my video,” and clicked OK.
Importing and organizing assets
Next, you need to import the assets by choosing File > Import > Multiple Files. Locate the video, graphic, and branding files, and click OK. All of the assets you choose will populate the Project panel and be ready to use (Figure 7).
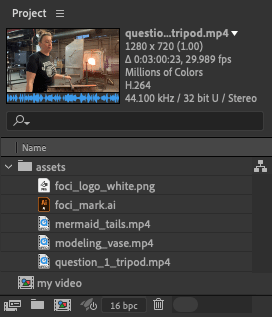
Figure 7. The Project panel shows all assets available for your project, including compositions and imported assets.
It’s a good idea to create folders in the Project panel, just like layer groups in Photoshop, to keep your assets organized. As you can see in Figure 7, the composition named “my video” shows in the Project panel as well. Finally, double-click the composition in the Project panel to open its contents in the Timeline panel. At this point, we’re ready to add our design assets into the Composition panel.
Adding assets to the composition
To begin composing our project, I started by dragging the modeling_vase.mp4 video from the Project panel to the Composition panel. After Effects now also shows the video as a layer in the Timeline panel. Next, I dragged the logo and mark graphics into the composition and positioned them in the center over the video (Figure 8).

Figure 8. Begin dragging assets into the Composition panel and arrange them to create your layout. The example shows a video with branding and a logo graphic placed on top.
Moving, scaling, and positioning elements in After Effects is very similar to creating layouts within InDesign. Arrange elements on the canvas as you’d like them to appear in your animation—realizing that this composition will be only one of the frames in an everchanging animation—a point which we’ll discuss next in greater detail.
Get Moving!
Now with your project created and artwork imported, you’re ready to make the design move. To do so, you assign various property values to your design elements, such as opacity and position, and then change those values over time. After Effects creates the necessary movements between those values to produce the resulting animation.
Creating a fade-in effect with opacity
As planned in the example’s storyboard sketches, the branding graphics appear first, then the video fades in. One of the things I like to do when transitioning video is to use an effect that matches what’s happening in the video. When reviewing the video from my phone, the spinning motion of the vase caught my eye. So to fade in this video, I decided to use a radial blur effect to match the rotating motion of the artist. But first, I needed to make the video appear by fading in.
To create a fade-in, start by dragging the playhead to between 0 and 1 second (about 00:15 frames), then click the disclosure triangle to reveal the properties of the layer (modeling_vase.mp4, in this case) and click the Stopwatch icon for the Opacity property. This will create the first keyframe for the Opacity property. (A keyframe is just a marker for the start or end of a transition.) Next, without moving the playhead, set the Opacity property to 0%. Take note that the stopwatch turns blue, and a diamond-shaped icon appears on the timeline. These are indications that Opacity now has animation properties within the project (Figure 9).

Figure 9. Clicking any Stopwatch icon in After Effects creates a keyframe along the timeline. Keyframes keep track of those properties as they change over time, resulting in an animation.
Drag the playhead to 2 seconds, and change the Opacity property for the video layer to 100%. After Effects creates a new keyframe and automatically calculates all of the opacity properties between the two keyframes—resulting in an animation that fades the video into view (Figure 10).

Figure 10. The two opacity keyframes you defined in the timeline produce an animation for the video layer.
To preview the animation so far, move the playhead back to 0 and press the spacebar (press it again to stop the preview). The branding elements are visible the whole time, while the video fades in over 2 seconds. Now try adding a second effect to the video by applying a radial blur as it fades in. In the Effects & Presets panel, locate the CC Radial Blur effect in the Blur & Sharpen group. You can apply this to the video layer in the Timeline panel by dragging the effect onto the layer. There will be no visible change to the video; however, you’ll now see the properties for the effect in the Effect Controls panel (Figure 11).

Figure 11. You can apply effects from the Effects & Presets panel to layers in the Timeline panel, much the same way as you apply layer effects in Photoshop. The Effect Controls panel gives you access to the properties of the effect.
Creating animations effect properties
You may also notice that all of the properties for the CC Radial Blur effect (Type, Amount, Quality, and Center) have small stopwatches next to them. This indicates that these properties can be animated. Move the playhead to the position of the first opacity keyframe (Note: You can hold Shift while dragging to snap to existing keyframes), then click the stopwatch for the Amount property in the Effects Controls panel. This will create another keyframe on the video layer for the applied effect with a value of 11. Next, move the playhead between the 2- and 3-second marks and set the Amount property of the effect to 0 (Figure 12).

Figure 12. The two additional keyframes you defined along the timeline result in a combined animation of blurring and opacity changes.

Let After Effects Do the Work
Once you grasp of the basics of working in After Effects, you can streamline your workflow with presets.
Getting started with animation presets
Now that you’ve learned to apply keyframes to layers, let’s take a look at how After Effects can make this process less tedious. If you are familiar with the Animation panel in InDesign, you know it offers presets that you can apply to elements on your page. The workflow in After Effects is very similar. The Effects & Presets panel contains a group named *Animation Presets (look for it at the top of the panel). This group contains a series of subfolders, which, in turn, organize a series of presets by categories. A quick exploration of the subfolders uncovers hundreds of animation presets you can apply to elements within your composition (Figure 13).

Figure 13. The concept of an animation preset is common to both InDesign and After Effects—and you can apply and customize both types in a similar manner.
You can apply animation presets to elements in the same way you do with effects: Drag them onto elements in the composition or on a layer, or select an element then double-click the preset you want to apply to it. Depending on the type of preset you choose, After Effects will make any necessary adjustments to your elements to achieve the preset’s intended results. In some cases, this may include adding one or more effects to the element, as well as adjusting the transform properties while adding keyframes to your timeline. When After Effects finishes applying the effect, you can review the results and make any adjustments you wish. It’s like having your own animation production artist!
Working with Type in After Effects
When it comes to formatting text, After Effects has a robust set of options located in the Character panel. The Type tool works just like the one in InDesign. Select it, click and drag to create a text frame, and then start typing. The Paragraph and Character panels provide a wide range of familiar options for formatting your text. You’ll even be pleasantly surprised to see that you can apply multiple font sizes and colors, apply baseline shifts and leading, adjust the kerning one letter at a time, as well as enable ligatures—all in the same text frame (Figure 14)!

Figure 14. The Character and Paragraph panels in After Effects offer many of the features you’ve become familiar with in InDesign.
Animating type with a preset
Now that we’ve introduced the video with a rotating blur effect, let’s bring in some text that sets up the introduction of the main subject. Because some folks may start watching this video with the audio muted, let’s pose the interview question in text, then quickly transition to video of the artist answering it. Animating the words with some kind of rotation effect would catch the viewer’s attention, but manually animating each character of the text would be extremely tedious. This is where using an animation preset can save a lot of time.
In browsing the presets for text, I found one named Twirl On Each Line in the *Animation Presets > Text > Animate In subfolder. When I applied this preset to the text layer, After Effects added new properties and keyframes (Figure 15). For example, it enabled a new property named Offset for animations (indicated by the blue stopwatch and keyframe icons as mentioned earlier).
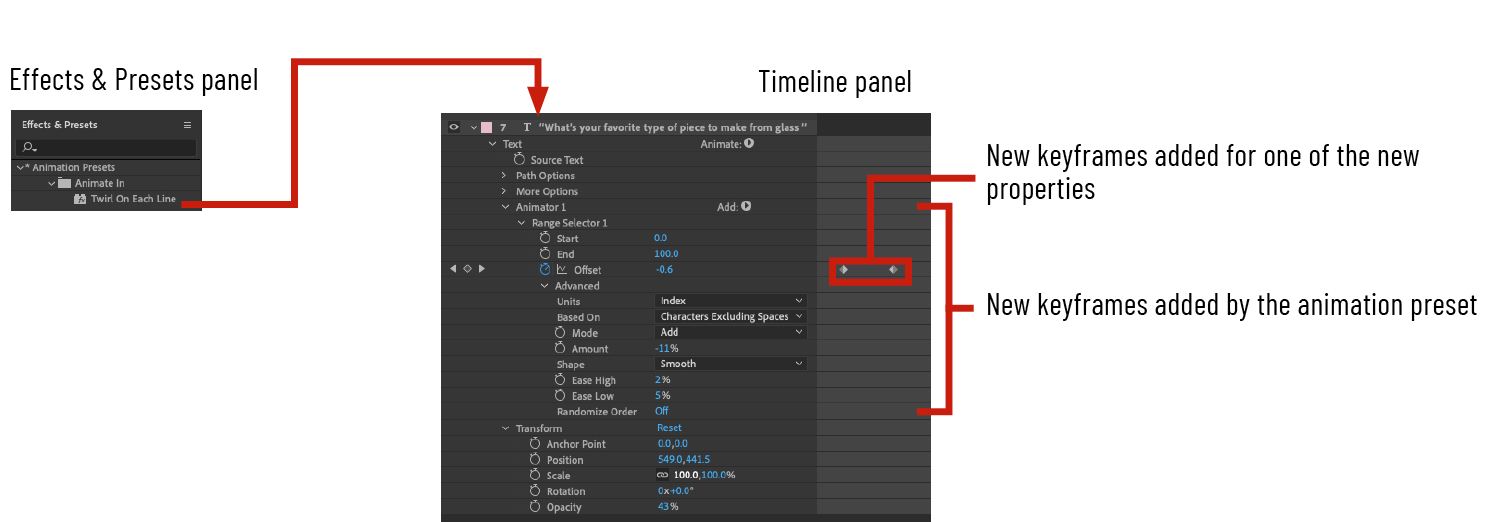
Figure 15. Many animation presets activate additional properties for a layer as well as apply keyframes to one or more values. After you create the animation, you can adjust the values and customize the position of the keyframes.
To review the results of a preset animation, select either the Composition or Timeline panel, and then press the spacebar. If necessary, you then can adjust the various values to further customize the effect. For the example project, I decided I wanted a smaller circular movement, the text to fade in, and the overall speed to be faster. I discovered that setting the Amount property to –11% and the Shape to Smooth gave me a smaller and more rounded motion. (Some of the property names can be difficult to decipher, so experimentation may be your best ally when fine-tuning.) Then, to make the animation faster, I dragged the second keyframe closer to the first one. And finally, to get the type layer to fade in, I created two keyframes for Opacity (as I did earlier with the video layer), and set the first one to 0% and the second one to 100% (Figure 16).

Figure 16. Use animation presets in After Effects to create complex motion graphics in a fraction of the time.

To complete the animation, I added a new shape layer underneath the animated text layer to help with legibility. To create a shape layer, I deselected all layers in the Timeline panel, and then dragged out a rectangle shape using the Rectangle tool. I set the fill to a dark red color using the Fill property at the top of the window. Next, I faded the shape layer in by animating the Opacity from 0% to 100%. Finally, I added keyframes to the Scale property of the shape layer, and set the keyframe values to animate from 0% to 100%.
Providing content for the text
After the intro animation of text and rotating glass, the video of the artist answering the question posed by the text needs to fade in. To accomplish this, I imported the video of the artist being interviewed, placed it behind the text and the shape layer and above the rotating glass video, then faded it in by animating the Opacity property. This effect provides a smooth transition between the rotating glass and the interview, while the text and shape layer are still on the screen—helping give context to the text and the artist’s actions.
Promoting the catalog in the video
Because this project will run on the organization’s social media channels, the video also needs to promote the new course catalog as a way to entice viewers to learn more about upcoming classes. To highlight the catalog, I used the cover design, which was created in InDesign and imported into After Effects (Figure 17).

Figure 17. Previously we exported the course catalog’s cover design from InDesign as a JPEG file, then imported it into After Effects. Now it’s time to include it in the social media video project.
Using the same techniques discussed earlier, I added animation keyframes for position and rotation to the catalog graphic to make it animate in from the left. I also brought back the branding graphics from the beginning of the project. Now with the project complete, let’s render a video.
Render Your Project
The final step in the process is to render, or export, your project to a video format. One of the most common video format used online, and in digital projects, is the MPEG-4 AVC format, or just MP4. The quickest way to access this export format is to use the Adobe Media Encoder. This Creative Cloud application can encode your project files into a wide range of video formats, including MP4.
You can run the Adobe Media Encoder by itself, or you can invoke it directly from within Photoshop, After Effects, and Premiere Pro. To start the Media Encoder from After Effects, choose File > Export > Add To Media Encoder Queue. This will launch the Media Encoder and add the active composition to the Queue panel (Figure 18).

Figure 18. The Adobe Media Encoder is dedicated to encoding and compressing video for a wide range of uses, including broadcast television, motion pictures, Blu-Ray DVDs, and videos for digital projects and social media platforms.
Once your composition is queued, select MP4 from the Format menu in the Queue panel, then select a rendering preset. To ensure the final video matches the custom composition size of your project, choose Match Source – High Bitrate from the preset list. Finally, choose a name and location for your video file and click the green Play button in the upper right. As Media Encoder encodes your video, you’ll see a preview in the Encoding panel.
Bring the Project Back into InDesign
Now let’s bring it all back home to InDesign. You remember you’re reading a magazine about InDesign, right?
Repurposing the video for the digital catalog
After completing a document, such as the example catalog in InDesign, you can use the Publish Online feature to create and share an interactive version of it that includes video. For instance, the online version of the catalog could repurpose the interview portion of the video. With this in mind, I simply duplicated the composition in the After Effects Project panel, then removed the branding and catalog graphics form the timeline. After following the same rendering process covered earlier, I created a second video to feature in the catalog.
InDesign lets you place video files in the same way you import photos and graphics. You can either drag the file directly into your document or choose File > Place. After sizing and positioning your video, open the Media panel to define additional properties for video playback (Figure 19).

Figure 19. Use the Media panel, located in the Interactive group under the Window menu, to set properties for the imported video file, including defining a custom poster frame.
Publish your InDesign file online
In order for people to be able to watch your imported video file, you need to publish your InDesign document as either an EPUB ebook or as an online document. For this particular campaign, we’ll choose the Publish Online feature so it is easier to share our enhanced content with anyone in the world (Figure 20).

Figure 20. The Publish Online feature not only posts your InDesign document online, but it also creates the necessary web code to display your layout and enable rich media elements for playback in a web browser.
Publish Online automatically transforms your InDesign document into the necessary HTML and CSS code required to display your publication in a web browser. This feature also generates JavaScript code that is used for navigation, user interactions, and anything else required to create an engaging user experience based on the original InDesign file. You can learn more about the amazing Publish Online features in Issue 81.
(Note that Publish Online places your document on Adobe’s servers. If you need more control over the HTML output or you need the HTML on your own server, you can use the commercially available in5 add-on.)
Skills in Motion
Exploring new types of design work can seem overwhelming. Branching into photography, motion graphics, audio, or video can seem like entering a whole new universe of things to learn—but that’s not entirely true. Many of the principles that govern the disciplines you already know also govern other disciplines. Motion graphics artists, for example, deal a lot with graphics, visual communication, and composition. Their goal is mostly the same as that of a graphic designer, with the exception being their designs need to move over time. My goal in this article was to inspire you to try something new that is mostly based on things you already know. And you’ll find that things like composition, text, file formats, and publishing options will be very similar across all design mediums—leaving a relatively small number of new things to learn as you grow your skills.
A Special Thank You
I’d like to thank the Minneapolis Center for Glass Arts and glass artist Shawn Kearney, for their written permission to use their branding and likeness for this article. Check out the official FOCI Website to see some amazing glass art as well as learn about upcoming classes they are offering to their community.
Using After Effects for Design and Photography
To help you add a new tool to your design toolbox, I have created two online courses that feature After Effects as both a graphic design tool and a photo enhancement application. These courses are taught from the perspective of a Photoshop user and will help you uncover the vast range of capabilities available to you in this industry-leading special effects application.
After Effects for Graphic Design (first chapter is free)
After Effects for Photography (first chapter is free)
Commenting is easier and faster when you're logged in!

Recommended for you

InDesign Magazine #57: The Photography Issue
We’re pleased to announce Issue 57 of InDesign Magazine has shipped! If you’re a...

What I Learned at CreativePro Week About Publish Online
One of my very favorite events is CreativePro Week, and this year’s conference,...