Inside Photoshop: The Color Lab

Application: Photoshop 5/5.5/6
Operating Systems: Macintosh, Windows
Color has always been a strong factor in image editing and graphic design. When working in Photoshop, there are many color modes to choose from. The more common modes that are implemented are RGB and CMYK. Undoubtedly, you’ve noticed that these color modes are a bit, shall we say, sketchy. For instance, RGB allows you to create amazing, vibrant blues, dark greens and purples. This is great on-screen, but the moment you try to print these colors to a CMYK printer, they look as if the black ink cartridge threw up all over them. Not to mention, it’s nearly impossible to create rich yellows and oranges using RGB. On the other hand, CMYK is quite limited in color representation. The hard truth is that if you have to print it, you have to do so in CMYK. This is usually the determining factor when deciding on a color mode to work in. But, you do have another option that has an endless color selection–Photoshop’s Lab mode. In this article, we’ll explore the benefits of working in Lab mode and we’ll show you how you can create imagery with colors as vibrant as those on our cover.
Origins of Lab Color
In 1931, the Commission Internationale d’Eclairage (CIE) came up with a color model that displays every color perceived by the human eye. In 1976, this model was updated and refined, in order to create the CIE Lab color system. Unlike RGB colors that are screen-dependent and CMYK colors that vary with printer, ink and paper characteristics, CIE Lab colors are device-independent. Therefore, the visual characteristics of these colors remain consistent on monitors, printers and scanners.
How it’s Broken Down
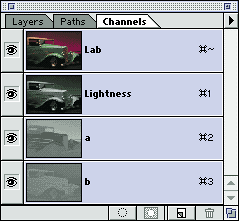
In Photoshop, the Lab mode consists of three color channels, as shown in Figure A. The first channel is Lightness (L). The Lightness component, otherwise known as luminance, can range from 0 to 100. A Lightness value of 0 equals black and a value of 100 equals white. So, the higher the value, the more vivid the color. The other two channels, a and b, represent color ranges. The a channel contains colors ranging from green to red and the b channel contains colors ranging from blue to yellow. Figure B shows how our original image is broken down within the channels.

Figure A
Photoshop’s Lab mode consists of three channels: Lightness, a and b.

Figure B
Each channel represents specific pixels within an image.
The Benefits of Working in Lab Mode
One of the main benefits you’ll notice when working in Lab mode is that you’re provided with a wide range of color values to choose from. Figure C shows the high intensity colors available to you in this mode versus those available in RGB and CMYK. The Lab color model actually includes all of the colors that you can create in both RGB and CMYK modes.
Besides having maximum color flexibility, working in Lab mode is just as fast as working in RGB mode. In both instances Photoshop has only three channels to work with when processing information, whereas working with CMYK images can be much slower. Also, keep in mind that even though you’re working in CMYK mode, your monitor is RGB so Photoshop is converting these values continuously.
Since Lab mode is device-independent, you can use it to edit any image. Not to mention, your colors won’t undergo major tonal changes when converted to CMYK for final output. This is one reason many of the high-end users prefer to work in Lab mode.

Figure C
The Lab color model encompasses all of the colors available in both CMYK and RGB modes.
Printing Lab Colors
There really are no limitations when selecting or editing colors on-screen if you’re working in Lab mode. Although, if any of your colors fall out of the CMYK range, you may have to fine-tune them a bit. This tends to occur when you’re working with very vibrant shades of blue and purple. A way to avoid any color alterations is to print to a PostScript Level 2 or Level 3 printer. You can print an image in Lab mode directly to either one of these printers to avoid any color conversions.
Having Fun with Lab Colors
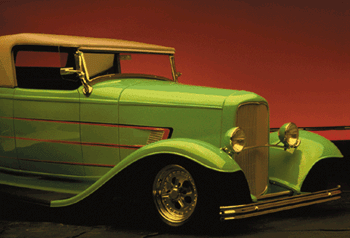
Now that you know the fundamentals behind Lab colors, we’ll explore their creative side. What’s great about working in Lab mode is that you can manipulate colors in an image with ease. Take, for example, the antique car shown in Figure D. The colors are fun, but what if you needed the same image with more subdued colors, or you wanted to reverse the pink and green areas? You can do both with a few clicks of the mouse. And what’s even better, you don’t have to worry about losing any detail from the original image.

Figure D
Let’s see how many ways that we can colorize our original image.
Color Swapping
To begin, open a color image in Photoshop and convert it to Lab mode. To do so, choose Image > Mode > Lab Color. Then click on the Channels palette (if the palette is hidden, choose Window > Show Channels), and select the a channel. This channel maps the greens and magentas. We’re going to invert these colors by choosing Image > Adjust > Invert, or by pressing cI ([Ctrl]I in Windows). After inverting the a channel, click on the top-most channel, Lab, to see the results. Figure E demonstrates how the greens have been replaced with magenta hues and vice versa in our image. Now, repeat these steps for the b channel. Notice how the blues and yellows are reversed, as shown in Figure F.

Figure E
By inverting the colors found in the a channel we were able to reverse our pinks and greens.

Figure F
By inverting the colors found in the b channel we were able to reverse our blues and yellows, giving our hot rod a whole new look.
Replacing Color
Not only can you invert colors using channels, but you can even replace a color. Open a new image in Photoshop and convert it to Lab mode. Select the a or b channel and then choose Image > Adjust > Replace Color. In the resulting Replace Color dialog box, shown in Figure G, select a color that you want to replace. You can do this by clicking on the preview window with the Eyedropper tool, or by clicking on an area of color directly on your image. Set the Fuzziness slider to 40 and choose the Selection option button. Then drag the Lightness slider back and forth to achieve your desired result. Click OK to apply your changes. Again, select the Lab channel in the Channels palette to see the final results. We selected the b channel and increased the Lightness to +70 to create the effects shown in Figure H.

Figure G
Here we replaced a specific color in our image within a channel.

Figure H
By modifying one color within our image our hot rod has gone from cotton candy to suave.
Joining the World of Color Junkies
These are just two simple examples of how you can have fun with colors using channels in Lab mode. Experiment with the Levels and Curves commands as well. You’ll be amazed at the results.
Lab colors are convenient and fun to work with. Why limit yourself to RGB or CMYK colors when you can have the best of both worlds? Test it out; you may find that once you go Lab, you never go back.

Copyright © 2000, Element K Content LLC. All rights reserved. Reproduction in whole or in part in any form or medium without express written permission of Element K Content LLC is prohibited. Element K is a service mark of Element K LLC.
This article was last modified on January 3, 2023
This article was first published on April 12, 2001
Commenting is easier and faster when you're logged in!
Recommended for you

Make a Quick Bar Chart (or an amazing geometric shape) with Transform Sequence
I love it when InDesign does stuff for me? not necessarily when it tries to...

Turn Any Object Into a Transparency Mask
A mask covers your face so you can’t see it, right? And masking tape cover...

CreativePro Week Sneak Peek: When To Use CC Libraries and When Not To
Learn when your workflow would benefit from working with an image that's been ad...


