
InDesign’s Hidden Color Tools
Don’t let these powerful tools for picking, organizing, and sharing colors in InDesign slip past your notice.

This article appears in Issue 106 of InDesign Magazine.
You probably already know the basics of working with color in InDesign, such as picking and managing colors using InDesign’s Color and Swatches panels. But did you know InDesign can show you the hex color of any swatch so you can use it in Photoshop or a web page? That it has a second, hidden Eyedropper tool that works outside of InDesign? Or that it lets you share colors (or groups of colors) between documents and applications seamlessly, and between designers working on the same project?
Adobe has added some new tools and features to InDesign in the past few years that give us new color capabilities. They are hidden in plain sight, and most people don’t use them. But you’re not most people, are you? So get ready—you’re about to become an InDesign color ninja!
Exploring Color Interactively
You know you need to pick colors for your new design, but which colors?! Choosing colors—especially ones that go well together—can be very stressful. Recognizing this, Adobe began developing new interactive color tools for choosing colors back in 2008, centered on a website called Kuler (yes, they actually spelled it that way). Kuler was designed as a place where you could create, explore, and share groups of colors called color themes. Soon thereafter, Adobe added a Kuler panel to InDesign, which let you both experiment with colors and download colors you created online. Since then, these tools have spilled out into other InDesign features, including the Color Theme tool, which I’ll talk about below.
Adobe color (Kuler) applications introduced concepts from color theory and psychology about creating color harmonies that follow color rules (see “Creating Harmonious Colors”). Adobe chose groups of five swatches to represent harmonious colors. It called such a collection a color theme. The
color which controls the theme when following a color rule is called the base color.
Color groups
Color themes are stored as a group of five swatches. Having color groups also means that you can import and export colors with Illustrator and other applications that support color groups. You can create a color group from solid colors, tints, or (as of CC 2018) gradients.
You can make color groups by clicking the New Color Group button at the bottom of the Swatches panel. Select swatches in the panel before you click to automatically add them to your new group. Later, if you no longer want those swatches inside a folder, you can right-click the folder and choose Ungroup Color Group.
InDesign’s Color Theme Tool
The Color Theme tool allows you to create color themes from InDesign objects, text, or even placed pictures. This tool is found in the same toolbar slot as the Eyedropper. You can switch to the Eyedropper tool by pressing the letter I, and the Color Theme tool by pressing Shift+I.
Unlike the Eyedropper tool, which samples and applies only a single color at a time, the Color Theme tool is particularly effective for creating a harmonious layout using multiple sampled colors. You can pull colors out of images and other page elements using a variety of methods.
When you select the Color Theme tool, it displays an “empty eyedropper” icon with a tiny icon representing a color theme (Figure 1).

Figure 1. Using InDesign’s Color Theme tool, you can click an image, or marquee-drag part of an image or multiple objects. The outline shows you the area from which colors will be sampled.
You can drag the tool over an image, or part of your image, or over any part of your layout. Outlines appear around objects as you move your cursor, making it easier to predict which colors will be picked. For more information on sampling colors from multiple page objects with the Color Theme tool, see Mike Rankin’s post here.
Alternatively, you can just click with the tool instead of dragging it. Either way, the cursor changes to a “full eyedropper” icon with a tiny swatch attached to it. That swatch is the base color. That and the other predominant colors in the selection are displayed as a color theme in a floating palette (Figure 2), with the base highlighted.

Figure 2. Click the Color Theme tool over a selected area to display a floating palette with a color theme using the predominant colors. A menu lets you choose color mood variations of the theme.
You can use the arrow keys to change it to a different color. You can choose related themes by choosing a color mood from the palette menu (see “Color Theme Tool Tips” below).
You can immediately apply the current base color to an object, just like you could with the Eyedropper tool. Click anywhere inside a frame to set the fill color. Click on the edge of a frame to set the stroke color. You can also click or drag across type to apply the base color as a fill to that text.
To save the theme you choose, click the Add Theme to Swatches button on the palette. This adds a new color group to the Swatches panel, and populates the group with the current colors in the Color Theme panel. To add the theme to the currently selected CC Library, click the Add Theme to Library button.
Color Theme tool tips
Here are some different ways to use the Color Theme tool:
- Click on an image: the predominant colors are sampled and displayed on the floating palette
- Drag over an image or any part of your layout: only the colors inside the marquee are used in the sample
- If you’re not happy with the colors you picked, hold down Option/Alt to return to picking mode and make a new selection.
- To add just one of the colors from the floating palette to your Swatches panel, select it in the floating palette, and then Option/Alt click on it.
- Colors stay picked even if you switch to a different tool. When you return to the Color Theme tool, the current theme is still available. Press the Escape key to clear the theme and return the tool to picking mode.
- Color moods are color theme variations of the colors you sampled. They are available from the Color Theme floating palette menu. Choose between Colorful, Bright, Dark, Deep, and Muted.
- To select just one color in a picture accurately (rather than all the colors throughout the image), hold down the Shift key. The cursor changes to a target icon. Clicking selects the color where you click and makes it the base color.
- When using the Shift-click method to select a single color, the color theme that appears is based on one of the color rules (see “Creating Harmonious Colors”). From the palette menu, you can choose between the Analogous, Monochromatic, Triad, Complementary, Compound, or Shades color rules (Figure 3). The selected theme can be saved like any other theme.
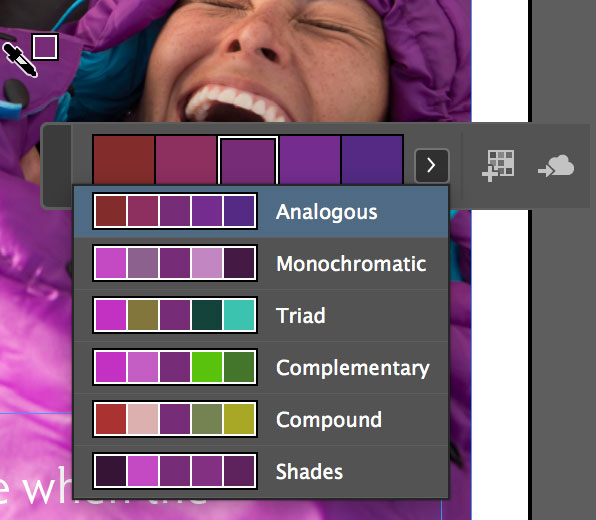
Figure 3. Shift-clicking with the Color Theme tool selects a single color. A color theme appears in the floating panel based on one of the color rules shown in the menu.
Color Theme tool options
You may wonder what color space is being used when creating a color theme. You can set this in the Color Theme tool options. Double-click the Color Theme tool to view and change the color space (Figure 4).
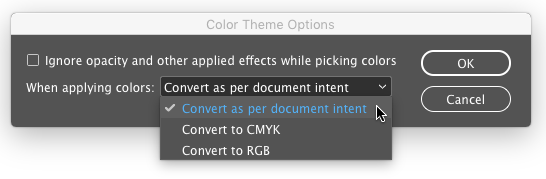
figure 4. Choose the color space for theme colors in the Color Theme Options dialog box.
By default, in the When Applying Colors menu, Convert As Per Document Intent is selected. (“document intent” is CMYK for a print document or RGB for a web or mobile document.) With this option, when colors are picked, they are converted as necessary to the appropriate color space before they are added to the Swatches panel, to the CC Library, or dropped on a selected object. In the same menu, you can also choose Convert to CMYK or Convert to RGB.
There is also an option in this dialog box to ignore opacity and other applied effects when picking colors.
The Color Themes Panel
Like the old Kuler panel, the Adobe Color Themes panel (Window > Color > Adobe Color Themes) gives you a window into the Adobe Color website, where you can create, edit, and share color themes as well as explore and download themes created by other users. Since this panel needs to communicate with the color database on the Adobe servers, you need an active Internet connection to use it.
Theoretically, it should be easier and faster just to work in InDesign rather than launching your web browser to work at color.adobe.com, but, as I’ll explain below, that may not always be the best choice.
Creating Harmonious Colors
There are several methods (called color rules) that you can use to create a color theme with harmonious colors. You can work with the color wheel found in the Create tab of the Adobe Color website or the Wheel option on the Create tab of the Adobe Color Themes panel in InDesign. Here’s a short description of each of the color rules:
• Analogous (default) colors are those with adjacent hues on the color wheel
• Monochromatic colors place the colors in a line from the center to a particular hue; they vary in saturation and brightness
• Triad colors are based on three equidistant points on the color wheel
• Complementary colors are based on colors on the opposite sides of the color wheel
• Compound (also known as split complementary) colors are based on opposites with the additional colors having hues adjacent to the opposites
• Shades creates colors controlled by the base color but with variations in brightness
• Custom color themes don’t follow the color rules; you can set colors anywhere on the color wheel
The Create Tab
The Adobe Color Themes panel is very small for what it’s tasked to do. It can be stretched taller, but its width is fixed. That means that you cannot view the three interactive color components all at the same time. And while you can always see the five colors of the color theme at the top of the panel, you have to toggle between viewing the color wheel and the color space sliders. The color rule menu is located on the right side of the panel underneath the color theme display (Figure 5).
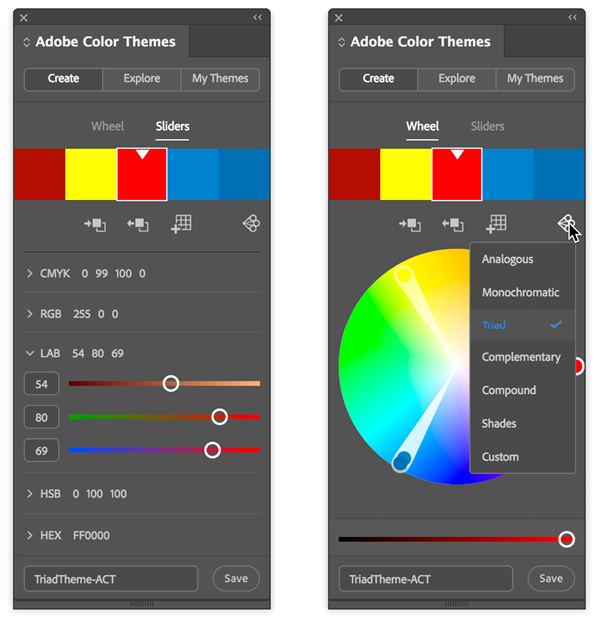
Figure 5. Mixing colors with sliders (left) and choosing a color rule (right).
You can change the luminance of the selected color not in the sliders but at the bottom of the Wheel display.
The Color Theme display includes three additional buttons:
- Click to Set Active Color: Changes InDesign’s active color (adds the current base color to the Swatches panel, changing the fill or stroke, whichever is active, to that color). Note: Clicking this button also changes the active color on any selected object in your layout.
- Set Selected Color from Active Color: Changes the base color on the color theme, replacing it with the InDesign active color. (Beware: this action has no undo!)
- Add to Swatches: Adds the current theme to the Swatches panel.
In my experience, it is easier and safer to create or edit a color theme on the website if you want to use CMYK or Lab swatches. I find that when using the Adobe Color Themes panel in InDesign with a theme saved in RGB, I can edit it to my satisfaction in the Create tab. However, if I switch the color mode to CMYK or Lab, it doesn’t reliably convert it like the web app does. I also find the larger interface on the website easier to work with. And I appreciate the ability to delete themes on the website, which I cannot do in the Adobe Color Themes panel.
The Explore tab
The Explore tab works like the Adobe website version of this feature (Figure 6). The Search field brings up the same query choices as you’d find on the website.
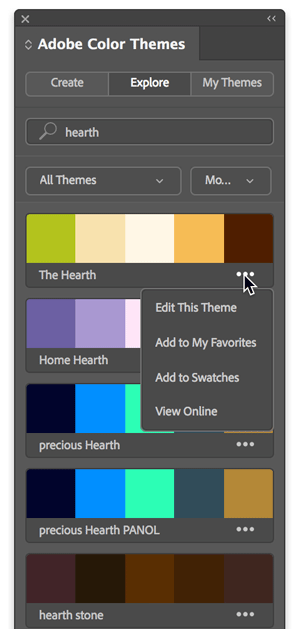
Figure 6. The Explore tab in the Color Themes panel lacks some of the social media features offered on the Adobe Color website, but includes the essential tools for searching and picking color themes.
Underneath each theme search result is the name of the theme and an ellipsis (…) menu giving you four choices:
- Edit This Theme switches to the Create tab. By default, the theme is named Copy of [Selected Name], and you can edit it and save it.
- Add to My Favorites works the same as on the website.
- Add to Swatches adds the unedited theme to InDesign’s Swatches panel, remaining in whatever color space it was created in.
- View Online opens the viewed theme in the Explore tab of the Adobe Color website so additional actions can be performed. In addition, clicking one of the unedited theme colors immediately adds that color to InDesign’s Swatches panel, using the current color space, and changes the active color.
The My Themes tab
At the top of the My Themes tab are two menus: the top one lets you choose between viewing the themes found in All Libraries (all your CC libraries) or selecting from those in a particular CC library. The second menu lets you sort the All Libraries selection by name, by date created, or by number of themes in the library, and to choose ascending/descending order (Figure 7).
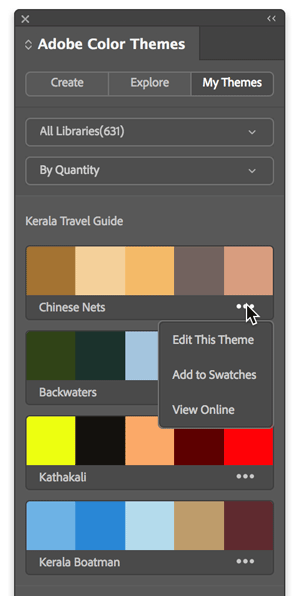
Figure 7. The Color Themes panel’s My Themes tab matches the features of the Adobe Color website.
Swatches Panel Sampling and Hex Values
We’ve talked about picking up colors from your document with the Color Theme tool, but InDesign has a couple more obscure-but-useful features for creating colors that you may not know about.
Sampling colors anywhere with the hidden Eyedropper tool
As you know, the Eyedropper tool can only select colors from the current document. It’s designed to select solid colors from InDesign objects, so, for example, you can’t pick colors within a gradient. And unlike Photoshop, it can’t sample colors from images or artwork open outside the InDesign window.
But InDesign has another, hidden, eyedropper tool, hiding inside the New Color Swatch dialog box (or, when you edit a swatch, in Swatch Options). But it only shows up when you switch the Color Mode to RGB. When you do that, you can sample colors like Photoshop’s Color Picker does (Figure 8).
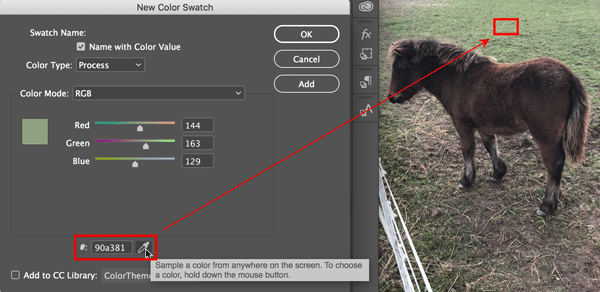
Figure 8. When your color mode is RGB, dragging the Eyedropper in InDesign’s New Color Swatch or Swatch Options dialog box lets you sample colors from anywhere on your screen. In this example, we’re sampling the color of the grass behind the horse from an image open in Photoshop. The dialog box also displays hex values of colors.
Click the eyedropper icon at the bottom of the dialog box. Click and hold, and then move the cursor over any color in the InDesign window, or anywhere on your screen!
When you release the mouse, you’ve picked that color. Click Add or OK to add the RGB value to your swatches. It’s important to understand that InDesign is reading the RGB values on the screen, not from an InDesign object.
Getting a Hex color value
Referring to colors by their Hexadecimal code (“hex colors”), such as #00AEEF for a light blue, is common for web, UX design, and onscreen graphics. InDesign users have long had difficulty in getting (or changing) the hex color values for colors inside InDesign. The solution usually required awkward workarounds, such as switching to Photoshop to use its Eyedropper tool, or using InDesign scripts.
However, that same New Color Swatch dialog box (shown in Figure 8) that brought you the hidden InDesign Eyedropper tool—and even the good ol’ Color Picker—also displays the hex values.
And, as with the New Color Swatch dialog box, in the Adobe Color Themes panel you can create or edit a swatch by typing or pasting a hex value into that field.
Importing Colors from the Adobe Capture App
Another source for color themes can be the camera on your phone or tablet that is, of course, always with you. The free Adobe Capture app for iOS and Android lets you capture a variety of things, including Shapes, Type, Color, Materials, Patterns, and Brushes. (The Color component of this app had previous incarnations in the Kuler and Color apps.)
After installing the Capture app on your device, open it and tap on Colors at the top. The first time you open the app, a help screen will provide suggestions. By default, it will attempt to capture color themes from the camera on your phone or tablet. But you can also click the Picture icon at the bottom right of the screen, which lets you open a picture you’ve already taken.
Once you select a picture (or use your camera), color markers appear on the image indicating the prominent colors. When you’re working from a saved image, you can drag the markers with your finger to change which colors are being selected. The results appear as a color theme at the top of the screen (Figure 9). When you’re satisfied, tap the checkbox at the bottom of the screen.
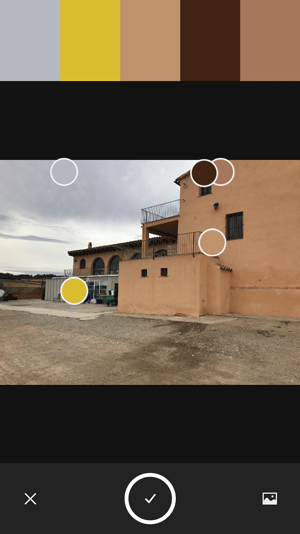
Figure 9. In the Color component of Adobe Capture, you can capture color themes from the camera on your mobile device.
You can edit the theme further by switching between Sliders, a Color Wheel, and the image itself (Figure 10).
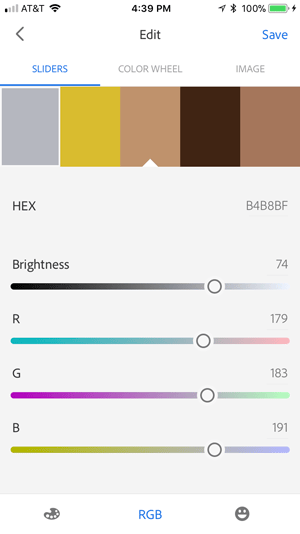
Figure 10. The Adobe Capture app has an interface similar to that of the Color Themes panel for editing and saving color themes.
At the bottom of the screen, you can switch between RGB, CMYK, Lab, and HSB values. Two buttons at the bottom give you menus of color moods and color rules.
Finally, tap Save at the upper right of the screen. In the Save window, you can edit the name of the theme as well as select or create a CC library to save the theme. (And soon after, you’ll find that it’s appeared in the CC Libraries panel in InDesign.) Of course, it will also immediately be synced to the Adobe Color website and the Adobe Color Themes panel in InDesign.
Sharing Colors and Themes
When you’re using colors and color themes, you frequently need to use them in more than one application, and you may need to share them with your colleagues.
There are two ways to share colors between InDesign and applications like Adobe Illustrator or Adobe Photoshop: ASE files and CC Libraries.
Adobe Swatch Exchange
Adobe Swatch Exchange (ASE) files have been the traditional way to exchange colors between applications. To make an ASE file containing process or spot color swatches you’d like to share, select the swatches or color groups in the Swatches panel, and choose Save Swatches from the panel menu. This creates an ASE file containing solid color swatches (you cannot include tints, gradients, or mixed inks). The colors can then be loaded into another application that supports ASE swatches (like Illustrator or Photoshop). If you’re using InDesign CS6 or earlier, this is the only way to share colors between the programs, other than copying and pasting objects.
CC Libraries
In the February 2015 release of InDesign CC 2014, a new kind of library was introduced to Adobe InDesign—called a CC library. Unlike the original InDesign object libraries, these libraries can be shared between almost all Adobe applications. They let you store and reuse a variety of objects—including colors and color themes. (For an in-depth look at CC libraries, see my article “CC Libraries” in InDesign Magazine #83.)
This workflow has several advantages for sharing color and color themes:
- CC Libraries let you copy and reuse colors and color themes between almost all Adobe desktop applications, the Adobe Color website, and many mobile applications (like Adobe Capture and Adobe Comp).
- You can add colors and color themes in a variety of ways, as illustrated throughout this article.
- You can share colors and color themes easily with other users who are signed in to Creative Cloud applications with an Adobe ID.
Adding colors and color themes
In InDesign, you can add a color to a library either from artwork or the Swatches panel. To add a color from a selected object, click the + button at the bottom of the CC Libraries panel, and then choose Fill Color and/or Stroke Color. Or, if text is selected, choose Text Fill Color and/or Text Stroke Color. The selected color(s) will be added to the current CC library (the one currently visible in the CC Library panel).
Alternatively, you can add colors from the Swatches panel to your CC library so that you can use them in other documents or apps. Select one or more solid color swatches (as with ASE swatches, tints, gradients, and mixed inks don’t work), and click the Add Selected Swatch to My Current CC Library button in the Swatches panel. If you’ve selected a swatch group, all of its component colors are added.
As described above, you can use the Color Theme tool in InDesign to create a color theme, and then click the Add This Theme To My Current CC Library button in the Color Theme floating palette. When you create or edit a color theme in the Adobe Color website or InDesign’s Adobe Color Themes panel, it is saved into a CC library.
Sanity Saver
To prevent the CC Libraries panel from flying open whenever you create a new color swatch or style (which may not even have anything to do with your current CC library), deselect the Add to CC Library checkbox. This option is sticky; best to leave it unchecked until you really need it.

Using colors from your CC library in InDesign
You can use your CC library just as you do the Swatches panel—to apply a fill or stroke color to objects or text in your InDesign document. To do that, first select the object or text in your document, and then choose the fill or stroke proxy (at the bottom of the Tools panel or the top of the Swatches or Color panel). Finally, to apply the color, just click any color from the Colors or Color Themes section of a CC library. InDesign applies the color and also adds that color swatch to your Swatches panel, if it wasn’t already there.
Or, you may want to add a color from a CC library to your Swatches panel in your current document, without applying it to an object on your page first. To do that, select one or more colors in the CC library (make sure nothing is selected on your InDesign page first), right-click one of them, and then choose Add to Swatches.
Similarly, in the Color Themes section of a CC library, you can simply right-click on a theme and choose Add Theme to Swatches. The color theme appears in the Swatches panel as a color group containing the swatches from the theme. Or, if you just want one color from the theme, right-click on that color, and choose Add to Swatches.
Putting It All Together
Many new workflows are made possible with the interoperability of these new color tools. Here’s just one example.
In Figure 11, Adobe Capture was used to create a color theme from the Spanish Ashram picture, as described above.
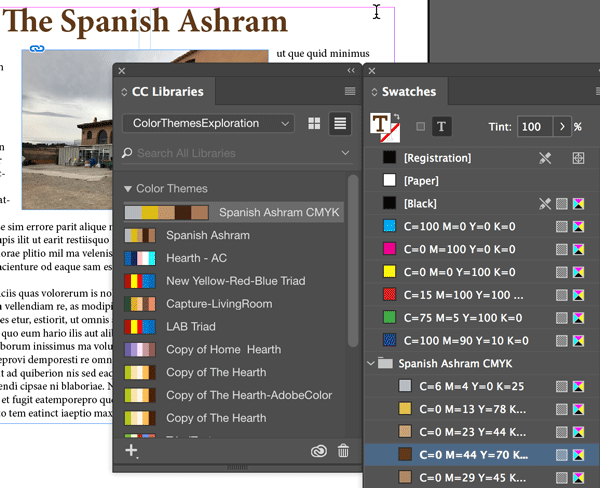
Figure 11. Colors in this example were moved from the Adobe Capture app to the Adobe Color website and then into InDesign, where they can be applied with the CC Libraries and Swatches panels.
Because the color theme was saved in RGB mode, I reopened it in the Adobe Color website’s Create tab and saved in CMYK mode. In InDesign, in the CC Library panel, I right-clicked on the Spanish Ashram CMYK color theme to add it to the Swatches panel. From there, colors from the theme can be applied to elements of a story about the ashram. Alternatively, I could have captured the colors by clicking with InDesign’s Color Theme tool.
I could also share my colors and color themes with colleagues by sharing them in CC libraries.
Sometimes we want to keep our hidden treasures to ourselves—like an excellent fishing spot or the last of the holiday treats—but some hidden treasures should be shared; the more people know and use them, the more we all benefit. Uncovering InDesign’s hidden color tools will help you be more effective with your use of color throughout your workflow.
Commenting is easier and faster when you're logged in!

Recommended for you

InStep: Borrowed Design Elements
A systematic approach for turning inspiration into items you can use in your lay...

Live Paint in Illustrator
Illustrator’s Live Paint feature transforms the work of coloring graphics into p...
Design How-To: Solve Color Dilemmas
Choosing colors doesn’t have to be a guessing game. In this article from B...