
InDesign 102
David Blatner is your guide for what to to tackle after you’ve mastered the basics of InDesign.


This article appears in Issue 102 of InDesign Magazine.
Step by step. That’s how you learn InDesign: by taking one step at a time. In my last article, we took our first steps on the path. We explored making a new document, creating text and graphic frames and filling them, and touched on how to export or print your layout.
Now it’s time to build on that knowledge and start using InDesign for real projects. To do that, you need to master a few essential tasks, such as understanding master pages, styles, and how to make text wrap around other objects on the page.
These aren’t linear… that is, you don’t have to learn any one of these topics before the other. Instead, each one is just another tool in your ever-expanding toolbox. As you learn each tool—what it does, why you want to use it, and how best to put it into practice—you’ll become a stronger, better InDesign user.
Master Pages and Page Numbering
When you create a page in InDesign, it’s usually based on a “master page” (similar to a “slide master” in PowerPoint). Whatever you put on the master page automatically shows up on all pages that use that master page, and if you change anything on the master page, it also changes on the document page. So master pages are a great place to put any kind of text or graphic that you want on most or all of your document pages. For example: page numbers.
To edit your first master page, open the Pages panel (Window > Pages) and double-click its name (by default, “A-Master”) at the top of the panel. Note that while all documents start out with a single master page, you can create more in the Pages panel menu. But we’re getting
ahead of ourselves!
After you double-click a master page, InDesign displays it in the document window for you to edit. To add an automatic page number, create a text frame with the Type tool, and—while the text cursor is flashing in the frame—choose Type > Insert Special Character > Markers > Current Page Number. It looks like you’ve typed the letter “A” but that’s just the name of this master page (Figure 1).

Figure 1: When you place an automatic number on a master page, it shows the name of the master page. But on the document page, it looks correct.
You can use the Control panel or Character panel to change this special character’s font, size, and so on. When you return to your document page (by double-clicking on it in the Pages panel), you’ll see that the “A” transforms into the proper page number.
One important note about master pages: in a document set up with facing pages (where there’s a left- and a right-hand page), the master page will also be set up as “facing.” Anything on the left-hand master page will show up only on left-hand document pages. So in this kind of document, after you set up your page number on one side of the master page, you can duplicate it to the other side (using copy-and-paste, or Option/Alt-drag the frame with the Selection tool).
Also, master page items are not ordinarily selectable on your document page. But if you need to select one (for example, to delete, move, or change it), you can override the master page item by Command-Shift-clicking (Mac) or Ctrl-Shift-clicking (Windows) on it.
Paragraph and Character Styles
Above this paragraph is a heading, and that heading has a particular font and size and color, right? It would be very tedious to have to apply each of those formatting characteristics for each and every paragraph, so instead we make use of a feature called “styles.” The two most important text styles are paragraph styles (which apply to an entire paragraph of text) and character styles (which you can apply to any selection of text, even a single character).
So a style can assign a lot of formatting all at one time. Even better, if you later change the style definition, it will change the formatting for all the paragraphs tagged with that style, throughout the entire document, which is a huge time savings.
The easiest way to create a paragraph style is to format one bit of text the way you want it to appear, place the type cursor inside that text, and then choose New Paragraph Style from the Paragraph Styles panel menu. (If you don’t see the Paragraph Styles panel, you can find it in Window > Styles.) This opens the New Paragraph Style dialog box, where you can give the style a name.
You may also want to disable the Add to CC Library checkbox in this dialog box before clicking OK; otherwise the CC Library panel opens and your style is added there. (CC Libraries are a good way to share special styles and other assets among your documents, and even from one app to another, but you probably don’t need to add every style you make to the library, so I leave this checkbox off most of the time.)
Then, after you click OK, you can apply the paragraph style by placing the type cursor anywhere in a paragraph, and then clicking once on the style name in the panel. The process for making a character style is the same, but of course you use the Character Styles panel instead.
Important: If you want to change the formatting of an entire paragraph (or most of it), use a paragraph style. Reserve character styles for formatting just a small chunk of text, like a word or sentence.
Later, when you want to edit your style definition, right-click on the style in the Styles panel, and choose Edit. (You can also double-click the style to edit it, but that runs the risk of accidentally applying that style to any currently selected text, or changing the default style for your document, so right-clicking is safer.)
Color Swatches
InDesign’s Swatches panel contains a number of basic colors you can apply to the fill or stroke of any object or text: red, green, blue, cyan, magenta, yellow, black, and Paper (Paper is the equivalent of white). You’ll also see something called Registration, which looks like black but should only be used for making things like print registration marks (which you will probably never need to do). Never use this as a replacement for black!
So while those colors are nice, you will quickly want to use others. To do that, choose New Color Swatch from the Swatches panel menu (Figure 2).
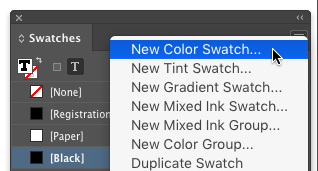
Figure 2: Choose New Color Swatch to define a new color that you can apply as a fill or stroke in your document.
Note that if you’ve selected any object or text on your page before creating the new color, InDesign will automatically apply the color to that object or text… so it’s probably a good idea to deselect everything before making new colors.
Defining colors can be complicated (I authored a whole video title on it at Lynda.com/LinkedIn Learning called InDesign: Color). But here are four basic rules when navigating the New Color Swatch dialog box:
Choose Process in the Color Type pop-up menu unless your document is specifically going to be printed by a commercial printer with custom spot inks. Spot colors can be tricky to manage, so you want to avoid them unless you specifically need to use them.
When you’re designing for print, pick your CMYK colors from an already-printed swatch book. The colors you see on screen may vary significantly from what you get in print, so don’t rely on your screen too much. The swatch book (such as books from Trumatch or Pantone) can tell you what CMYK values to type in when defining the color.
In general, you want to choose CMYK from the Color Mode pop-up menu when creating colors for print, and RGB for documents designed for displaying on screen. But there are always exceptions.
Turn off the Add to CC Library checkbox unless you really want to add the color to your CC Library panel. (It’s really annoying that this is enabled by default.)
The Add button adds the color to the Swatches panel, and leaves the dialog box open to create another one. The OK button adds the color and closes the dialog box.
Once you create a color swatch, it appears in the Swatches panel, ready for you to use anywhere in your document. Bonus tips: You can drag color swatches up and down in the Swatches panel to reorder them, and if you add or reorder color swatches while no documents are open, the new configuration applies to all new documents you create from now on.
Named vs. Unnamed Colors
Why use the Swatches panel to create and apply colors instead of the Color panel or some other technique? Because the Swatches panel creates “named” colors—they’re like styles: once you make one, you can easily apply it elsewhere, and even better, if you edit the swatch by right-clicking it and choosing Edit, it will update everywhere in the document you’ve used it. If you use the Color panel, you get an unnamed color, which is technically okay to use, but is usually not as efficient in the long run.
Layering Objects
Every object you create or place on your page is stacked up—even when objects are not overlapping, InDesign keeps track of each one as being above or below the others. When objects do overlap, you often need to track or adjust this stacking order. One way to do this is by selecting one or more objects and choosing one of the options in the Object > Arrange menu. For example, choosing Bring to Front will bring the selected object to the top (Figure 3).

Figure 3: You can change the stacking order of objects with the Object > Arrange submenu, or with the Layers panel.
A second way to control stacking is the Layers panel (Window > Layers). You can create a new layer quickly by clicking the New Layer button at the bottom of the panel (or Option/Alt-click if you want to name it or change its options). If you click on a layer in the panel before creating or placing a graphic or text, InDesign places the new object on that layer. Note that each layer has its own color label, and objects on that layer are always highlighted in that color.
When you select one or more objects, you’ll see a little highlighted square on the right side of the Layers panel (the square is the same color as the layer). You can move a selected object from one layer to another by dragging that little square up or down. (Note that sometimes you need to drag it, and pause briefly over the destination layer before letting go of the mouse button, or else InDesign just beeps at you.)
Tip: Layers work even on master pages. For example, if you always want your automatic page numbers to sit above anything on your document pages, create a new layer above any others, and move the master page text frames to it.
One last layers tip: You can expand each layer in the Layers panel by clicking the little arrow next to its name. This shows you each of the objects on that layer—drag an object up or down in the list to adjust its stacking order on the layer.
Text Wrap
When the text in a text frame overlaps another object, such as an image or another frame, you’ll often want the text to run or wrap around it. This is very easy in InDesign, using the Text Wrap panel (Window > Text Wrap). First, select the object you want to wrap text around (e.g., a photograph), and then choose one of the four text wrap buttons at the top of the panel: Wrap Around Bounding Box, Wrap Around Object, Jump Object, or Jump To Next Column (Figure 4).

Figure 4: You can use the Text Wrap panel (Window > Text Wrap) to force text to run around another object, like a picture.
If the object is rectangular, then the first two of these options are identical.
Note that it doesn’t matter if the text frame is above or below the text wrap object (in terms of stacking order). The Text Wrap panel also lets you control how the text will wrap, including how far it will offset from the object, and which side it should stay on. If you’re wrapping around an image that has a white background, you should set the wrap to Wrap Around Object, and then choose Detect Edges from the Contour Options pop-up menu.
I should quickly mention one other text wrap trick: sometimes you’ll put a text frame—such as a figure caption—near or over an image, and text wrap will affect the text improperly (it may even force all the text out of the frame, causing it to become overset). You can avoid this by selecting the text frame, choosing Object > Text Frame Options, and turning on the Ignore Text Wrap checkbox.
Text Columns
Text frames—literally frames in which a text story flows—are usually plain rectangles, but InDesign gives you a lot of options for spicing up those rectangles. For example, you can adjust the number of columns per frame, change how far the text is inset from the edge of the frame, control where the text should sit inside the frame, and more. You can do all this by choosing Object > Text Frame Options (or press Command/Ctrl+B, or Option/Alt-double-click on the frame with the Selection tool).
The most common change inside the Text Frame Options dialog box is adjusting the number of columns (Figure 5).
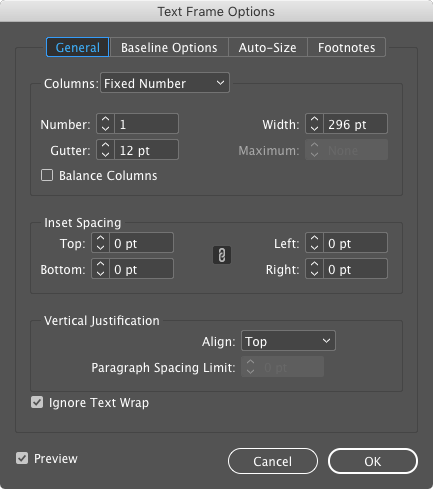
Figure 5: The Text Frame Options dialog box lets you add columns, change the inset (distance from the frame edge), and more.
The Gutter field controls the amount of space between each column. You can also type in a column width if your design calls for a specific size. When you enable Balance Columns in this dialog box, InDesign will try to match the number of lines in each text column, so that you don’t have one column at the end with just a little text in it.
Transparency Effects
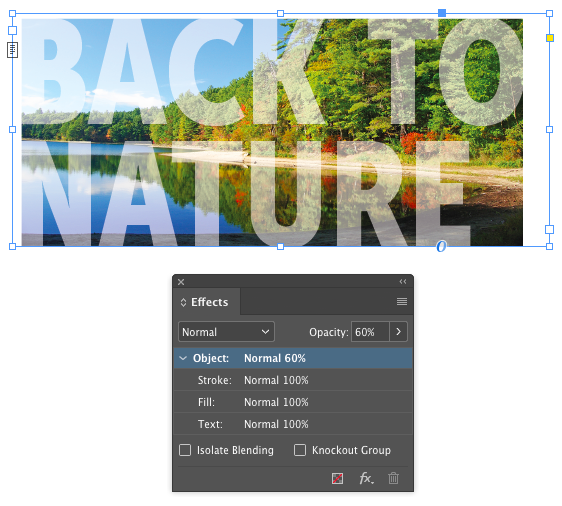
Big, bold, white text over an image looks nice, but if you make the white partially transparent—so you can see some of the image coming through the text—well, that looks awesome (Figure 6)!
InDesign offers a wide range of transparency effects, from changing an object’s opacity to giving it a drop shadow to beveling its edges to make it appear raised. You can apply many of these features in the Control panel, but it’s often easier to use the Effects panel (Window > Effects).
I strongly encourage you to just spend some time playing with the features in this panel. For example, put a red frame over a yellow one, and then try setting various combinations of Opacity and Blend Mode. (The Blend Mode is the pop-up menu in the upper-left corner of the panel, and contains mode options such as Multiply and Screen.)
A few important notes about applying transparency in InDesign:
- You can apply transparency effects only to whole objects. That means you cannot change the transparency of a single word inside a frame.
- You can apply different transparency effects to the fill, stroke, and contents of a frame. To do that, click Fill, Stroke, or Text inside the Effects panel before applying the effect. For example, if you have black text inside a Paper-filled frame, you could click Fill (in the panel) and then change the opacity to 80%. That way, the text would stay 100% solid black but the white background would be partially transparent, creating a “ghosting” effect.
- You can choose and apply effects such as Drop Shadow or Outer Glow from the “fx” menu at the bottom of the Effects panel. Once you have applied an effect, you can edit it later by double-clicking the “fx” icon that appears in the right-hand column of the panel.
Next Steps
We’ve still just barely scratched the surface of what you can accomplish in Adobe InDesign, but at least now you have some powerful tools to help you build excellent pages!
In an upcoming article, I’ll go deeper into InDesign’s features, including guides, Story Editor, special characters, and putting text on a path. But if you get hungry to learn more before then, I encourage you to check out my title InDesign Essential Training at Lynda.com/LinkedIn Learning, and of course look through the thousands of tips and tutorials on InDesignSecrets.
Happy InDesign-ing!
Commenting is easier and faster when you're logged in!

Recommended for you


The Digital Art Studio: Patching Text without the Fonts
How do you fix a typo when you don’t have the correct font? After my beloved stu...
Tip of the Week: Placing an Image in a Compound Frame
This tip was sent to Tip of the Week email subscribers on October 1, 2015. Sign...