

Renaming catalog images later
Although it is always best to rename files at the import stage, files can also be renamed any time after you have imported them into Lightroom. You can make a selection of images in the Library module using the Grid or Filmstrip and choose Library Ô Rename Photos (alternatively, you can use the F2 keyboard shortcut). This opens the Rename Photos dialog shown in Figure 20, where you can use the File Naming menu to select a custom file renaming template like the ones just discussed, or choose Edit… from the File Naming menu to open the Filename Template Editor (Figure 18). My advice is to always rename early before you start sharing your work with clients. If you rename your files at a later stage this can only lead to confusion.  Figure 20: In the Rename Photos dialog shown here, I selected a pre-created custom file renaming scheme from the File Naming menu, entered custom text that would be utilized during the renaming, and set the Start Number to “1.”
Apply During Import panel
The Apply During Import panel (Figure 21) lets you choose the Develop settings and metadata information you wish to apply to photos as they are imported into Lightroom. For example, the Develop Settings menu lets you access all of the Develop settings you currently have saved in the Develop module Presets list. This is?extremely useful because it means you can instruct Lightroom to apply a favorite Develop preset to photos as they are imported. In Figure 21 you can see that I selected one of the default Lightroom settings: General – Auto Tone. I generally find this develop setting useful whenever I want to auto-adjust photos as they are imported into Lightroom. 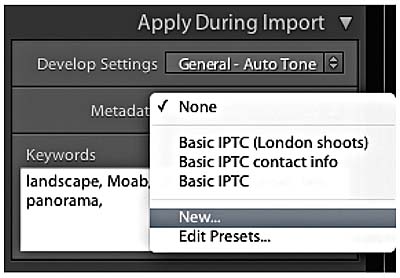 Figure 21: The Apply During Import panel. Sensible folder naming and file naming can certainly make it easier to retrieve images later, but as your library grows you will begin to appreciate the benefit of using EXIF metadata and other types of metadata to help track down your files, especially when searching a large catalog collection of photographs. The Library module offers a number of ways to search for a specific image or groups of images. For example, the Library Filter bar can help you search for files using criteria such as by “Date,” “Camera,” or “File Type.” This method of searching requires no prior input from the user, of course, but in the Apply During Import panel you can add custom metadata and keywords to your photos as they are imported and thereby ensure that such informational data is present in your files right from the start. Next to the Metadata item is a pop-list. This lets you access any metadata templates that you have pre-saved (see page for more about working with metadata templates). Or, you can click New… to open the Edit Metadata Preset menu shown in Figure 2. You can use this dialog to create brand-new metadata templates. Admittedly, the dialog shown here is rather ti
ny, so check out the above page reference if you would like to see the preset dialog contents more clearly. Metadata presets are particularly useful where you wish to add common information that conforms to the Telecommunications Council (IPTC) standards. This can include information such as your contact details and image copyright status. . Also, once you have an established keyword list, as you begin to type in a keyword, Lightroom can auto-complete your entries by referring to the current Keyword List panel contents. Basically, adding metadata at the time of import can greatly assist you later when searching for specific images, and the metadata information you add will also be applied to any derivative files that are created from the master photos.</p>
<p><h2>Destination panel</h2></p>
<p>The Destination panel is only shown when you are doing an import by Copy as DNG, Copy, or Move, because once you have selected a source folder you'll need to decide where the imported photos should go. Basically, the Destination panel allows you to select a destination folder for the imported photos. The folder hierarchy display works exactly like the Source Panel. Single-click the arrows to the left of a folder to reveal the subfolder hierarchy, double-click on the folder name to show a compact hierarchy view, and double-click on a parent folder to reveal the folder list that the parent folder belongs to and so on.</p>
<p>Basically, imported photos can be organized in one of three ways. The )
 Figure 23: The Destination panel. Notice how the volume headers in the Destination panel reveal how much disk space remains out of the total hard drive volume capacity.
  Figure 24: The Destination panel showing the segment folder options.
  Figure 25: This shows the date calculation in progress where a large number of files have been imported.
Planning where to store your imported photos
The Lightroom files can be imported to any drive destination you like. The only restriction you have is that the catalog file cannot be stored on a network attached storage (NAS) device. This is because the Lightroom catalog can’t be shared with other users across a network. How you plan to organize your photos and the folders they are stored in is a question I’ll be addressing in more detail in the following chapter, where we will look at working with the Folders panel in the Library module in more detail. For now, let’s just consider the various options that can be implemented here and ways to make the import workflow as smooth as possible. There are four main approaches I see photographers using. By far the most popular is the one of total chaos, where photographers are haphazard and inconsistent in the way they segment their photos into system folders. Obviously this is something you want to avoid, so you should at least try to segment your imported files by putting them into named folders that have some kind of systematic structure. If you mainly shoot on assignment you could import your photos to folders that use the client name plus date. I actually find this works pretty well for all my studio shoots. So, on a shoot for a client called “Clipso” that was shot in April 2011, I created a new folder called Clipso_190411 and used this to contain all the photos imported from that day’s shoot. Alternatively, one could use a location name hierarchy, where Rome photos go inside an Italy folder inside a Europe folder. This can work but only as long as you are consistent with your folder hierarchy. Note that when choosing to import your files “Into one folder,” you can use the directory to locate the folder to download to and check the “Into Subfolder” option to specify a subfolder (see Figure 26). A third method is to segment by date (as shown in Figure 24). This system can work well whether you shoot mainly on assignment or for pleasure. Plus, if you are using keyword metadata to extensively catalog all your photos it really should not matter which folder your photos live in. This is because you can search for everything by metadata. It can be argued that organizing your photo imports by date offers a much more consistent approach to folder organization and is specially suited to those users who systematically apply keywords to all their photos. 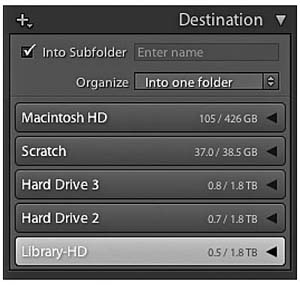 Figure 26: In Lightroom 4, whenever the “Into Subfolder” option is checked in the Destination panel, the placeholder text says “Enter name,” reminding you that you must type the name of the subfolder destination. With the above methods you need to take into account the scalability of the system you choose to implement. This is something I’ll also discuss in more detail in the next chapter. So, rather than worrying too much at the import stage about where your imported images should eventually be stored, there is a fourth option, where a series of workflow folders are used to store the incoming files before you decide where best to store them for the long term. There is much to be said for a workflow folder system. Instead of trying to work out at the import stage which folder the photos should go into, or what hierarchy to use, you just import everything into the same import folder. This can be regarded as an initial holding folder to store all new, incoming images before you decide where they should eventually live. For example, when I am on location I download everything to a laptop computer. The laptop is only required to temporarily store the imported images before they are transferred to the main computer archive. It therefore makes sense to use a standard import folder such as the LR Import Folder, shown in the Figure 23 example. It is also pretty easy to create a standard import preset (see page 59) that can be used for every job. This method of importing can help you standardize the import process and has the added advantage that you don’t need to think too much about where to store the images just yet. You just use the same import preset for each and every shoot.
Importing to a selected destination folder
You may often find yourself working with a folder of images and wish to import more photos to this same folder. You could go to the Import dialog and manually locate the relevant folder but there is an easier way. While you have the folder highlighted in the Library module Folders panel right-click (or use the key with an old-style Mac mouse) to access the contextual menu shown in Figure 27 and select “Import into this Folder…” This launches the Import dialog with that folder preselected as the destination folder. 
This article was last modified on July 20, 2021
This article was first published on May 14, 2012
Commenting is easier and faster when you're logged in!

Recommended for you

Intelligently Resize Images with iResizer
Content Aware Scale, which allows you to resize photos disproportionally without...

The One-Hour Ad Deadline
The phone call and the email arrived together. “We’ve reserved a full page ad in...

10 Free Vector Patterns, Volume 3
You may have seen my 20 free vector patterns and the follow-up 20 free line...