
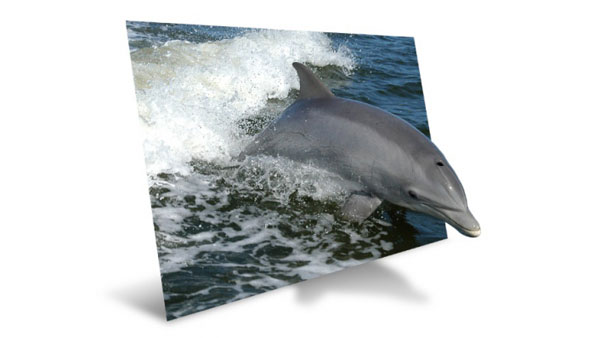
Images where animals or people bust out of their background are very popular, and it’s easy to see why: the results can be very dynamic, adding a tremendous sense of movement. The technique is called Out of Bounds, and here’s how you can create it using any version of Photoshop. It’s not hard, and it is fun to do.
1. Choose your image
First, you need to choose an appropriate image. This one comes from Wikipedia, and was – bizarrely – taken from the NASA website. Perhaps it was an outer space dolphin? Anyway, the point is that you really need a shot of a person or an animal leaping at an angle towards you. If it’s jumping straight up, or entirely in profile, you’re not going to get such an impressive result.

2. Make a frame
The next step is to decide on the framing. The easiest way to do this is to create a new layer, and fill it with white; then reduce the opacity of the layer to 50%, so you can see the background through it, and use Free Transform to distort it into a pleasing shape. You don’t need to get it exactly right, as you can always change the angle later.

3. Make a Clipping Mask
Once you’ve got a shape and a crop that you like, set the opacity of the layer to 100%. Duplicate the background layer, and drag it over the frame layer; use Layer > Create Clipping Mask. If you fill the original background layer with white, then the new version will now only be visible where it overlaps the frame layer beneath.

4. Cut out the dolphin
Hold Option (Mac) or Alt (Windows) and click between the copied background and the frame layer to disable the Clipping Mask. Then make a selection of the front part of the dolphin, and copy it to a new layer. You can use the Quick Selection Tool if you like, but be sure to smooth out the resulting selection with the Refine Edge dialog box. Otherwise, all that water spray will produce a fuzzy outline. Make sure the cutout is at the top of the layer stack.

5. Make the Clipping Mask again
Make the background layer into a Clipping Mask with the frame layer once again, either by Option/Alt clicking between the two layers or by choosing it from the menu as in step 3. At this stage, you might want to revisit the shape of the frame: when it’s vertical, as this is, the whole effect is rather stilted.

6. Adjust the frame shape
You can use Free Transform once again to adjust the shape and position of the frame layer. Because you’ve now got the full dolphin on view, it’s easier to create a pleasing arrangement: the effect here works better when the dolphin appears to come from the center of the frame. This means only a small portion of it is now busting out of the frame—but, as is so often the case, less is more.

7. Add a dolphin shadow
Paint a shadow on a new layer, in black and with a hard-edged brush, beneath all the other layers. It doesn’t need to be that accurate. When it looks right, use Filter > Blur > Gaussian Blur to soften it. I’ve chosen a lighting direction coming from the top right, because that suits this image well.

8. Add a frame shadow
To make the background picture look more convincing, add a new shadow on a separate layer behind the frame. It’s easiest to draw this with the Polygonal Lasso tool (hint: hold Option (Mac) or Alt (Windows) with the regular Lasso to access this temporarily). Draw along the bottom of the frame, so there’s a faint shadow there. Fill with black, then use Gaussian Blur once again to soften it.

9. Group the shadows
Select both shadow layers, and choose Layer > Group Layers. Then reduce the opacity of the whole group. This produces better results than lowering the opacity of the shadows individually, especially when they overlap.

10. Fade the shadows
Make a Layer Mask for the shadow layer (Layer > Mask > Reveal All) and paint on the edges of the shadow with a large, soft-edged brush at low opacity, to make the shadows fade away slightly. This makes them look much more realistic. And now you’re done.

This article was last modified on June 18, 2014
This article was first published on June 18, 2014
Commenting is easier and faster when you're logged in!

Recommended for you

Create a Searchlight in Photoshop
Step 1 Begin with a new document. You can either use an existing photo, or creat...

Understanding Dotted Stroke Styles in InDesign
InDesign’s Stroke Styles, especially the dotted stroke styles, are a mysterious...
Knowing Your Camera: The First Step for Getting Better Results in Photoshop
Understanding the abilities of your camera and Photoshop can help you produce be...