


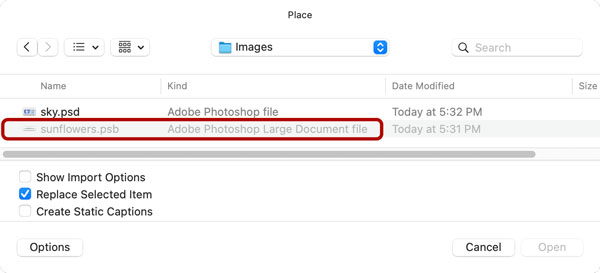
When you’re dealing with clients, you are bound to receive files in many different formats. The most beautifully layered, carefully designed image file may be of no use if the designer or a printer cannot place it into a layout. If you try to place a PSB file in InDesign you’ll see that it appears grayed out when you try to use the File > Place command, so you might think you’re out of luck.
Fortunately, there is a simple solution—two actually.
But first, let’s make sure we all understand what PSB files are and how they’re different from PSDs.
What Are PSB Files?
As most folks know, PSD (Photoshop Document) is the native image file format for Adobe’s Photoshop application. I’m a real advocate of saving in the native file formats of my applications whenever it’s practical to do so. When it comes to PSDs I like to say the acronym stands for “Prevents Significant Destruction”, since the file format preserves all editing capabilities, including layers, masks, adjustments, effects, paths, type—you name it—that are lost when you save to other formats like JPG.
PSB, on the other hand, basically stands for Photoshop BIG!
The main difference between a PSD and PSB file just comes down to file capacity. A PSD file can only save up to 2 GB of data before it’s unable to hold any more information. On the other hand, a PSB file can save files much larger than 2 GB while still retaining all the same important file and layer information you need.
Some facts about PSB files:
- There’s no practical limit to their file size. Technically there is an upper limit but it dwarfs any hard drive you have, so you need not worry about it. (By comparison, PSDs max out at 2 GB and TIFFs can’t be larger than 4GB.)
- The maximum image size for the PSB format is 300,000 pixels (horizontal and/or vertical).

- The PSB format supports Photoshop-specific features such as Adjustment Layers, vector shapes, channels, and so on.
- There is limited support in Lightroom Classic for PSB. See this Adobe support doc for details.
So, now you know a few things about this format, how do we use it in print projects? If you are working on large format projects, sometimes building out big Photoshop files is necessary. You are most likely going to have to place that PSB file into a layout application like InDesign to “tile” it before sending the data to the RIP (Raster Image Processor) for output.
I’ve seen some folks waste countless hours cropping and saving PSBs into smaller pieces. Please don’t do this!
Instead, what I recommend is:
- Create your document to scaled proportion (For example, 1/10 of the final size).
- Add a graphic frame and set the Frame Fitting Options to Fit Image Proportionally.
- Then do one of the following:
- In your operating system, navigate to the PSB file and drag it into the layout.
- In Photoshop, drag from the icon in the title bar of the window and drop it into the InDesign document.

Note: If you have the default Photoshop preference for Open Documents as Tabs turned on, you’ll need to drag from the tab to undock the window and access the icon (or choose Window > Arrange > Float in Window).
Both of those techniques work with all drag-and-droppable file formats, not just PSBs.
Finally: When working with PSBs, remember to consider the scale that you built your document and check the effective resolution of placed images before you output to PDF! For more information on working with large format projects, check out Alan Gilbertson’s article on Big Design in InDesign Magazine Issue #121.
This article was last modified on July 9, 2021
This article was first published on July 9, 2021
Commenting is easier and faster when you're logged in!

Recommended for you
Free Webinar: Photoshop Power Hour
Learn the latest Photoshop techniques and pro-level tips to help you work faster...

Photoshop and Illustrator: June 2020 updates
The June 2020 releases of Adobe Photoshop and Illustrator bring some small but s...

How to Make Amazing Halftone Effects with Photoshop
Use a Photoshop method to explore and control creative halftone effects for prin...