
How to Use Lightroom Mobile for Temporary Travel

An attendee of one of my workshops wrote recently with a query. She was about to embark on a photo trip and needed to pack light, so she’d decided to take just an iPad loaded with Adobe Lightroom CC for iOS. She uses Lightroom Classic on her Mac and had no interest in syncing her entire Lightroom library the way Lightroom CC for the desktop does. Could she use the iPad as a temporary Lightroom studio while traveling, and have her trip photos show up effortlessly in Lightroom Classic?
Absolutely.
Lightroom Setup
First, a quick refresher on the current state of Lightroom to make sure we’re all on the same page. Lightroom CC for the desktop (Mac or Windows) is the newer, cloud-focused version of Lightroom; everything you import is automatically synced to Creative Cloud and synced with other computers and devices running Lightroom with the same Adobe ID. My friend doesn’t use this version.
Lightroom Classic CC is the desktop-focused (Mac or Windows) version of Lightroom that’s been around for more than a decade. It has many more features than Lightroom CC, but is much more limited when it comes to syncing with Creative Cloud and devices.
Lightroom CC for mobile (iOS or Android), sometimes referred to by Adobe as “Lightroom Mobile,” is the version for tablets and phones that mirrors most of the features in Lightroom CC for desktop. It automatically syncs its content through Creative Cloud. Thanks to some clever behind-the-scenes file management, it’s possible to access your entire photo library in the app, regardless of its size. I’m going to use an iPad as the example in this article, but it applies to the Android version, too.
Now that we have the players out of the way, let’s look at the stage. My friend wants to start with a blank slate on her iPad, import photos while she’s on her trip, edit and organize them as needed, and then have them appear—with edits intact—in Lightroom Classic when she returns. And then she wants to be able to wipe the iPad clean for the next time she ventures out. Here’s how to do it.
The first step is to make sure you’re signed into Creative Cloud in the Lightroom CC for mobile app and Lightroom Classic. Next, in Classic, click the Identity Plate (typically, your name) at the top left corner and click the Start button next to Sync with Lightroom Mobile.
If you already have photos stored on Creative Cloud—perhaps previously imported into the iPad—they’ll automatically download into Lightroom Classic. (If no photos are in Lightroom Mobile, skip this step.) Once syncing is complete, go ahead and delete the images from the mobile app. Don’t worry, images already synced remain in your Classic library.
- Tap the ellipsis (…) button and choose Select.
- Tap the All Photos checkbox.
- Tap the Delete button. In the dialog that appears, tap Delete.
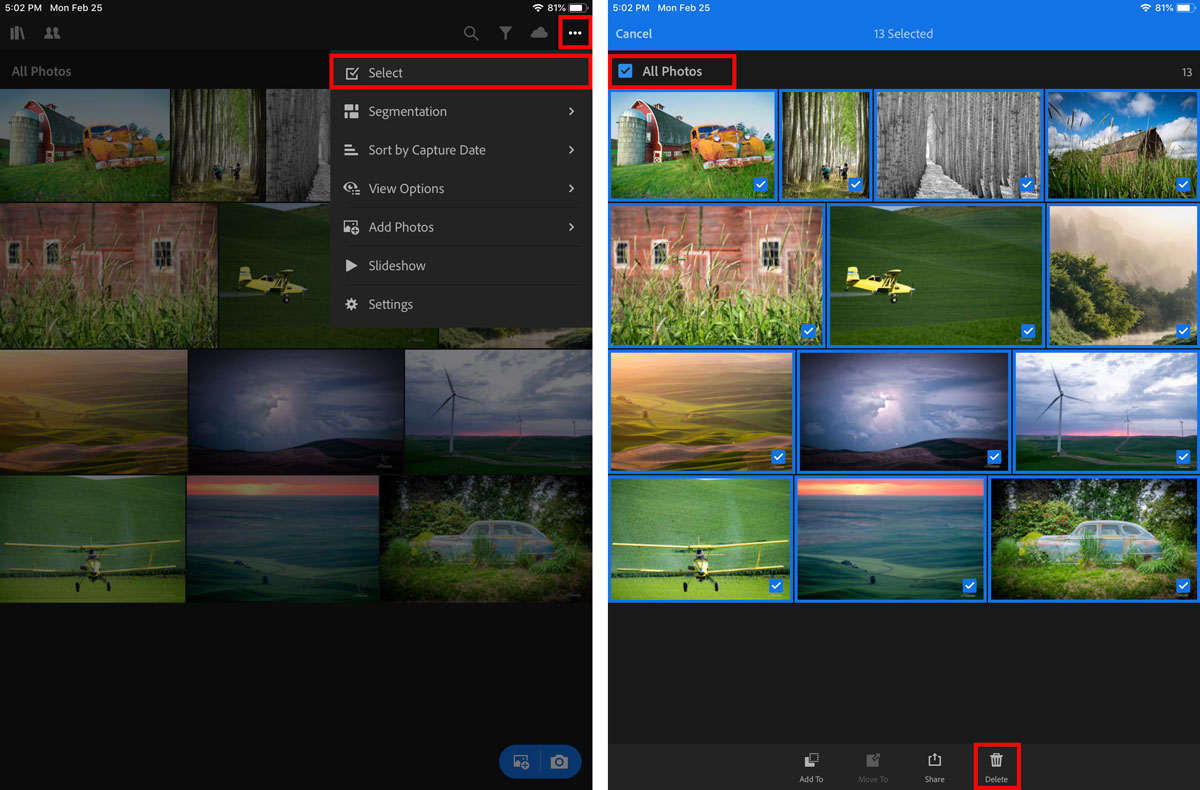
In the Catalog panel, the All Synced Photographs number should be zero.
Unlike the Lightroom CC app on the desktop, which keeps everything in parity bidirectionally, Classic syncs “one-and-a-half-directionally”: anything from the cloud is downloaded and imported at full resolution, but you choose which collections in Classic are uploaded. It’s an old architectural limitation designed to minimize the amount of data that’s transmitted and stored in the cloud, but one we can take advantage of here.
In the Field
With those pieces set up, take the iPad and its empty Lightroom CC app along on your next shoot. After you’ve captured photos using your camera of choice, connect an SD-card or USB adapter for your model and import the images. (If you’re on an Android device, you can import directly into Lightroom.)
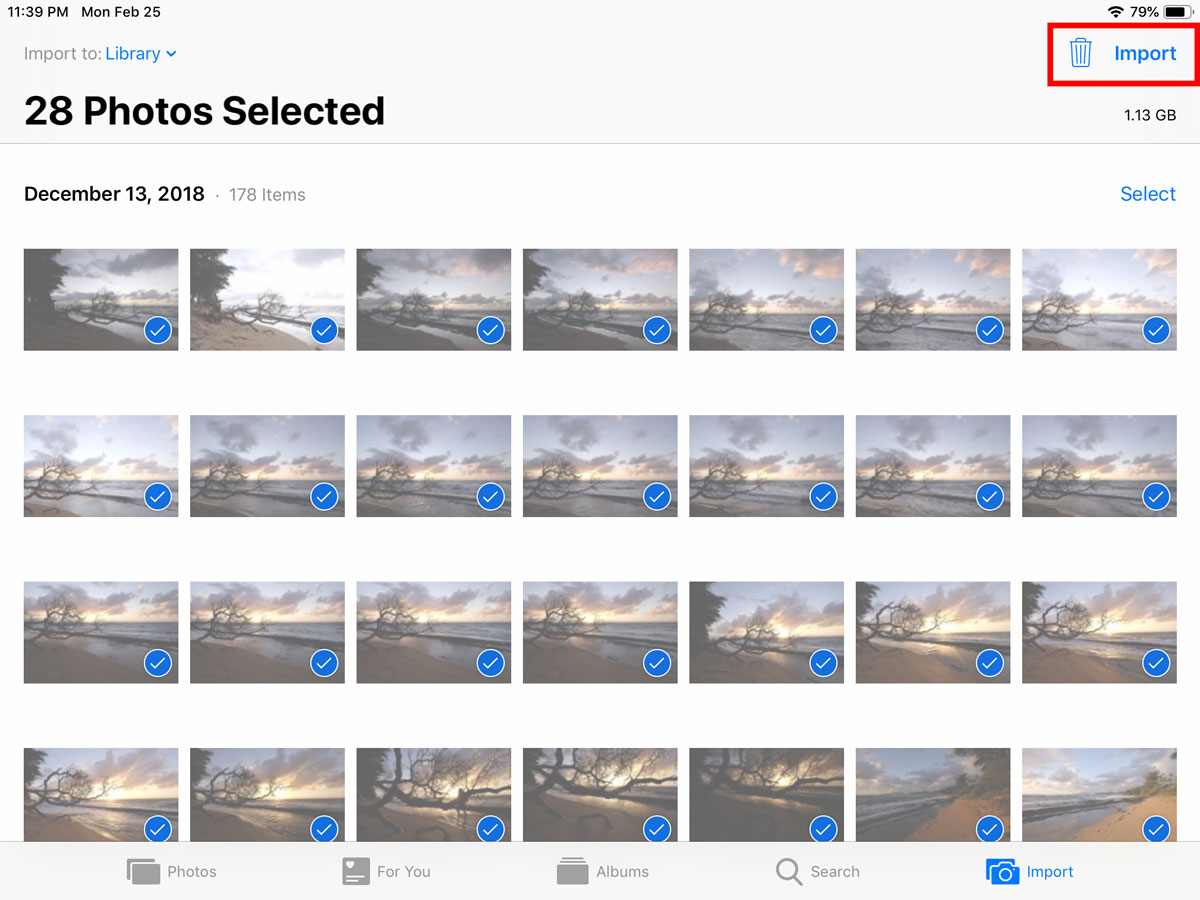
- Open the Photos app if it didn’t open automatically.
- Tap the Import All button on the Import screen. Or, select the photos you want to and tap Import, and then Import Selected.
- Tap the Keep button when prompted to make sure you have the original copies on your memory card.
On the iPad, imported photos are stored in the Camera Roll, a section of the built-in Photos database. You can edit them in Photos if you’d like, but since we’re working within the Lightroom ecosystem, the next step is to bring the images into Lightroom Mobile.
- Open Lightroom Mobile and tap the Add Photos button.
- Swipe to select the photos to import, or tap the ellipsis (…) button and choose Select All.
- Tap the Add [number] Photos button to import the images into Lightroom Mobile.

Depending on how many photos you’ve shot and the capacity of your device, you can go back to the Photos app and delete the images stored there. This step reduces duplicates on the device, and also reduces your bandwidth usage if the Photos app is set to sync with iCloud Photos. To remove the photos, tap the Albums category and choose Imports under the Other Albums list.
Now, you can organize and edit the photos: apply ratings and keywords, mark images as flagged or rejected, adjust tone and color, and use all the tools Lightroom offers. Doing this while on a trip means you can pick away at the tasks instead of facing them all when you return. While that’s happening, copies of the originals, including raw images, are being uploaded to Creative Cloud (if the device is connected to the Internet, of course). Tapping the cloud icon reveals the current sync status.

You may optionally want to add a level of organization at this point by creating a new album for the photos. Doing so also creates the same collection in Classic.
- Tap the ellipsis (…) button and choose Select.
- Select the All Photos checkbox.
- Tap the Add To button.
- Tap the (+) button to make a new album and then tap Add.
Back to Classic
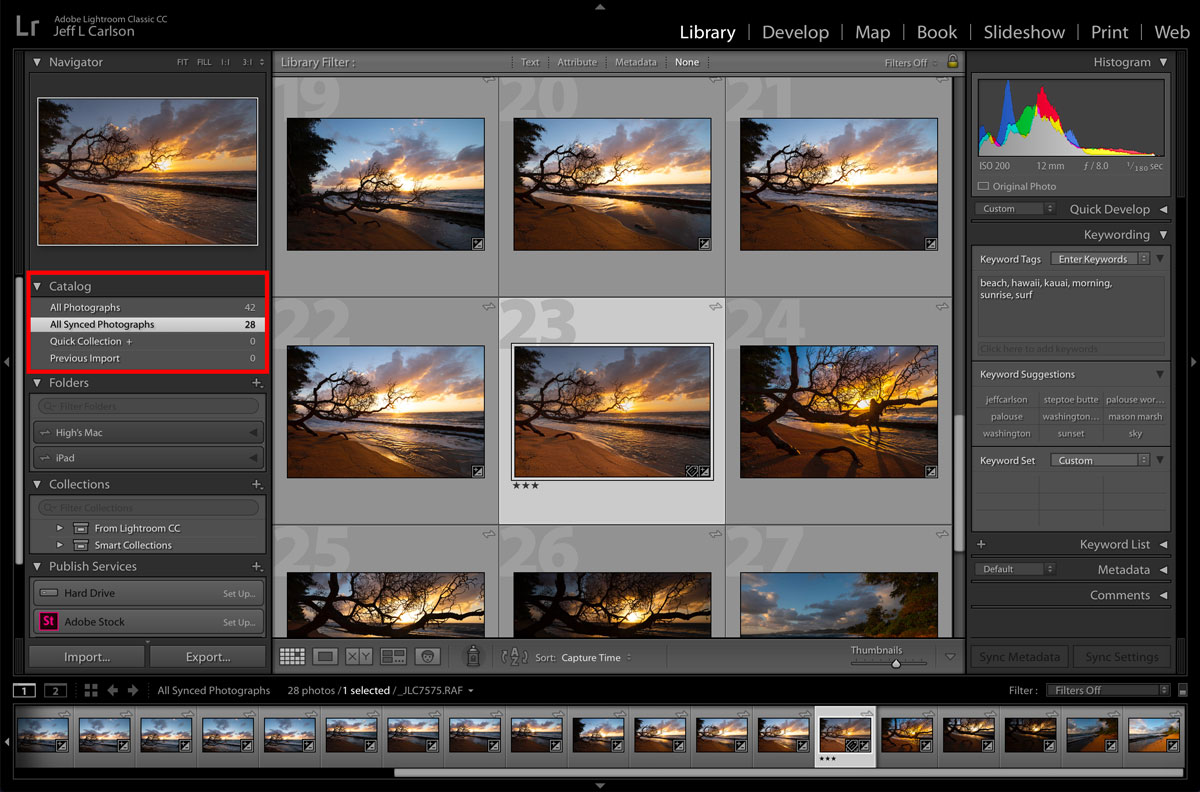
When you’re back home and ready to move your tagged and edited images from Lightroom Mobile to Lightroom Classic, you may be in for a surprise: it could already be done! Since the images sync from the mobile app to Creative Cloud, Classic automatically starts downloading the photos from the cloud, edits and metadata and all. In the Catalog panel, select All Synced Photographs to view the photos.
If the Internet connection was spotty on your trip, or it wasn’t convenient to upload the images, you’ll want to open Lightroom on the mobile device and on your computer to allow all the photos to sync to the cloud and back. Unfortunately, you can’t sync directly Lightroom photos between the device and the computer via a cable or local network, because the cloud acts as the central repository for Lightroom CC synced images.
As long as the images are still syncing, any adjustments you make in Classic appear in Lightroom Mobile and vice-versa. (The exception is keywords, which sync only between Lightroom Mobile and Lightroom CC, not Classic.)
The next time you want to venture out with just a mobile device, delete the images in the Lightroom Mobile app as described earlier to start with a blank slate. Or, to do the same from within Classic, select All Synced Photographs in the Catalog panel, select the images, and choose Photo > Remove from All Synced Photographs. The photos are deleted from Creative Cloud and the mobile device, but remain in the Classic catalog.
One Last Syncing Note
Here’s why I mentioned earlier that Classic syncs “one-and-a-half-directionally.” Let’s say you’ve wiped the mobile device—thereby also deleting images from your Creative Cloud storage—for the next trip, but you decide you still want to edit some images from your couch. In Classic, you can add any of the photos to All Synced Photographs or, if you created an album for your shots, you can turn syncing back on for just that album in the Collections panel.
The catch here is that when syncing photos from Classic to Lightroom Mobile, the images are converted to Smart Previews to save storage and bandwidth; instead of working with originals on the device, you’re editing lower-resolution versions. In most every case, this is no big deal: Smart Previews are DNG files that contain plenty of image data for making adjustments and the edits themselves are synced the same as with originals.
The only snag you’ll run into is if you try to export one of the shots from Lightroom Mobile, because it will be limited to 2048 pixels on the longest edge. That’s fine for Instagram or Facebook, but not ideal for sites such as Flickr or 500px. You won’t run into this issue when importing originals to the mobile device directly, because the originals are either stored in Lightroom Mobile or available from Creative Cloud.
This article was last modified on March 19, 2019
This article was first published on March 19, 2019
Commenting is easier and faster when you're logged in!

Recommended for you

Importing Photos in Adobe Photoshop Lightroom 4: Part 2
Excerpted from The Adobe Photoshop Lightroom 4 Book: The Complete Guide for Phot...

Set Them Free!
The other day I was working in Adobe InDesign, trying to reproduce a 1970s-era w...
Using Perspective Warp in Photoshop CC
The big news in the latest Photoshop CC update is 3D printing—at least, that’s t...