


In my last article, I discussed how to reduce Ink Density in Photoshop. Now, let’s see how to do something similar for Illustrator files.
Right off the bat we face an obstacle, since Illustrator’s Separations Preview panel is very limited and lacks the ink percentages and total ink limit settings that InDesign offers.
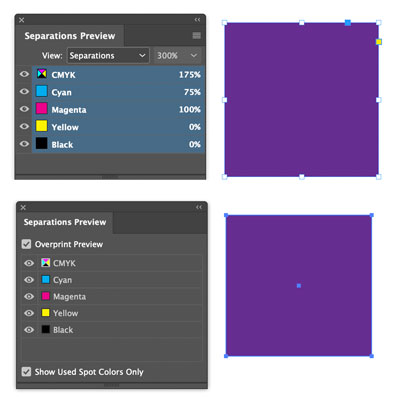
InDesign’s Separations Preview panel offers more useful features than Illustrator’s.
So, how do we measure the Total Ink Coverage (TAC) of a vector Illustrator file?
In my experience, the easiest way is to create a new InDesign document and place the Illustrator file, and use InDesign’s Separations Preview panel.
You can also open the file in Acrobat and use the Output Preview panel. You can see the ink percentages for a chosen simulation profile and highlight any areas that are over a specified TAC.
There are also some third-party tools like Enfocus Pitstop Pro that will reduce TAC with an action list on a final PDF.
Reducing Ink Density in Illustrator
Note: This method of reducing Ink Density has does not have anything to do with color profiles. This is simply a way of reducing overall total ink in a vector file. As always, check with your print service provider for the final print condition specs.
The main steps are:
- Add global swatches for all colors used in the artwork
- Merge similar swatches
- Edit the CMYK values in the swatches to get the total ink under your limit
- Save a copy of your file (so you always have a backup of the original)
- Check the new file in InDesign to confirm it’s under the limit
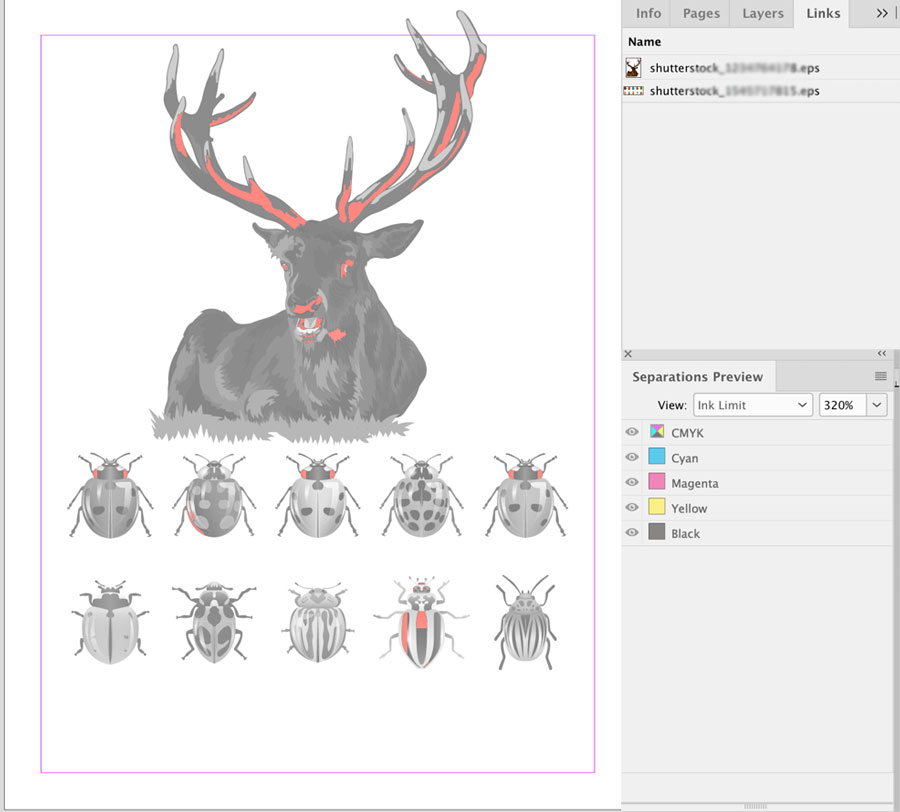
First, place the files into an InDesign document and check if the TAC is too high in the Separations Preview panel.
If it is, open the file in Illustrator and confirm that the file is in CMYK mode.
Clear out any unnecessary swatches by going to the Swatches panel menu and choosing Select All Unused, then click the trash can at the bottom of the panel.
Then, select all artwork (make sure no objects or layers are locked) and in the Swatches panel menu, choose Add Selected Colors. They’ll be added to the panel as global swatches, which is great since you can easily recolor your artwork without having to select each object that uses those swatches.
You can tell a swatch is global by the presence of a white triangle on the thumbnail.

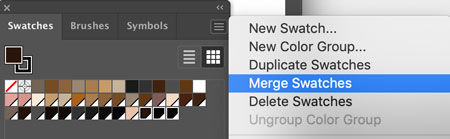
You can save a lot of time and effort by merging similar swatches so you have fewer to edit. Select similar swatches by Shift-clicking them. Then, from the Swatches panel menu choose Merge Swatches.
Next, visually pick out the darkest swatches.
Usually the reason the TAC is too high is that the sum of C,M,Y, and K values of the “black” swatches in the file is over the limit. Blending modes like Multiply and transparency effects can also be a factor.
You can check the value of a swatch by pausing your pointer over it. Double-click a swatch to edit it (or choose Swatch options from the panel menu).
If there are a lot of “black” swatches I creatively make a decision to replace them with a standard rich black. I use 60/40/40/100 or 50/45/45/100.

Before and after standardizing a rich black color swatch
When you’re done editing the swatches, save a copy of the artwork as an AI file and place it in InDesign to check the TAC and confirm that it’s good to go.

Actions to the Rescue!
This process isn’t hard but it can be tedious, especially if you have a large number of files to process. In a recent job I had to deal with 400 EPS files with ink density issues, so I was highly motivated to find an automated solution! To that end, I created an action that you can download here. It will perform all the steps of cleaning up your Swatches panel (getting rid of unused swatches, adding global swatches from your artwork, and sorting by kind).
Use the action, open the Actions panel (Window > Actions). Then, choose Load Actions from the panel menu. Load the Swatch Clean Up action. It will then appear in the panel and you can run it by clicking the Play button.

Enjoy!
This article was last modified on September 7, 2021
This article was first published on September 7, 2021
Commenting is easier and faster when you're logged in!

Recommended for you
InDesign Magazine Issue 147: Illustrator vs. InDesign
Issue 147 has articles on InDesign vs. Illustrator, InCopy vs. Word, emphasizing...

InDesign Basics: Working With Bleeds in InDesign
Bleed is printing that extends beyond the edge of where the paper will be trimme...

CreativePro Week 2026 Preview: 5 Pixel-Perfect Photoshop and Illustrator Sessions
Our Editor in Chief lists his must-see Photoshop and Illustrator sessions at Cre...