

When a Welsh friend wanted to propose to his girlfriend, he thought it would be a good move to present her with an engagement ring in the form of a Welsh dragon. He’d done a rough sketch; it was up to me to turn this sketch into a reality.
Step 1: The initial sketch
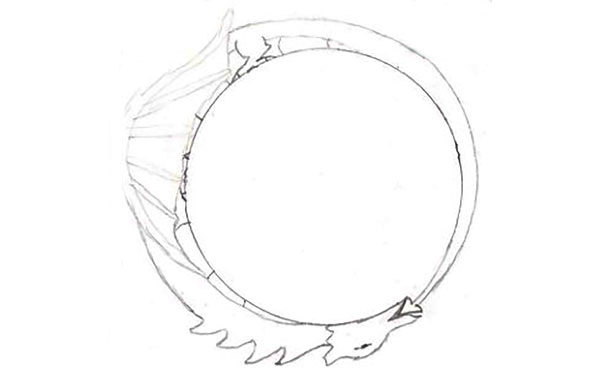
This is the drawing my friend gave me. It’s well worked out, with a perfect circle in the center, and it gave me a good idea of what he wanted.
Step 2: Starting the build
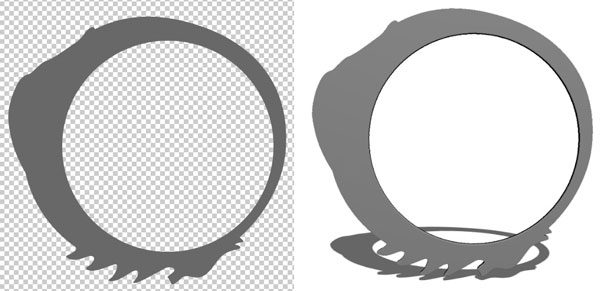
To start the process I made a new layer in Photoshop, and copied the ring design in a solid, flat mid gray. I then chose 3D > New Mesh from Layer > Depth Map to > Two Sided Plane. This turned the ring into a 3D object. I selected the ring and, in the Properties Panel, clicked the button marked Edit Source. By choosing Window > Arrange > Tile All Vertically, I could place the extrusion and the original artwork side by side. (The source artwork is on the left.)
Step 3: Add a bevel
The next step was to add an Inner Bevel to the source artwork, using the Layer Styles dialog. When you make a Depth Map, light areas appear high, dark areas low; so when I saved the source image, the darker areas resulted in a lower profile on the 3D model.

Step 4: Paint the legs and tail
Source images can contain multiple layers. I made a new layer, and painted the legs and tail in a paler gray, so it would be raised from the body; I then added another Inner Bevel, and painted a little darkness around the foot and the claws. Saving the Source image (left) produced the raised legs and tail in the 3D model (right).

Step 5: Paint the features
On another new layer in the source image, I painted the wings and the head. Note how a very subtle brighter tone for the ribs, painted on a separate layer, produced a dramatic effect in the 3D model: the key here is to use subtle shades to create the desired result. Again, saving the image updates the changes to the 3D model.

Step 6: Add some depth
I used the Burn tool to darken the area beneath the ribs, to make them stand out more, and painted a brighter middle with the Dodge tool to make the body appear more rounded.

Step 7: The scales texture
Painting the scales texture was simply a matter of creating a new layer in the Source image, and painting small irregular dots with a soft-edged brush. You can see how this produced a convincing dragon effect.

Step 8: The finished 3D model
Here’s the finished 3D model in Photoshop, rotated to show a different viewpoint. Once my friend was happy with it, I used Photoshop’s 3D printing tools to create a printable file that could then be sent to the 3D print bureau Shapeways for printing.

Step 9: The printed ring
Here’s the finished ring, printed in solid 18 carat gold. My friend was delighted; his girlfriend was overjoyed. She said yes!

This article was last modified on July 9, 2018
This article was first published on July 9, 2018
Commenting is easier and faster when you're logged in!

Recommended for you

Creating a Color Burst Montage in Photoshop
Try this colorful collage idea the next time you want to convey imagination, vib...
New Features in Photoshop 2025
New features in Photoshop 2025 including powerful new ways to select, mask, and...
What’s New in Photoshop: April 2026
New features for removing unwanted people and objects, rotating objects, and ren...