


Here’s how you can use artboards to make social media graphics perfectly sized for Instagram, Facebook, Twitter, and Pinterest in one Photoshop file.
Step 1: Find the Preferred Sizes for Each Social Media Outlet
You can find the dimensions on the Sprout Social Always-Up-To-Date Social Media Image Sizes Guide. There is a link in the article to a Google Spreadsheet where you can look up ideal graphic dimensions and file weights. Each social media outlet has its own sheet, you can choose them using the tabs at the bottom of the screen.
Step 2: Make Photoshop Artboards
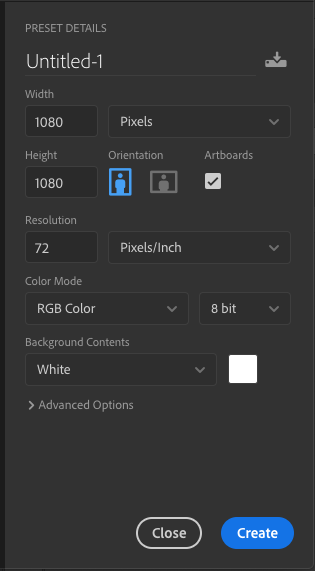
Create a new RGB, 72dpi file. The dimensions should match the largest file size you plan to make. In this case, I used the Instagram post size, 1080 px x 1080 px. Select the Artboards checkbox and click the Create button.
Zoom out by choosing the Zoom Tool (magnifying glass), holding the Alt key for PC or the Option key for Mac until you see minus sign (-) in the magnifying glass cursor. Click with the zoom tool to make the view smaller and smaller until you can see the whole document and plenty of pasteboard around it.
With the Artboard tool, opt+click (Mac) or right+click (PC) on the move tool (the one with four arrows) in the toolbox.

Click and drag to create a new artboard. Notice that the width and height dimensions appear hovering near the leading edge of the rectangle you’re drawing. It’s OK if you don’t size the artboard perfectly while drawing it. You can adjust the size of the artboard in the Contextual Menu (the menu above your document that changes depending on which tool you are using).
Click on your new artboard to make it active. Plus signs in a circle will appear around the active artboard.

Type the dimensions for the new artboard into the Contextual Menu. My next artboard is for the Pinterest Pin version, so I type in 720 px in the box for the Width and 1080 px in the box for the Height.
Next, I make the artboard for the Facebook Timeline version the same way. Click+drag a new artboard and set the size to a Width of 1200 px and a Height of 630 px.
You can follow the same steps to make as many artboards as you need. I made the fourth one for the Twitter In-stream version and set the size to a Width of 1024 px and a Height of 512 px
I named the artboards for the social media and included the dimensions in the name. I plan to re-use this Photoshop document to make graphics for other projects.

Design Your Graphics
Make Your Design on the Largest Artboard
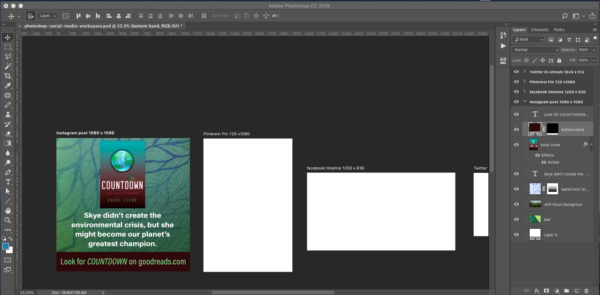
For this project, I had a flattened version of the cover, and couldn’t pick up any of the art. I researched stock art that mimics the blue lines on the book cover and put in a tight close-up of a leaf to bring in the environmental theme. A layer of abstract soft-focus colors mutes the textures so the cover stands out without washing out the color of the background. I put a mask on the blue lines so they would smoothly fade behind the type. The cover has a slight stroke around it for definition. I picked up colors from the cover using the eyedropper tool for the Call to Action band at the bottom of the graphic. Be sure to keep all the elements of your design on separate layers, so you can rearrange them to fit the other artboards.
After you finish the design on the largest artboard, show the design to your client for an OK on the design and text. It’s better to do this before you make the other versions. If the client wants changes and you had already made all versions, you will have to make the same changes on all four versions.
Duplicate the Design Elements to the Next Artboard
Group all the layers in the design to be sure they stay in the right order when duplicating them. (When I was testing, some of the layers were duplicated out of order and onto the wrong artboard — grouping the layers solved this problem.) Select all the layers by shift+clicking on their names in the Layers panel, and choose Layer > Layer Style > Group Layers. Click on your new group to select it and choose Layer > Duplicate Group. In the Duplicate dialog box, specify the current document, and then choose the next artboard. In my project, that’s the Pinterest Pin artboard.
Rearrange the Design Elements For the Version
The design elements won’t fit right since the two artboards are different dimensions. If one of the elements isn’t visible on the artboard, click to select its layer in the Layers panel, choose Layer > Align Layers to Artboard > Vertical Centers to move the design element onto the artboard.
Adjust your design to fit the second artboard’s dimensions. Using the move tool, I selected the book cover layer and chose Layer > Align Layers to Artboard > Horizontal Center. Then I rebroke the lines of text into a narrower column. With those layers in place, I adjusted the background and the bottom band.
Repeat
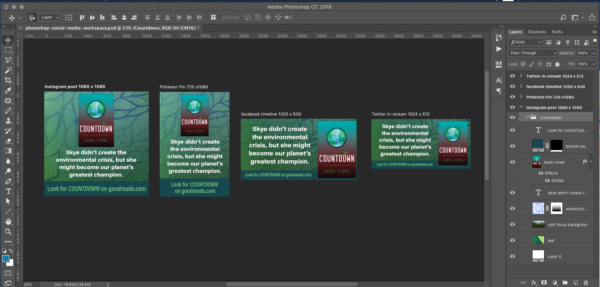
Select the grouped layers in the Instagram artboard again and duplicate them, this time make the destination your third artboard. In my project that’s the Facebook timeline artboard. Adjust the design elements to fit the artboard shape.
Using the same technique duplicate the grouped layers from the fourth artboard and adjust the design elements to fit.
How To Make a Fix on All Artboards
I noticed the red call to action box interfered with the cover image on the horizontal versions, so I decided to change it to blue on all the artboards.
A couple of times during this project, I made a change on the wrong layer since the duplicated layers have the same name on each artboard. To make it easier to work on one artboard at a time, you can hide the layers on the other artboards. In the Layers panel, click on the arrow next to the name of each artboard to toggle show/hide layers.
Output the files
Shift+click to select all the artboards in the Layers panel. This is easiest if the layers are toggled to hidden. Then choose “Export As” from the fly-out menu. You’ll see a dialog box with the artboards listed on the left, a preview in the middle and File Settings on the right.
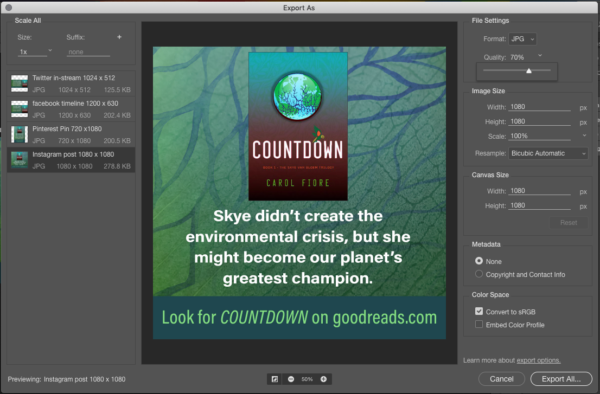
You can click on each artboard name on the left and set the File Setting options for each. You can shift+click to select all the artboards and set the options for the files all at once. If you’re unsure which file format is accepted, you can find that information in the Sprout Social Always-Up-To-Date Social Media Image Sizes Google spreadsheet.
Photoshop will save the files with the names you’ve given the artboards.
Special thanks to Carole Fiore for letting me use her novel, Countdown, as a sample for this project, and to Kevin King for the Sprout Social Always-Up-To-Date Social Media Image Sizes Guide and spreadsheet.
This article was last modified on August 9, 2019
This article was first published on January 14, 2019
Commenting is easier and faster when you're logged in!

Recommended for you

Redesigning a Magazine
An interview with designer Pam Sparks reveals the process used to redesign InDes...

Graphic Design on the Go with Adobe Comp CC
Traveling and working as a graphic designer means having a flexible mobile workf...
InQuestion: Fixing Problems With Text Wrap Applied to Graphics
Q. I’ve got an image grouped with a caption. The text on the page is jumping to...