How to Make a Connected World in Photoshop
Creative techniques for visualizing ideas in Photoshop.

One of the hardest challenges for an illustrator is showing something that’s invisible. How do you portray a world in which everyone’s cellphones are connected? The answer is that you have to make the invisible visible.
The Starting Image
This image of three women engaged in a meeting comes from pxhere.com, and you can download it for free here. As well as showing three phones, the open hand is crying out for a something to hold.

Add a Globe
I modeled this globe in Photoshop, but it’s easy enough to find one online. Place it so it could reasonably be held by the open hand.

Mask the Globe
Make a Layer Mask for the globe layer, and use a hard-edged brush to paint out the fingers that go in front of it.

Make it Glow
The easiest way to make the globe glow is to use the Layer Styles dialog to add an Outer Glow. It’s best to increase the Size rather than the Spread, as that would produce a solid white outline.

Add some Exposure
The glowing globe needs to have an effect on the area immediately around it. The easiest way to do this is to make a new Exposure Adjustment Layer, and increase the Exposure amount for a glowing effect.

Limit the Effect
Each Adjustment Layer comes with a built-in Layer Mask. Select black as the foreground color and use Option-Delete / Alt-Backspace to fill the Mask with black, to hide the effect everywhere. Then switch to white and use a soft-edged brush to paint the effect back in around the globe. Don’t forget the reflection of the glow on the table.

Draw a Line
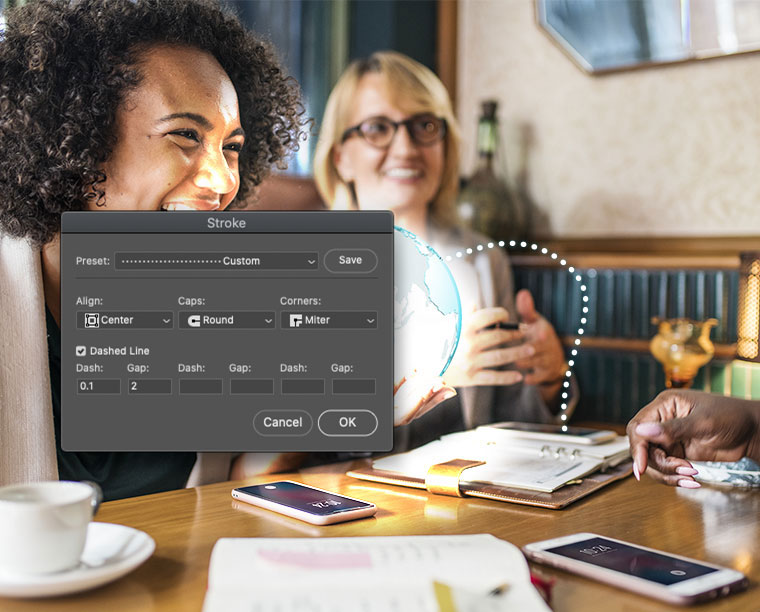
Set the Pen tool to Shapes mode, and draw a path coming from the globe to one of the cellphones. Set the Fill to none, and choose an appropriate width for the Stroke.

Adjust the Stroke
Click the Stroke type in the Options Bar, then click the More Options button at the bottom. Set a dotted stroke, and adjust the Dash and Gap. A minimum Dash is needed here – I used just 0.1, with a Gap size of 2.

Finish the Strokes
Draw two more paths, starting from the globe and ending on the two remaining phones. The best way to apply the glowing style is to make a new Layer Group from all the Shape paths, then use the Layer Style dialog to add an Outer Glow. You’ll need to set the Glow style to Normal rather than the default Screen, or it won’t show up over the bright clothing.

This article was last modified on April 2, 2021
This article was first published on April 2, 2021
Commenting is easier and faster when you're logged in!
Recommended for you

How to Make a Solid Gold Ring With Photoshop
When a Welsh friend wanted to propose to his girlfriend, he thought it would be...

Learning about 3M VAS: A CreativePro Conversation
CreativePro Network CEO David Blatner chats with 3M's Sean Springer about the ne...

How to Apply a Matrix Number Grid Effect to Images in Photoshop
We’ve all seen those sci-fi movies like The Matrix, in which images are bu...


