
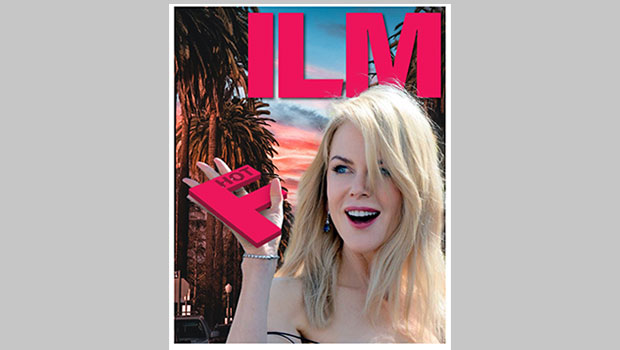
It’s hardly uncommon for magazines to feature photographs of Oscar-nominated actors on their covers. But how can you make the stars look as if they’re interacting with your magazine? Here’s one solution, and it isn’t hard to achieve.
01: The starting image
I chose this image of Nicole Kidman (courtesy of Georges Biard on Wikimedia Commons) because she has her hand in the air, which will allow us some interaction. 
02: Place her on the cover
It’s easy to use Photoshop’s Select Subject menu option to cut Nicole from her background. Placing her in front of the logo of this fictional magazine brings her forward, rather than being placed behind the title. 
03: Move the hand
The problem with the photograph as shot is that if the hand is visible, Nicole is pushed out of the frame. It’s a simple job to select the arm and cut it to a new layer, and then move it a little closer to her head. 
04: Add a background
Cutout hair often looks unrealistic, but when you add a background – such as this Hollywood tree-lined avenue – the hair blends in much better. 
05: Cut the first letter
Now for the interesting part. Copy the first letter of the title, and hide it on the masthead. Then, using Free Transform, it’s easy to distort it so that it appears to lie in her hand. 
06: Add some depth
A two-dimensional letter looks wrong on a three-dimensional person. Here’s the easy way to add
depth: Select All, then hold Option (Mac) Alt (Windows) and use the cursor keys to nudge it up. Each time you nudge, the extrusion gets deeper. Then Inverse the selection and darken the extruded portion to make the letter more legible. 
07: Add a mask
Make a Layer Mask for the letter, and load the arm layer as a selection by holding Command (Mac) Ctrl (Windows) and clicking on its thumbnail in the Layers Panel. It’s easy now to paint over the thumb area in black on the mask, which will hide it behind the letter. 
08: Don’t forget the shadows
Make a new layer above the arm layer, using it as a Clipping Mask, and paint a soft shadow beneath the letter. Then do the same above the letter layer, so the thumb casts a soft shadow on the letter. And there’s a much more dramatic cover. 
Commenting is easier and faster when you're logged in!

Recommended for you

Advanced Layer Blending in Photoshop
Photoshop’s Layer Modes provide several ways of enabling you to see throug...
Edit Illustrator Effects in the Appearance Panel
Use Illustrator’s Appearance panel to change, add, and blend effects applied to...

Filtering and Finding Fonts in Adobe Apps
Is there anything worse than diving into a new design project and getting stuck...