
InDesign has all the tools you need to build working user interface (UI) elements.
In the article, I’ll walk you through the steps needed to create a pop-up. This can be used for menus, pop-up video players, and “modal” dialogs (e.g., alert boxes).
I’ll show you how to do all of this with InDesign’s native tools so that you don’t have to write any code.
Steps for How to Create a Pop-up With InDesign
- Create your pop-up elements (the message, the dialog box, and the artwork for any buttons) and group them together.
Recommended: Create a “background” rectangle that covers the entire page and is partially transparent. Group this behind the rest of your artwork. It will help create an overlay effect to make your pop-up appear on top of the other page content. - Create a small rectangle with no stroke or fill that doesn’t sit on top of any important artwork. This will be the “empty” state when the pop-up is not shown.
- Select both elements, open the Object States panel (Window > Interactive), and use the button at the bottom of the panel to convert your selection into a Multi-State Object (MSO). The MSO will have two states (your artwork and your “empty” state). Give the MSO a clear name in the Object States panel, like “popup.” Name the state with the clear rectangle “empty” by triple-clicking on the state name and then drag it to the top so that it’s the first state. Name your other state “dialog.”
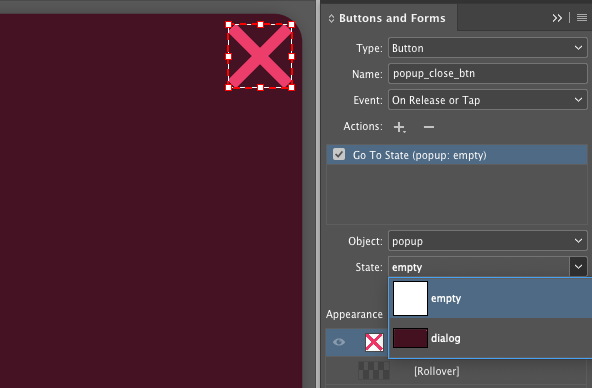
- Create a button and apply a Go To State action, which goes to the “dialog” state on the “pop-up” MSO. If you created artwork for a “close” or “ok” button, select that artwork (you may have to double-click to get to the item, and/or hit ESCAPE if you enter a text frame or get too deep in your selection), open the Buttons and Forms panel (Window > Interactive), click the plus (+) sign and add a Go To State action. Assign this to the “empty” state of the “dialog” MSO so that it will close the popup when clicked. If you created a background element, it’s recommend that you apply this action to that element as well.
The Details
Let’s go a little deeper into the concepts from the steps above.
Creating the Artwork and Converting to an MSO
Multi-State Objects let you change the appearance of your content. It’s easier to create complex artwork first, then convert it to an MSO. Each Object State contains separate artwork and can be edited independently.
Creating an Empty State
The “empty” state is part of how you can create magic with MSOs. It makes a your pop-up appear from nowhere. Best of all, having an empty state doesn’t limit you to 2 states. Your MSO can have multiple “visible” states.
It can be tedious to create empty states, so in5 makes this super easy. Once installed, in5 adds a right-click option to the Object States panel that will create an empty state for you…even if you’re only using the demo version of in5.

I’ll talk a bit more about in5 below.
It’s good to make your empty state small and out-of-the-way so that it doesn’t sit on top of (and block) any other interactive elements on your page.
Adding Button Actions
By changing the state of an MSO, you’ve created dynamic content!
You can even play animations and/or video once a state is loaded.
You can trigger multiple actions with a single button (including changing multiple MSOs).
The power of MSOs + Buttons is enormous and it just takes a few clicks!
How You Can Publish Interactive Content with MSOs
The follow formats can be exported from InDesign and will support Object States and Buttons:
- Publish Online
- Fixed Layout EPUB
- HTML5 created with in5
Note that Interactive PDF does not support MSOs and is not recommended.
Both Publish Online and Fixed Layout EPUB are native to InDesign. in5 is similar to these options, but is a 3rd-party add-on. in5 lets you publish to your own website (whereas Publish Online only works on Adobe servers). in5 also lets you create far more interactivity.
In addition to letting you create flipbooks, scrolling websites, 3-D flip cards, scrolling frames, slideshows, responsive layouts and more; in5 also has a Pop-up Builder that will do all of the steps listed in this article for you!
Check out this video of the pop-up builder in action.

If you liked this article and you want to learn how to build other UI elements with InDesign, check out the InDesign UX Design Patterns guide.
This article was last modified on September 29, 2021
This article was first published on September 28, 2021
Commenting is easier and faster when you're logged in!

Recommended for you

Spell check text in Multi-state Objects
Keith shows how to spell check text on all the hidden states of Multi-state obje...

Why Making a Flipbook from InDesign Beats Online PDF Converters
Learn how exporting flipbooks directly from InDesign gives you more control and...

Exporting from InDesign to HTML5: Amazing Free Script
Oh, if I only had a dollar for each time someone asked me: How do I export my In...