


The popular Ken Burns effect is a good way to add subtle motion to your still photos for use in interactive documents. You could, of course, add the effect to a photo (or a group of photos) using iMovie, Adobe Premiere Pro, or any number of other video editing tools, save the effect as video, and place the video in InDesign. But you can also create the effect entirely in InDesign. There are lots of variations possible. For example, you might only pan across an image. Or, you might only zoom in (or out). Or you might pan and zoom. You can vary the speed. The sky is the limit. No matter the variation you choose, the basic workflow is the same. The method described here will work for files exported to EPUB, Publish Online, or using Ajar Productions’ in5. Sadly, the effect will not work in an exported PDF. You can download a simple 3-page fixed layout EPUB file that demonstrates the effect here. In the steps that follow, I’ll show how to create an effect that pans to the right while zooming in on the image. Before you begin, if the Animation panel and EPUB Interactivity Preview panels aren’t visible on your screen, choose Window > Interactive > Animation and Window > Interactive > EPUB Interactivity Preview to display them.
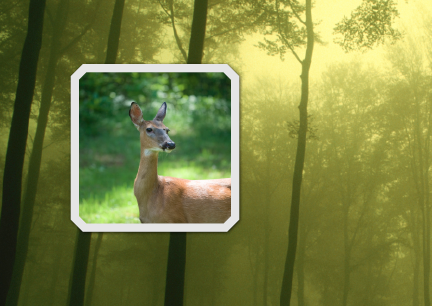
- Create a rectangle that is the size you want the image to occupy in your layout. For clarity while you work, give this rectangle a visible stroke (which you can remove later if you choose). I’ll call this the “crop rectangle.”
- Place your image in a separate frame, positioned underneath the crop rectangle you created in step 1 (Figure 1). Depending on the amount that you are going to pan
and zoom, you will likely need an image that is larger than your crop rectangle.

Figure 1. A crop rectangle with a thick black stroke is placed over the image frame that will pan and zoom.
- With the image frame selected, in the Animation panel choose one of the Move and Scale options from the menu of animation presets (Figure 2). Note that this preset is set to play on the “On Page Load” event, which means that it will play when the reader turns to the page containing the image.

Figure 2. These four animation presets are a good starting point for the Ken Burns effect.
- In the Animation panel, change the Scale to the final size you want the image to grow or shrink to (Figure 3).

Figure 3. The Scale value you enter should be the percentage of the original size that you want the image to enlarge or shrink to.
- Preview the animation by clicking the Play button in the EPUB Interactivity Preview panel. Ignore any image that is displayed outside the crop rectangle, as this part of the image will be hidden in a subsequent step (Figure 4).

Figure 4. Click the Play button to preview the animation. It likely won’t be the way you want it at this point.
- The bright green arrow displayed on the image is the “motion path” of the animation. It indicates the direction and length of the pan effect (Figure 5). With the Direct Selection (white arrow) tool, click on the arrow, and then drag the anchor point at the arrow head end of the line to adjust the motion path length and direction (Figure 6). A shorter line will cause the image to pan less, a longer line will cause the image to pan more. It takes a little practice to get your head around how this affects the movement of the image, but after some practice it will become clear. Make small changes to the line, and preview the result, repeating until you achieve your desired pan movement.
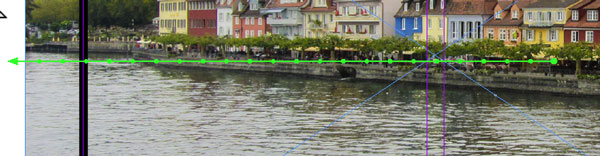
Figure 5. The green arrow indicates the animation’s motion path, both the direction and length of travel of the selected frame.

Figure 6. Adjust the length and direction of the motion path by clicking on the arrow end of the path with the Direct Selection (white arrow) tool.
- In the Animation panel, adjust the duration to something fairly slow, like 5-10 seconds (Figure 7).
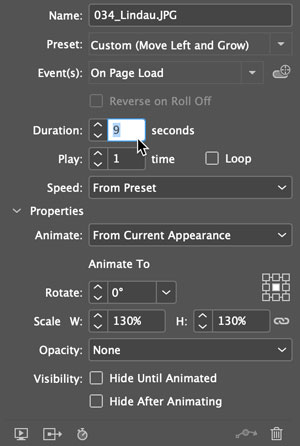
Figure 7. You will likely want to slow the animation down by increasing the Duration.
- Select the image frame, and choose Edit > Cut or pressing Command+X (macOS) or Ctrl+X (Windows).
- Select the crop rectangle, and choose Edit > Paste Into or pressing Command+Option+V (macOS) or Ctrl+Alt+V (Windows).
- Preview the results (Figure 8).

Figure 8. Previewing the final effect
Commenting is easier and faster when you're logged in!

Recommended for you
Hiding Content Within a Frame
Haste makes waste, except when it leads you to stumble upon an aspect of InDesig...

InDesign Magazine Issue 80: Template Tips
We’re happy to announce that InDesign Magazine Issue 80 (December, 2015) is now...
HerGeekness Says: Convert Any File Part III
If you’re new to this series, you may want to start from the beginning: He...