

InDesign’s New Document dialog box has its pros and cons. One one hand, it gives you handy access to recently used settings and Adobe Stock templates. On the other hand, it’s rather klutzy and slow, and we seem to have lost the ability to edit the new default document preset. The old way, of creating a new preset, naming it [Default], and overwriting the original preset no longer works.

Fortunately, we still have the option of using the “Legacy” New Document dialog box in General preferences.
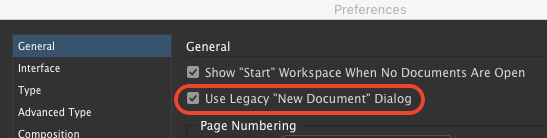
When you do that, the old method still works.
Simply open the dialog box and edit the settings as desired.

Then click the button to save the settings as a preset and name it [Default].

InDesign will ask you if you want to replace the original preset.

Then, any time you want to quickly make a document with your custom settings, use the keyboard shortcut Command+Option+N/Ctrl+Alt+N.
This article was last modified on October 4, 2024
This article was first published on December 10, 2018
Commenting is easier and faster when you're logged in!

Recommended for you

Using Edit Original and Edit With in InDesign
Sign up for the InDesign tip of the week to get a new tip, roundups of new artic...
How to View Two Parts of a Document at Once
In the recent releases of InDesign, many new features have been presented quite...
InDesign’s Early Days: Versions 1 & 2
In this week’s InDesignSecrets video, Andrew Keith Strauss walks us through what...