
I get this all the time when I teach InDesign Level 1. Why are there two ways to draw a rectangle? What’s the difference?
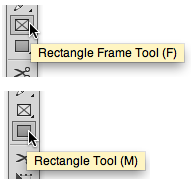
The two tools as they appear in the Tools panel
In addition to the two tools to draw rectangles, there are two tools to draw Ellipses and Polygons.
Differences in Appearance
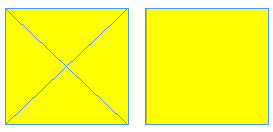
First thing you will notice is what the rectangles look like on the page.

A rectangle drawn with the Rectangle Frame tool

A rectangle drawn with the Rectangle tool
One of the rectangles (drawn with the Rectangle Frame tool) has a big “X” drawn through it. That is the symbol that mechanical layouts (cardboards used in the distant past to layout pages) would use to indicate that an image would go in that area. The X would be drawn with a non-reproducing blue pencil.
The other rectangle has no X.
So one difference is you can use the Rectangle Frame tool as a placeholder for images. And it tells the next person looking at the file that “an image goes here.”
Differences in Content
There’s another difference in how InDesign treats the two types of rectangles. The one with the X has content described as “Graphic.” The one without the X has content described as “Unassigned.” Go to Object > Content and you can see these two choices.
This means that you can change the content of a Graphic frame to Unassigned with a simple click.
Uses for Unassigned frames
Why would someone deliberately choose an Unassigned frame? One important reason is to add a color or stroke to an area without a humongous X cluttering up their layout.
An unassigned frame is much more subtle in applying color or a stroke to a layout.
I know so many designers who can’t stand all the X’s on their layouts and are constantly switching to preview to see it less cluttered. Sure it looks cluttered. They’ve got tons of Graphic frames with big X’s on the page. This is a technique left over from using QuarkXPress which does have an equivalent to the Unassigned frame, but doesn’t give it a separate tool.
Differences in Defaults
One other difference is the defaults for the frames.
Look at the two frames in the Preview mode. Whoops! Where’s the Graphic frame?

In the Preview mode the default setting for Graphic frames shows Fill: None, Stroke: None.
The default for Unassigned frames is Fill: None, Stroke: black.
Graphic frames have a default of no fill or stroke. And there’s no way to set the default to anything else. They are drawn with those settings.
But Unassigned frames can have any default setting you want—strokes, fills, corner settings, effects—the whole shebang.
Putting stuff into Unassigned frames
Now, here’s where InDesign starts to blow my mind. Once you have an Unassigned frame on the page, you can select it and use it as the frame to hold a placed image. You can also click with a loaded cursor to insert the image into the frame.

The curves around the cursor indicate that the image will be inserted into the unassigned frame.
Even more mind-blowing, you can click with the Type tool to convert the Unassigned frame into a Text frame or import text into a selected Unassigned frame.
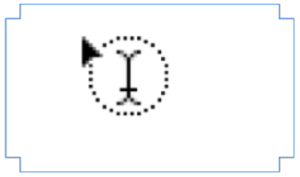
The curves around the cursor indicate that the frame is about to be converted into a Text frame.
Similarly, you can convert a Graphic frame into a Text frame.
There’s more…
There’s even more to the defaults and settings for these frames. check out this article: InDesign’s Three Kinds of Frames: Text, Graphic, and Unassigned.
This article was last modified on December 30, 2021
This article was first published on August 16, 2013
Commenting is easier and faster when you're logged in!

Recommended for you

There’s No Logos Like Show Logos
Originally published on January 30, 2009 Depending on who you ask, my musical ta...

A Free Script to Invert Selections
Ever wish you could quickly invert a selection like you can in Illustrator or Ph...

This Week in InDesign Articles, Number 23
It's a deluge of articles and videos and good InDesign stuff to dive into!