
Following the lead of Photoshop CC and Illustrator CC, the InDesign CC 2015.4 update finally added GPU support— beginning with Macintosh computers. We covered an overview of 2015.4 features here, but we’ll give more details and shortcuts in this posting.
As Retina and HiDPI monitors are becoming the standard, applications have to “push” more pixels around. Relying only on the CPU can show down screen rendering.
GPU Support for Macintosh
Here are the requirements for Macintoshes to use their GPU in InDesign CC 2015.4:
- The computer must have at least 1 Gb of dedicated VRAM (2 Gb recommended) and it must support OpenGL version 4.0 and greater; AND
- The computer must have a native Retina display (e.g., MacBook Pro, iMac 4K, iMac 5K, etc.) For computers like a Mac Pro or Mac Mini, they have to be connected to a HiDPI (Retina) monitor
If your computer meets these requirements, you’ll see a choice like this in a new GPU Performance preference:
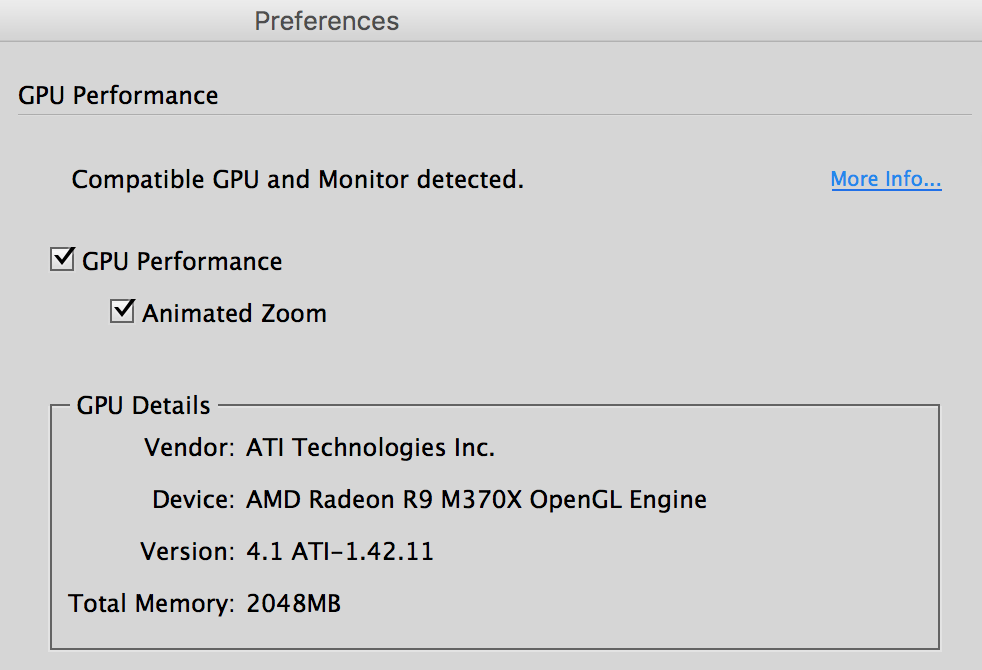
GPU Performance Preference
Otherwise, you’ll see the message, “Compatible GPU and monitor not detected.”
A new “rocket” icon will appear in the Applications Bar (a similar icon appears in Illustrator CC 2015), and clicking it will take you to the GPU Preferences:
Rocket Icon
By default, GPU acceleration will be turned ON for all documents. This will speed your computer operation during scrolling, zooming, panning, moving objects between pages, and so on.
You have the option to turn GPU acceleration OFF in GPU preferences. You can also toggle it on and off for an individual document by choosing View > GPU Preview or Preview on CPU. The shortcut to toggle is Shift-E. You can have both GPU and CPU windows open at the same time as shown below:
GPU vs CPU Windows
When you’re doing complex layouts with transparency, overprinting, and so on, check your display when using the GPU. Since this is the first version of this display software, there could be unexpected bugs or glitches. If that’s the case, just switch back to the CPU.
Display Performance in the View menu is independent of GPU or CPU setting. If your system has a compatible GPU card, the Display Performance is set by default to High Quality. For other systems it’s still Typical Quality.
Animated Zoom
Illustrator CC and Photoshop CC have had another style of zooming called Animated Zoom, powered by a GPU that the application recognizes.
InDesign CC 2015.4 also adds this new feature and turns it on by default with a computer that meets the requirements listed above. If you switch to CPU mode (Shift-E) or Overprint Preview mode, Animated Zoom doesn’t work, and you’ll only see the Marquee Zoom behavior you’re used to. Marquee Zooming is still the default if you don’t have hardware that meets the specifications for GPU Performance.
There are two ways to invoke Animated Zoom:
- With the Zoom tool selected, clicking and holding your mouse zooms in continuously until you reach the maximum zoom (4000%). This allows you to zoom in at the exact center of your cursor. Press the Option/Alt key and press to zoom out.
- You can also click the Zoom tool and scrub right to zoom in. Click and scrub left to zoom out. (Photoshop CC calls this Scrubby Zoom.)
InDesign, unlike Photoshop and Illustrator, let you disable this behavior with a modifier key. Pressing the Shift key returns you to the previous default, Marquee Zoom.
And, if you don’t want Animated Zoom at all, you can turn it off in GPU Performance preferences.
If you have a qualifying computer, try out this new behavior and let us know what you think.
This article was last modified on July 25, 2019
This article was first published on July 18, 2016
Commenting is easier and faster when you're logged in!

Recommended for you

InDesign How-to Video: How to Convert Shapes
How to change circles to squares, rectangles to starbursts, or hexagons to trian...

How to Create PDF Bookmarks with a Table of Contents in InDesign and Acrobat
See pro tips for creating a table of contents and PDF bookmarks from that TOC.

This Week in InDesign Articles, Number 17
A dozen articles, videos, and blog posts that you should know about (one for eac...