
Going From Markdown to InDesign
How to use Markdown as an authoring tool in InDesign workflows

This article appears in Issue 146 of InDesign Magazine.
Not everyone uses Microsoft Word to write and format text documents destined for an InDesign page. Increasingly, people are turning to alternatives to Word, such as Google Docs and InCopy. But there is yet another class of options: plain-text editors, such as BBEdit, Sublime Text, Atom, or even just Notepad. Of course, at first glance it seems that text editors don’t support text formatting, but there’s a workaround in the form of very simple Markdown codes that you can add as you type.
This article will show you a method for getting content from Markdown to InDesign with the help of something called Pandoc. I admit that this is going get a bit geeky (there will be code and Terminal or PowerShell commands), but once you have all the pieces set up, the workflow is relatively straightforward. So pour yourself a stimulating beverage, and let’s have at it.
What Are Markdown and Pandoc?
Created by John Gruber in 2004, Markdown is a lightweight markup language with a simple formatting syntax. It is written as plain text and is often used for creating rich text using a plain-text editor. It’s great for doing things like formatting readme files or writing messages in online forums. If you’re familiar with HTML, you’ll notice a few similarities between the two markup languages, though Markdown tends to be easier for newcomers to read and use. To learn more about the Markdown language, check out the Wikipedia article here.
Pandoc is a document converter that was created in 2006 by John MacFarlane. It is an incredibly powerful and versatile command-line utility that can import a document from more than 20 supported file formats and convert its markup to another format. In addition to its extensive native capabilities, it also allows you to write custom plug-ins and filters using the Lua scripting language. Pandoc’s extensive library makes it the perfect tool for converting Markdown files to various other formats including InCopy (ICML) and Word (DOCX). To learn more about Pandoc, check out the Wikipedia article here.
The first step in converting documents using Pandoc is getting it installed. Windows and macOS users can download the Pandoc installer here. Alternatively, if you are the kind of person who feels comfortable using the command line and you have Homebrew installed, then you can also install Pandoc by following the instructions here.
Writing in Markdown
The Markdown syntax was created with readability in mind, and for that reason, it is very easy to write. Begin by opening your favorite text editor. You can use any text editor, because Markdown is written in plain text. I often just use the default text editor that ships with macOS, TextEdit. However, there are dozens of free and commercial text or code editors for macOS, Windows, Linux, Android, and even iOS—including some that are specifically designed for working with Markdown.
Let’s go over some of the basics of Markdown.
Header and body text
First, all text written on unmarked lines will be treated as normal body text in Markdown. To start a new paragraph of body text, make sure you insert a blank line (two line-breaks in a row).
Markdown treats any lines that begin with a hash (#) and space character as header text. A single hash followed by a space it considers equivalent to h1, two hash symbols it considers as h2, and three hash symbols Markdown considers h3 (Figure 1).

Figure 1. Header syntax in Markdown
If you want a bulleted list, start your line with a hyphen character, followed by a space (Figure 2).
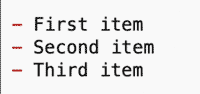
Figure 2. Bulleted list syntax in Markdown
Similarly, lines that begin with a number followed by a period will be considered part of a numbered list (Figure 3).

Figure 3. Numbered list syntax in Markdown
Tables
Markdown supports three approaches to creating tables. You can create a table using the Pipe Table, Grid Table, or Simple Table syntax. I personally prefer to use the Pipe Table syntax, because I find it easier to read and write but any method you choose will result in a table in your output document, so use the one you like best (Figure 4).

Figure 4. Examples of a Pipe Table (top), Grid Table (middle), and Simple Table (bottom)
Images
To insert an image into your document, start by adding an exclamation mark (!). Then put the alt text in brackets, followed by the relative path or URL to the image asset in parentheses. If you want to add a title, put it in quotes after the URL in the parentheses.
Figure 5 shows an example of an image that has alt text in Markdown.

Figure 5. Image syntax in Markdown
Custom styles
What about those times where you need to step outside of the traditional h1, h2, and h3 styles? No worries, Pandoc has a way of handling custom styles as well! You can create and implement custom styles on both the character level and the paragraph level using basic Markdown syntax.
You can apply a character style to text inside a paragraph by using a combination of square and curly brackets (Figure 6).

Figure 6. Character styling syntax in Markdown
Paragraph styles are, of course, very important to InDesign users. You can apply a paragraph style by starting a line with three colons followed by some code that includes the style name. Figure 7 offers a look at applying a custom style to an entire paragraph.

Figure 7. Paragraph styling syntax in Markdown
The style names that you create for any custom styles will also need to be configured in something called a “style reference document.” Read on for more information about that.
Of course, there are dozens more formatting codes available in Markdown. For a comprehensive Markdown cheat sheet, check out the guide at Github or go right to the source: John Gruber’s Daring Fireball site.
Figure 8 shows an example of a Markdown file that contains a lot of the commands that I mentioned above. The file shown here can also be found in the downloadable files for this article.
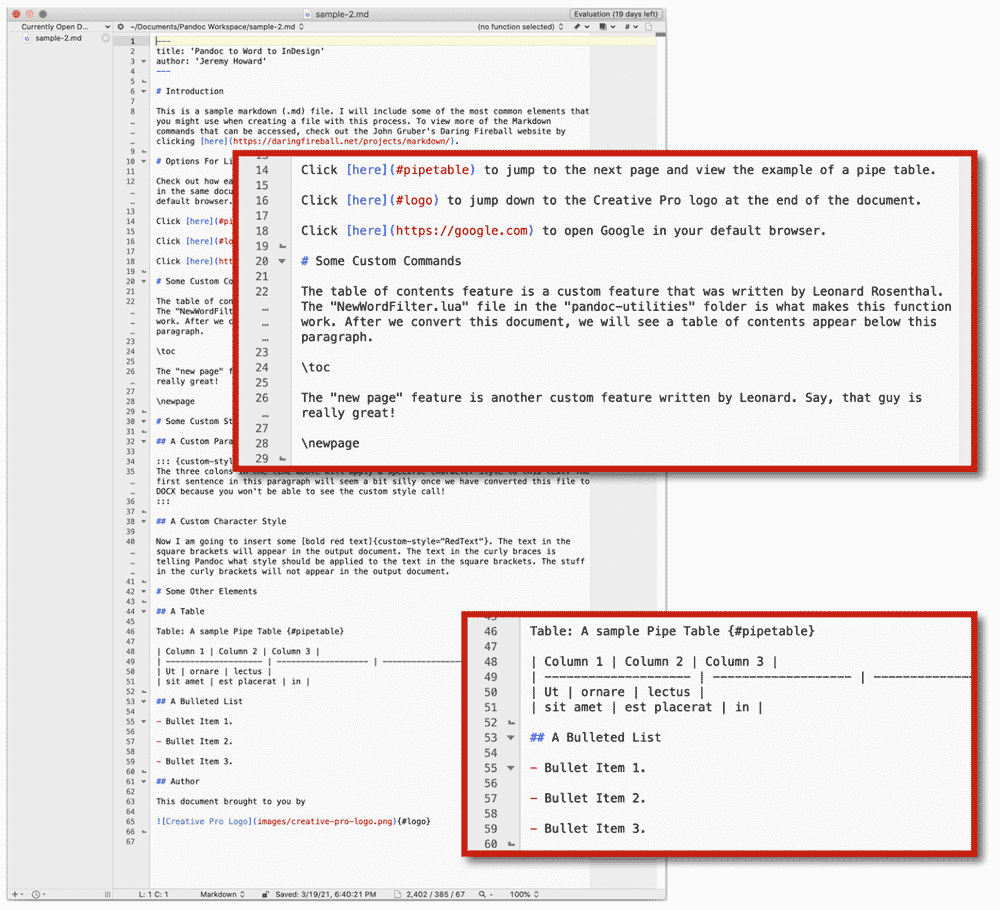
Figure 8. A Markdown document
Converting to DOCX
It would be great if you could place Markdown files directly into InDesign, but you can’t. InDesign doesn’t recognize the .md file extension as something it can handle, so it’s just grayed out in the Place dialog box. You can’t even place it as plain text. You need to convert Markdown files to something InDesign does understand: Microsoft Word documents in the form of DOCX files. As I mentioned earlier, the best way to do that is to use Pandoc. When converting to DOCX, you need to concern yourself with two main components: images and styles.
Images are easy enough to take care of with a little planning. You just need to be sure that the image format you used is supported in a DOCX document. This means that you should stick to the basic JPG or PNG whenever possible.
Styles are a bit more complicated. Getting the DOCX styles setup for your converted documents will take a bit of work up front, if it matters to you what the output looks like when it’s in DOCX form. However, whether you decide to perfect your styles in a DOCX document or not, you will need a style reference document for Pandoc to read the styles from when it converts your Markdown.
Creating a reference document
In the Markdown-to-InDesign workflow, a style reference document is simply a Word document that contains all of the styles that Pandoc will reference when it converts the Markdown file to DOCX. Pandoc duplicates this document and fills it with content from the Markdown file. The styles that you have defined in the reference document are then applied to that content Pandoc adds it.
To create a reference document, start with a new Word document and edit the default styles until you’re satisfied with their appearance. Remember that your final output document will use the styles you define here. Once you are done, save that file in a convenient location. I recommend saving the reference document in your Pandoc Workspace folder (more on that in a moment).
You can see what my style reference document looks like in Figure 9.

Figure 9. An example of a style reference document
Notice that I added text for each of the elements that I will use. This is the easiest way to see the edits that you make to style sheets as you make them. You can keep all of these style references on the page when you save your reference document. That will make it easier to distinguish between multiple style reference documents in the future.
Be sure to stick to the default styles in the DOCX document when creating your styles because those styles are the ones that Pandoc will use when it makes the conversion (with the exception of any custom styles that you create). You can read a great article here that details how to edit the default styles in a DOCX file.
A Scripted Solution for Simple Documents
Would you like to try Markdown as an authoring tool but the idea of using Terminal makes your eyes glaze over? There is a scripted solution that can take your content directly from Markdown to InDesign. Written by Jongware, the script is called MarkdowntoID, and you can download it and learn how to use it here. There is one big caveat: The script does not support images. So if your documents contain them, you’ll need to stick to the method described in this article.
Pandoc Workspace Folder Structure
Let’s have a look at the folder structure that I recommend you use when creating a workspace for converting documents using Pandoc. When I say “workspace,” I am simply referring to a folder structure that will contain all of the files needed for the Pandoc workflow. (This is not the same as InDesign workspaces, which are arrangements of panels that you can save and switch between as you work on various tasks.)
Technically speaking, there is no need to create a specific folder structure for converting your documents, but I do recommend setting one up so that making conversions can be quick and painless. Think of your folder system setup as something akin to a templated workflow.
You can see my Pandoc Workspace setup in Figure 10.
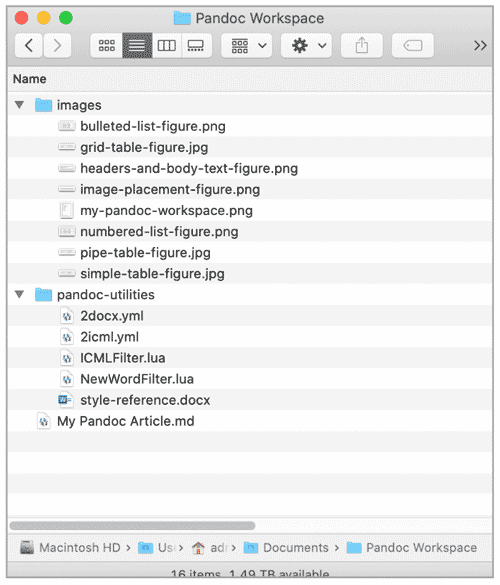
Figure 10. An example of the preferred way of structuring your Pandoc Workspace folder
Setting your workspace folder up in this way will make it easier to reference images and utilities as you work on writing your Markdown file and eventually converting it. For example, all of the image paths in the Markdown document can use relative paths like images/bulleted-list-figure.png. Pandoc knows where to find that image because it understands the relative folder structure of the workspace folder.
Notice that I placed my style-reference.docx file in my pandoc-utilities folder. I did this so that the style reference document will be easier to access later in this process.
Any time that you change the name or path of your style reference document, you will also need to edit the file named 2docx.yml. This is a YAML file. YAML files are commonly used as configuration files where data can be quickly stored and transmitted. In this case, you’re going to use the YAML file format to store information about which version of Pandoc to use, which style reference that you want to use, and which filter should be applied when making the conversion.
To update the file path to your style reference document, open the 2docx.yml file (in the downloads for this article) with any text-editing application. Edit the file path found on line 5 so that it points to the style reference document that you would like to use. If you are using the Pandoc Workspace folder structure that I suggested, then you can simply use a relative path from the top level of the workspace folder like I did in Figure 11.

Figure 11. A look at the 2docx.yml configuration file
Conversion Commands
At long last, we have come to the actual conversion process! Before we begin, I want to mention two things:
Remember that the workflow consists of converting your Markdown file to a DOCX file, and then placing the DOCX file into an InDesign file.
All of the instructions and command-line prompts that I am writing as examples are based on the assumption that you are following the folder structure that I outlined above.
Mac OS: Accessing the Pandoc Workspace folder via Terminal
You will need to access the command line in order to convert your Markdown files. For macOS, this means launching the Terminal app (you’ll find it in Applications > Utilities).
Next, you need to specify your Pandoc Workspace folder. The easiest way to do this in Terminal is to type cd (don’t forget a space after cd), and then drag the Pandoc Workspace folder over the Terminal window and press the Return key. The cd in this command stands for change directory and when you drag a folder into the Terminal window, it will automatically enter that folder’s path into the command line for you. So this command just tells Terminal to change the current directory to the specified path.
You can verify that you are in the correct folder by typing ls into the Terminal window and pressing Return. The ls command means list files, Terminal will display a list of the files and folders that exist inside the Pandoc Workspace (Figure 12).

Figure 12. Listing files and folders in Terminal
Windows: Accessing the Pandoc Workspace folder via Command Prompt
On Windows, the command-line utility is called Command Prompt. To access it, click the Start menu and type Command Prompt into the Search bar. Once you see the Command Prompt application in the search results, click it to open it.
You now need to specify your Pandoc Workspace folder. To do that, type cd (don’t forget a space after cd) followed by the path to your Pandoc Workspace folder. For example, if you created a folder named Pandoc Workspace in your Documents folder then your command will look like this: cd C:Users<username>Documents (replacing <username> with your actual username).
The cd in this command stands for change directory, so it tells your command-line utility to change the current directory to the specified path.
You can verify that you are in the correct folder by typing dir into the Command Prompt window and pressing Enter. The dir command tells Command Prompt to list all of the files and folders in the current directory, so you should see a list of the files and folders that exist inside the Pandoc workspace. Figure 13 is an example of what the output of the dir command looks like in the Command Prompt window.

Figure 13. Command Prompt window after accessing my Documents folder with the cd command and using the dir command
Converting Markdown to DOCX
Now that you know that you are inside of the Pandoc Workspace folder, you can use relative paths to access your documents. Let’s have a look at what a basic conversion command looks like and how it works. First, I’ll show you the full command to type, and then I’ll explain what each of the parts mean:
pandoc -d pandoc-utilities/?2docx.yml -s -o example-output.docx example-markdown.md
To begin, pandoc tells the command-line utility that this command should run the Pandoc utility.
Next, -d pandoc-utilities/2docx.yml states that you want your default settings (-d) to be the settings specified in the 2docx.yml file, found in the pandoc-utilities folder.
Then, -s lets Pandoc know that you want to produce a standalone document that is valid without relying on any other documents.
The phrase -o example-output.docx specifies your output document. The -o stands for output, and the file path that you enter directly after it is where Pandoc will save the document that it produces.
Finally, example-markdown.md is the name of your input file. You simply need a file name since you used the cd command to change the directory to the Pandoc Workspace folder (assuming that the Markdown file is at the top level of your Pandoc Workspace folder). If the file existed elsewhere on my system, I would need to enter the full file path here.
Figure 14 shows what the command looks like when it’s typed into Terminal on macOS.

Figure 14. This is what the command looks like when it’s typed into Terminal (macOS).
Now that you’ve had a look at the command that you’ll be using, execute it by typing it in your command-line utility and pressing the Return key (macOS) or Enter key (Windows).
A fraction of a second after pressing the Return or Enter key, you will see your DOCX file appear in the same folder as your Markdown file! Figure 15 shows what my Markdown file looks like compared to my Word file.

Figure 15. The source Markdown file compared to the output Word file
You can find both of these documents in the downloadable files for this article.
Placing the DOCX File in an InDesign Document
At last, it’s time to import your content into an InDesign document! To do this, go to InDesign and create a new document, making sure that the Primary Text Frame option is turned on (Figure 16). Enabling this option will make InDesign insert as many pages as needed when you place the Word document. This is especially important when placing a long Word document.

Figure 16. Having the Primary Text Frame option enabled when you create your document will ensure that extra InDesign pages are automatically inserted to fit all of the content from your Word document.
Once your new document is open, choose File > Place.
In the dialog box, navigate to the Word document that you created, choose it, and click Open. Now click the Primary Text Frame on a page in your InDesign document, and you should see the text frame get filled with styled content from your Word document (Figure 17).

Figure 17. The InDesign document with styled text
Notice that you now have several new paragraph styles in your InDesign document. These new paragraph styles are all imported from your Word document and they can now be altered as you see fit. (Alternatively, if you already have an InDesign document that contains styles named exactly the same as the Word document, InDesign will use those instead.)
It’s worth noting that DOCX and ICML are not Pandoc’s only output formats; it is capable of taking dozens of file types as input and converting them to dozens more. You can find a complete list of Pandoc’s input and output formats at pandoc.org, as well as extensive documentation that goes into much more detail than I could here.
Making Your Mark
While this process will probably take a bit of trial and error to get down, it will certainly be worth it in the end, especially if you need to convert many files. It’s not hard to see how you could create a workflow process using this system that could make lightning-fast document conversions and open up a whole new avenue for authoring content destined for InDesign.
Special thanks to Leonard Rosenthol and Jeff Carlson for contributing their expertise to this article.
Commenting is easier and faster when you're logged in!

Recommended for you

InDesign & Word Styles – How well do they transfer with each other?
Moving Styles back and forth between InDesign and Word is possible, but some of...

The Source of the Mysterious _GoBack Bookmark and How to Get Rid of It
Ever get a strange bookmark in the InDesign Bookmarks panel called _GoBack? Lear...
Import Word Files into InDesign, Remove Local Formatting but Keep Italics and Bold
This is a workflow I use almost everytime I import a Word file that someone send...