

What does the weather have to do with the quality of your photos? Plenty. The amount of sunlight (and resulting warmth) can obviously affect your photos, but so can the amount of humidity. It’s also important to understand how sunlight affects the saturation of the blue hues in the sky. Here are a few tips on avoiding climate-related problems when taking photos outside in general, and getting a rich, deep blue sky color in landscape photos in particular.
Angles and Filters
You’ve probably noticed how the sky closer to the sun appears almost white. As you look farther away from the sun, the sky appears bluer (Figure 1).

Figure 1. The blown-out areas distract from this photo of Hollywood’s Chinese Theater.
You can solve the blown-out problem in a couple of ways. Most obviously, wait for the sun to move so it isn’t in the shot. (Many landscape photographers prefer to shoot 30 minutes before and after sunrise or sunset.) If you can’t wait, change the composition of the shot and shoot at different angles so the sun isn’t close to the edge of the shot.
Polarizing filters (Figure 2) can also help you capture a deep blue sky. They work with light at 90 degrees from the light source (the sun in landscape photos), so shooting at the sun or close to it makes the filter ineffective. If you have a super-wide angle lens, the sky will be unevenly saturated, with rich, deep, darker blue hues within the filter’s area, and much lighter blue hues outside of that 90-degree field.

Figure 2. A polarizing filter.
Polarizing filters are also useful for minimizing reflections on top of water, so the color of the water and what’s in it can be seen with more color saturation.
Get the Dry Look
You also may not be getting the best saturation if you have condensation on your camera. When a camera is significantly cooler or warmer than the air around it, condensation forms on the lens. Let any lens condensation evaporate — don’t wipe it off. Not only will wiping it not remove all the condensation, but it may scratch the lens.
To avoid condensation, keep your camera in its bag as you change climates; for example, as you leave an air-conditioned car and step onto a hot beach. Give it about 30 to 60 minutes to adapt to the new conditions. If the climate differences are extreme, you may also want to keep your camera and lenses in a sealed bag, which speeds up the acclimation time.
It’s also important to not change the lens or clean the sensor in adverse conditions. This is an obvious precaution in sandstorms, blizzards, and thunderstorms, but high humidity levels and condensation are also potential hazards to your camera body and mirror.
If at all possible, change your lenses in a room where the temperature of the room is the same as that of the camera. If you have to change lenses outside, make sure the camera is at the same temperature as the air around it; otherwise, you may get condensation on the sensor when you open the camera body even if the lens no longer has condensation on it.
Fix Climate-Related Problems in Photoshop
While it’s preferable to shoot a photo without having to edit it afterwards in Photoshop, sometimes post-capture editing is the only way to improve an image. To follow along with these steps, download the source files below:
source_images.zip
Step 1
After you download and uncompress the source files folder, open santa_monica.jpg in Photoshop (Figure 3). This lackluster shot is of a very overcast day on the beach.

Figure 3.
Step 2
Duplicate the background layer (Figure 4) by either clicking-and-dragging it in the Layers palette onto the New Layer icon at the bottom of the palette or by pressing Cmd-J (PC: Ctrl-J). I like to work on duplicated layers so that I can return to the original if I make mistakes.

Figure 4.
Step 3
Change the Layer Blending Mode to Multiply. This usually adds a saturated richness to the color, and in this example it darkens the photo (Figure 5).
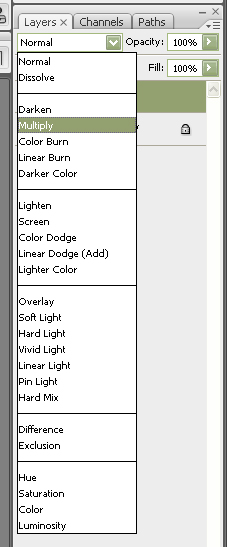
Figure 5.
Step 4
Click the New Layer icon on the bottom of the Layers palette, then choose the Gradient tool by clicking and holding the Paint Bucket tool to bring out the Gradient tool option.
Change the gradient’s foreground color to white by clicking on it on the bottom of the toolbar and selecting white in the dialog box. Change the background by clicking on it and choosing a shade of gray. I changed it to a medium gray by typing 878787 in the hexadecimal field. Click OK.
Click and drag from the horizon line (not from the bottom of the photo) to the top of the photo, then let go to create the gradient shown in Figure 6.

Figure 6.
Step 5
Change the Layer Blending Mode of the top layer that has the gradient to Overlay (Figure 7). This brightens the original photo without losing any rich color.
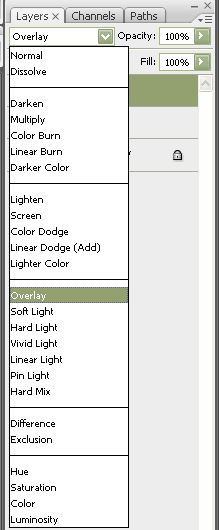
Figure 7.
While the “after” sky (Figure 8) isn’t amazing because the original photo had only limited appeal to begin with, these blending modes and gradient do improve this overcast shot.

Figure 8.
Step 6
Now let’s try adding even more rich blue color to a clear sky. Go to the folder you downloaded and open marathon_keys.jpg (Figure 9). This is a photo of Marathon in the Florida Keys.

Figure 9.
Step 7
Duplicate the layer by pressing Cmd-J (PC: Ctrl-J). Select the Quick Selection tool (if you don’t see it in the Toolbar, click and hold the Magic Wand tool) and press the right bracket on your keyboard to increase the size of the brush. Click and drag above the horizon until it selects the sky and nothing else (Figure 10). If it does select part of the ocean, hold down the Option key (PC: Alt) and click and drag the area to remove it from the selection. Go to Select > Modify > Feather and add a 2-pixel feather for a soft edge.

Figure 10.
Step 9
Press Cmd-J (PC: Ctrl-J) to duplicate only the selected area (the sky) into a new layer (Figure 11).

Figure 11.
Step 10
Change the Layer Blending Mode of this top layer (called Layer 2 in my screenshot) and change it to Multiply. You’ll see that the sky in the edited photo is a much richer hue of blue (Figure 12).
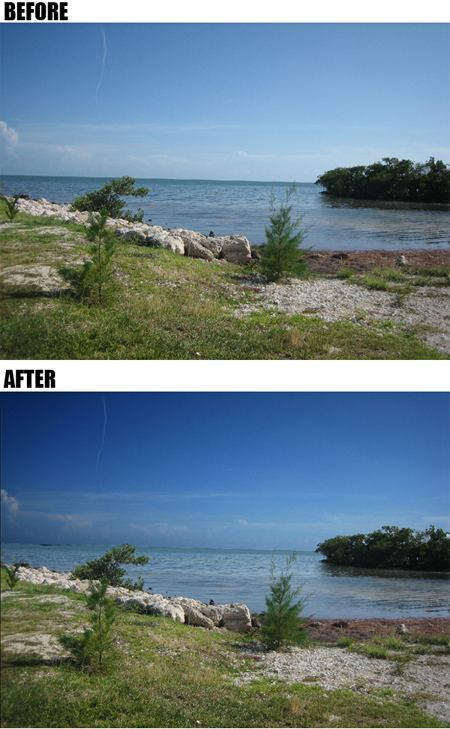
Figure 12.
As you perfect your images, you may also want to try Photoshop’s cooling and warming photo filters (Image > Adjustments > Photo Filters).
The next time you’re shooting landscapes, be aware of the humidity and climate and don’t shoot too closely to the sun to ensure rich, deep hues of blue sky. But if you should end up with images that need a little help, these techniques will serve you well.
This article was last modified on January 5, 2023
This article was first published on January 16, 2008
Commenting is easier and faster when you're logged in!

Recommended for you

PhotoSpin Expands Their Lifestyle Collection With New Images By Yuri Arcurs
PhotoSpin, www.photospin.com, a leading royalty free stock subscription company...

Turn a Photo into a Planet Using Photoshop
We’re all familiar with panorama photography, and you may have used Photos...
Photography Fundamentals: Work the Scene
Excerpted from The Passionate Photographer: Ten Steps Toward Becoming Great by S...