


In my last Framed and Exposed column, I introduced some basic photography concepts that every film photographer has to learn, but that many digital photographers can easily be uninformed about. Because automatic cameras do so many things for you, you can use them to great effect without having to understand what they’re actually up to. A more thorough understanding of some basic photographic principles will not only help you with difficult shooting situations, but will expand your palette of creative options as well.
As with the last column, if you’re a long-time photographer, then there’s probably nothing here that you don’t already now. For the rest of you, who have found your way into photography through using an automatic digital camera (or have been forced into a photographic role by evil corporate masters) then this column should offer you some useful tips.
Basic Exposure
We’ve already discussed how your light meter makes certain assumptions when calculating an exposure for a scene, and how you sometimes need to modify these assumptions to intentionally over- or underexpose a scene.
But what, exactly, is an “exposure”? At the simplest level, photography is the process of exposing the focal plane of your camera to light. Whether there’s a piece of film or a digital image sensor sitting on that focal plane, you need to make a careful calculation of how much light is allowed to pass through the lens. Too much light and your image will lose detail in the highlight areas, eventually turning those areas to complete white. Too little light, and your image will lose detail in the shadow areas and eventually the shadows will become completely black. In simpler terms, if an image is underexposed, it’ll look too dark; if it’s over-exposed, it’ll look too bright.
Your camera has two mechanisms for limiting the amount of light that hits the focal plane. First, there is the aperture, an iris valve that can be opened or closed to allow more or less light. Second, there is the shutter, which can be opened or closed for longer or shorter times, thus allowing more or less light to pass through to the image sensor.
Because both controls can be used to limit light exposure, why would you choose to use one over the other? Because they both have very different effects on your final image.
Shutter speed is a very easy concept to understand. If the shutter is open longer, moving objects will be blurrier because they’ll be moving through the frame as the exposure is made. (Or, if you’re holding the camera by hand during a long exposure, then your entire image will be blurry. Usually, anything slower than 1/30th of a second is considered to slow for hand-holding a camera.)
When envisioning your final image, you might want to intentionally blur or freeze motion, and so shutter speed choice will be very important.
Aperture changes affect the depth of field in your image. Depth of field is simply a measure of how deep of an area in your image is in focus. For example, you might want to shoot a portrait with a blurry background so as to bring focus to your subject. Beginning photographers often have a misconception of depth of field. Depth offield is NOT a distance beyond which things are blurry. The depth of field in an image centers around your point of focus. In an image with shallow depth of field, there is less area in focus both in front of and behind your point of focus.
The two pictures below demonstrate this concept (see Figure 1).
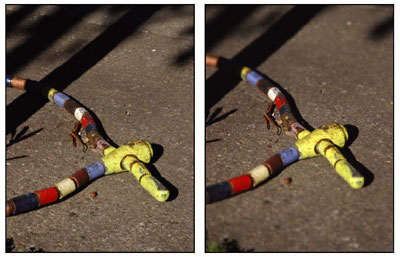
Figure 1: Both the frontmost foreground AND the farther-away background are out of focus in this image. In other words, it has a depth of field that centers around the very middle part of the bicycle lock.
Apertures are measured in “f-stops,” with higher numbers denoting more light stoppage. More light stoppage means a narrower aperture, which means deeper depth of field. For example, f16 restricts more light (and yields deeper depth of field) than f8.
So, as you envision your final image, you might want to consider a wider or narrower aperture in an effort to control the depth of field in your final picture.
Now the bad news: Depth of field is also a function of the focal length of your lens — the longer the focal length, the shallower the depth of field. Unfortunately, most point-and-shoot digital cameras have very short focal lengths — even when you zoom in all the way — which means that you’re not going to be able to shoot with very shallow depth of field using these cameras.
So, when you look at a scene, if you’re doing anything more than taking a simple snapshot, you’ll want to make some decisions right off the bat. Do you need to stop or blur motion (requiring a slow shutter speed)? Do you want to shoot a close-up portrait (which means shallow depth of field) or a product shot, where you want to ensure that the entire product is sharply defined (requiring really deep depth of field)? You can then begin to bias your exposure decisions accordingly.
This is where things get complicated. If you want shallow depth of field, you may have to move to a more telephoto focal length, which might change the sense of depth in your image (refer to my last column for more on this). Shallow depth of field means wider aperture, which means more light, which usually means you’ll need to shoot with a faster shutter speed. If you were hoping to blur motion in addition to shooting with a shallow depth of field, then you may be in trouble, as you won’t be able to have both a wide aperture and slow shutter speed without over-exposing your image. Things are even more complicated if you need to over- or underexpose to restore true blacks and whites.
If all of this makes you want to never pick up a camera again, don’t worry. It’s very rare that you’ll find yourself in a situation with that much exposure complexity. The point of this discussion is more to get you to start thinking about stopping motion, depth of field, sense of depth, and color tone. You won’t always need to take control of all of these factors, but it’s good to get in the habit of thinking about them.
Fortunately, most digital cameras these days offer some tools that make these exposure manipulations much easier.
Reciprocity
For any given exposure, there are a number of different shutter speed/aperture combinations that you can use. In other words, there are a lot of shutter speed/aperture combinations that yield the same amount of light.
This is not as complicated as it might sound. For example, say your camera’s automatic exposure mechanism recommends a given shutter speed/aperture combination. If you double the shutter speed — which cuts the resulting light in half — but open the aperture twice is wide — which doubles the resulting light — you end up with a different set of exposure settings that yield the same amount of light.
Photographers say that these settings are reciprocal. The fact that exposure settings are reciprocal means that you’ve got some room to choose specific apertures or shutter speeds to achieve the final result that you want, while still maintaining a correct amount of exposure.
Many cameras today have an automatic reciprocity control of some kind (though they usually don’t call it this). For example, on the Canon EOS 20D, there’s a dial just behind the shutter button. After you press the shutter button halfway to meter the light, the camera displays its recommended shutter and aperture settings. By spinning the dial behind the shutter button, you can cycle through all of the reciprocal settings for that exposure.
So, if you know you want a fast, motion-stopping shutter speed, but the camera has chosen 1/125th of a second, you can spin the dial until you see a combination that provides a faster speed. This simple control very often precludes the need to go into a priority or manual mode to get the level of control that you need, particularly when combined with a basic exposure compensation control, which makes it easy to adjust for over- or underexposing.
Nowadays, many point-and-shoot mid-range — and even some inexpensive — cameras have a similar reciprocity control.
A couple of caveats: Some point-and-shoot cameras don’t have a separate shutter and aperture. Instead, they use their aperture as a shutter. This means you won’t always have access to a full range of reciprocal exposures. For example, if you want a really wide aperture, the camera may not be able to simultaneously manage a very fast shutter speed, because it simply won’t be able to get the shutter closed fast enough. If you start finding yourself hampered by such limitations, it might be time to consider upgrading to a new camera.
Also, be aware that most lenses lose a little bit of sharpness at either end of their aperture range. So, if you’re going for shallow depth of field, simply opening the aperture all the way is not always the best choice, as it might result in a softer (less detailed) image. If your camera has a depth-of-field preview (something you’ll only find on SLRs with removable lenses) then use it to try to find an aperture that gives you the shallow depth of field that you want without having to go to an extreme aperture.
The “Other” Exposure Control
Here’s the part where you get to gloat over your film photographer friends. Because a digital camera can change its ISO with every frame (ISO is a measure of how sensitive the image sensor is), rather than being fixed for a roll’s worth of images, you can effectively use it as an additional, third exposure control.
So, for example, if you find that you want to shoot with a very narrow aperture for deep depth of field, but your camera recommends a shutter speed of 1/15th of a second (which is way too slow for shooting without a tripod), then you can crank the ISO up a couple of steps to 400, and pick up the extra sensitivity you need to get the camera back up to a more reasonable 1/60th of a second.
Bear in mind that on most cameras there is a price to pay for this: As you increase ISO, your images will become more noisy. Experiment with your camera to determine how bad the noise is, and to get a feel for when this is an acceptable trade-off.
How to Press a Shutter Button
The above subhead is not facetious. With beginning photographers, I encounter one problem more than any other: a misunderstanding of how the shutter button works on an autofocus camera.
I regularly hear the same complaint from beginning digital photographers: “I don’t like my digital camera because when I press the shutter button down, there’s a delay before the picture takes.” At first I thought these people were just very sensitive to the slight shutter lag that some cameras have. Until recently, most low- and mid-range cameras did possess a perceptible delay between the time you pressed the shutter and the time it actually recorded an image. However, most diligent vendors have solved this problem.
I’ve finally realized that the problem these people are having is that they’re not pressing the shutter button correctly.
Here’s how it’s supposed to work on an autofocus camera: frame your image the way you want, and then press the shutter button halfway. This tells the camera to autofocus, calculate an exposure, and calculate a white balance (if you’re using automatic white balance). Once it’s done this — and in low light, or with a camera with a poor autofocus mechanism, it might take a few seconds — the camera will beep, and will usually display a light in the viewfinder. At that point, it’s ready to go. You can then press the button the rest of the way, and the camera will take its shot.
If you just mash the button all the way down the instant you want a picture to be taken, then you will most certainly miss the shot (unless you’re shooting a landscape or other immovable object) because the camera will have to perform all of those tasks before it can take the picture.
“Well that’s silly,” you say, “I didn’t have to wait for all of that stuff on my old camera.” Right. You usually did those things yourself if you were shooting with a manual camera, or you didn’t have to do them at all if you were shooting with a fixed-focus disposable camera. These are not extra steps that are a result of the camera being digital; they’re simply the realities of working with any automatic camera, whether film or digital.
Nag Nag Nag
Hopefully, the concepts covered in these last two columns will help you get along a little better with your digital camera, as well as help open up some new creative possibilities.
My last tip is a simple one: practice. It may sound strange to think about practicing photography, but learning to see in a way that’s relevant to making a good picture is a discipline, and it’s something that you will find you get better at as you continue to shoot.
Obviously, the first step is to carry a camera with you, but it’s easy enough to carry a camera and still never shoot anything because you “didn’t see anything.” Get your camera out of the bag and start looking through it! You might be surprised at how many good photos are right under your nose once you get in the habit of searching them out.
Read more by Ben Long.
This article was last modified on January 6, 2023
This article was first published on November 9, 2004
Commenting is easier and faster when you're logged in!

Recommended for you
Scanning Around With Gene: Stuff I Miss About Photography
For my thirteenth birthday, my father gave me a “junior darkroom” kit and taught...

Damn You, Art School
It takes more than a good education to succeed in a any field. It takes real-wor...

Digital Camera How-To: Shooting Snowy Scenes
Winter is a great time to get out and take some pictures with your digital camer...