


Digital photography mavens tout the superior convenience of shooting digital, and it’s definitely speedier than shooting film. But, as anyone who’s sorted through hundreds of digital image files knows, managing your digital photography workflow is still a major time-suck. Apple’s new Automator application, included in every copy of Tiger (the latest upgrade to OS X), is an exceptional workflow automation tool that can greatly ease your digital photography management chores.
Many people have called Automator as a “visual AppleScript,” and it certainly does put AppleScript control into the hands of many people not comfortable writing scripts. Others have pigeonholed Automator as a macro program similar to CE Soft’s QuicKeys. Since it’s built on AppleScript, Automator is far more powerful than macro programs because it can so easily span multiple applications.
But what really sets Automator apart is its sophisticated integration with the Mac OS. With some clever Automator setup, you create commands that can be accessed directly from the Finder, freeing you from the time-consuming process of launching a full-blown image editor when you only need simple manipulation. Though no automation process can replace the hands-on, image-specific edits and adjustments that a photographer needs to make, there are a number of operations that don’t need a brain behind them. This is where Automator shines.
Get with the Flow
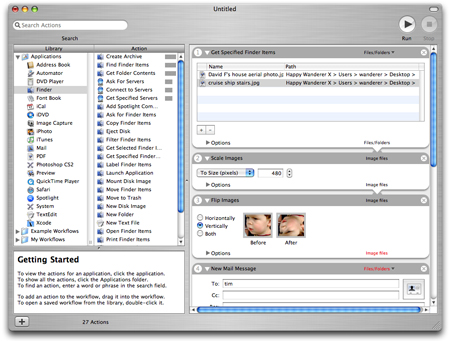
Automator’s design roughly follows the design of iTunes and other Apple iApps. You’ll find a list of Automator-supported apps on the left side of Automator’s main window, in the Library column. Click on one of these, and all of the Actions that Automator can access from that program will be displayed in the Actions column. To combine these into a sequence that Apple calls a “workflow,” you simply drag actions into the workflow area in the right side of the window.
Apple’s new Automator is a tremendous boon for digital photographers drowning in files.
In a previous column, I looked at ways to use AppleScript to improve your digital imaging workflow. I demonstrated how to write AppleScripts to perform simple tasks, such as resizing and mailing images. If you never wrote those scripts, congratulations! Automator makes it much easier. Here’s how:
Drag a couple of image files into Automator’s workflow space. Automator automatically adds an action called Get Specific Finder Items. This action will display the images you’ve selected and let you easily add and delete pictures from the list.
Now click on Preview in the Library list. You’ll see all of Automator’s supported Preview actions. Drag the Scale Images action into your workflow, directly beneath the Get Specified Finder Items action. (Automator will probably warn you that you may want to create a copy of your image before doing this. Proceed as you please.) In the Scale images dialog, you can enter a scale value. The two Actions are now linked together: Images flow from the Get Specified Finder Items into the Scale Images action.
Click on Mail in the Library list and drag a New Mail Message Action into your workflow. You can fill out this piece of mail, just as if you were in your email program. Drag the Add Attachments To action below the New Mail Message action, and you’re done. Click the Run button (or hit Command-R) and your action will execute.
Obviously, going through this procedure isn’t faster than driving your mail program by hand. The benefit comes in the ways you can re-use this workflow. The easiest way is to save it as an Automator document, then open it at any time and drop new images into it. That’s a time-saver, but Automator can do even better.
We Don’t Need No Stinkin’ Apps
In the previous example, you specified files to operate on. You can just as easily define workflows that aren’t pointed to specific files.
Delete step 1 (Get Specified Finder Items) from the workflow you created by clicking on the little X in the action’s upper-right-hand corner. Now go to the File menu and choose “Save as Plug-In.” Select “Finder” as the plug-in type and enter “Resize and Mail” as a name.
Go to the Finder and Control-click on any image file to open up the Finder’s context-menu. You should see an Automator submenu, and within that, the Resize and Mail workflow that you just created. Select it, and your image will automatically be resized and attached to a message in Apple’s Mail program.

Automator workflows integrate tightly into many parts of the Mac OS, including the Finder’s standard context-menu. Automator allows you to easily execute complex workflows on individual files.
Automator’s context-sensitive integration with the Finder means that you can take a more “document-centric” approach to many of your basic tasks. For example, you can create Automator plug-ins for all of your basic image editing operations — scale, rotate, flip, convert format, etc. — and then access them from Automator’s pop-up menu without ever leaving the Finder.
Watch This!
Automator provides other kinds of plug-ins, but for digital photographers, the most useful (after Finder plug-ins) is to create a Folder Action. Select Save as Plug-in and then change the type to Folder Action. Your workflow will be attached to the selected folder. Any file dropped into that folder will automatically be processed through the attached action.
Folder Actions are particularly useful for regularly repeating production workflows where you need to rename files in specific ways, ensure that images are converted to certain color modes, or move files to other servers. Automator’s Finder library includes an excellent renaming action that can sequentially number batches of documents, as well as actions for copying files to remote servers.
Finally, you can also save any workflow to the standard AppleScript menu that appears in your menu bar.
Taking Action
Learning to exploit Automator requires a slightly different mindset. Most of us are used to thinking about solving particular problems by first activating the relevant application and then moving our data into it. Once you’ve built and installed the appropriate Automator workflows, you’ll probably find yourself less dependent on launching applications. Automator gives you access to a program’s individual commands even when the program isn’t open. In the case of image editing, you simply choose the images you want to process, then pick the process you want to perform. Automator takes care of grabbing the requisite functionality from the right places.
Apple has shipped Automator with a good supply of actions, but it covers only Apple’s own apps. The included Preview actions provide these basic image manipulation tasks:
- Apply ColorSync Profile
- Change type of image
- Create Thumbnail
- Crop
- Flip
- Open in Preview
- Pad
- Rotate
- Scale
Fortunately, Automator’s Action selection can be easily expanded. I’ve already written scores of Photoshop actions that work with either Photoshop CS or CS2. You can download them for free. Here is a sampling of the Photoshop commands I’ve added to Automator:
- Unsharp Mask
- Change Mode
- Flatten Document
- Edit IPTC Info
- Auto Levels
- Save as TIFF
- Do Action
- Rename from EXIF
- Fit Image
- Filter From EXIF
- Filter From Orientation
The more you use Automator, the better you’ll become at making its power work for you. Automator alone is worth the price of the Tiger upgrade, especially if you’re a photographer who regularly needs to process lots of images.
This article was last modified on December 14, 2022
This article was first published on May 11, 2005
Commenting is easier and faster when you're logged in!

Recommended for you
Scanning Around With Gene: Stuff I Miss About Photography
For my thirteenth birthday, my father gave me a “junior darkroom” kit and taught...
Photoshop Quick Tip: Applying OpenType Alternates
As Ilene Strizver wrote in a recent TypeTalk, you can use alternate characters i...

Creative Blöks: The Perfection Fairy
Each step you take on a creative path—whether you’re designing, drawing, or deve...