


Adobe Camera Raw is an incredibly powerful and flexible tool for applying adjustments to images before you open them in Photoshop. And in the recent announcement of Photoshop CC, it was revealed that Creative Cloud subscribers will get the ability to apply Camera Raw adjustments as a filter. So if you’re new to Camera Raw (or if you just want a refresher) these ten tips will help you get even more out of using Camera Raw.
1. To process JPEG, TIFF, or raw images in Camera Raw, select one or more of the files in Adobe Bridge and choose File > Open In Camera Raw (or press Command+R Mac or Ctrl+R on Windows). You can also use the your Camera Raw preferences to specify whether or not JPEG and TIFF images with Camera Raw settings are automatically opened in Camera Raw.

2. When you finish making adjustments to an image in the Camera Raw dialog box, you have a few options of what to do next. Click Open Image to accept the changes and open the adjusted image in Photoshop.
![]()
Hold Option/Alt while clicking Open Image to open a copy of the adjusted image in Photoshop (and not save the adjustments to the original image’s metadata).

Hold Shift while clicking Open Image to open the image as a Smart Object in Photoshop.
![]()
3. Click the Save Image button in the lower-left corner of the Camera Raw dialog box to save camera raw files in PSD, TIFF, JPEG, or DNG format. You can use the Save Options dialog box to specify location, file names, format, quality, etc.

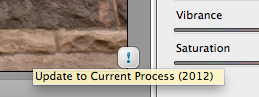
4. If you have images that you adjusted with an older version of Camera Raw, you can update them to use the current process version and take full advantage of the newest Camera Raw controls. To update a photo to the Camera Raw 7 process version, click the exclamation-point icon that appears in the lower-right corner of the image preview.
5. Click the black or white triangles over the histogram to see which pixels are being clipped in the shadows or highlights. You can also use the keyboard shortcuts O (to show clipped highlights) and U (to show clipped shadows).
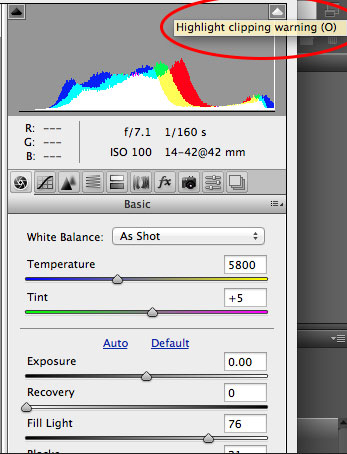
To see only the pixels that are being clipped inside the preview image, hold Option/Alt while dragging the Exposure, Contrast, Highlights, Shadows, Whites, or Blacks sliders.
6. You can keep track of the exact color values in specific locations within an image while you apply adjustments by placing color samplers. Press S to get the Color Sampler tool, then click in the image to place samplers. RGB values appear above the image. Drag a sampler to move it. Option/Alt-click a sampler to remove it. Click Clear Samplers to remove all of them at once.

7. You can quickly remove a color cast from an image by clicking on an area that you know should be neutral gray with the White Balance tool. The values in the Temperature and Tint sliders will be adjusted to neutralize the color you clicked on.

Double-click the White Balance tool to reset White Balance to As Shot.

8. If an adjustment isn’t turning out the way you want, you can double-click any of the slider controls to reset them to their default positions.
![]()
![]()
9. Ever wonder exactly what the Clarity, Vibrance, and Saturation controls do? Clarity increases the contrast of midtones, with an effect similar to a large-radius unsharp mask. Vibrance targets the saturation of less-saturated colors while having a smaller effect on already highly-saturated colors and skin tones. Saturation simply adjusts the saturation of all colors equally.

10. With the Targeted Adjustment tool you can drag on specific areas of a photo to make changes to color and tone there. Click and hold on the Targeted Adjustment tool to choose the type of adjustment you want (or use the keyboard shortcuts shown below), then drag on the area of the image you want to affect. Drag up or right to increase values; drag down or left to decrease values.

This article was last modified on July 20, 2021
This article was first published on May 6, 2013
Commenting is easier and faster when you're logged in!

Recommended for you

Peachpit Announced the Publication of Layers: The Complete Guide to Photoshop’s Most Powerful Feature
Peachpit announced the publication of Layers: The Complete Guide to Photoshop’s...

Photoshop 10 Essential Tips: Working with Layers
Photoshop users have been enjoying the ability to shuffle around layers since ve...

Creating a Retro Comic Book Effect in Photoshop
How to turn any photo into a comic book style image