
Focus & Filter: Finding the Right Lenses

The following excerpt was taken from Focus & Filter: Professional Techniques for Mastering Digital Photography and Capturing the Perfect Shot by Andrew Darlow.
Finding The Right Lenses
There is no substitute for doing your own lens testing (search “How to test a lens” on www.lensrentals.com for some excellent step-by-step advice). That being said, it’s very difficult to properly test a lot of lenses. Technologies such as image stabilization (IS), which allows you to get sharp images at shutter speeds slower than the norm, are constantly improving, and on some cameras, the IS happens inside the camera body, allowing all lenses to be stabilized. The best sources I’ve found for unbiased reviews of lenses are magazines and online sites (you’ll find many listed in this tip) that write about and review lenses. But before you head to your computer, here are some things to keep in mind.
Upgrades—some lenses may be upgraded by their manufacturer, but may keep the same or very similar name. For example, Sigma has created at least four generations of their 120–300 mm f/2.8 lens, and the only way to quickly see which lens you are looking at is via the string of two- to three-letter abbreviations that follow the product name. I’ve noticed that Canon and Tamron will usually add a roman numeral to the end of their lens names if a lens with the same basic specs is updated. Some companies also designate a higher-end group of lenses with one or more letters, such as Canon’s L series of lenses (see fig. 20.1).

Fig. 20.1 A collection of Canon L lenses and converters at a photo trade show. L glass is Canon’s highest quality lens line.
Crop Sensors And Non-Full-Frame DSLRs—Many lenses are made specifically for crop-sensor or non-full-frame DSLRs. Canon’s line of DSLR crop-sensor lenses are designated with the term EF-S, as opposed to its EF line. The EF line will work properly when mounted on either a full- or crop-sensor camera body, but the EF-S line will not mount on the eF line of full-frame Canon bodies.
Nikon’s DSLR crop-sensor lenses are called “DX.” the DX lenses can be used with its DX DSLR camera bodies, as well as its full-frame FX line of DSLRs. However, Nikon FX DSLRs will use the camera’s DX crop mode, which does not use the full area of the camera’s sensor. This is very important to know before purchasing lenses (especially if you own a Canon DSLR). If your camera comes bundled with one or more lenses made for a crop-sensor camera, you can always sell them while they are brand new and invest those funds in lenses made for full-frame cameras.
Lens Weight—The differences in weight between lenses can be staggering, even for lenses with similar specs. This should be considered because if you are planning to travel the world, you may not want to lug 40 pounds of gear around. Another important point about crop sensor lenses is that they tend to be much lighter than their full-frame DSLR counterparts because the lenses only need to cover a smaller sensor area. This can be seen with the Micro Four thirds system, which is defined primarily by its sensor size (like the term full-frame or APS-C). Cameras built around the Micro Four thirds system have a 2x crop factor, resulting in lenses that are often one-third to half the weight of full-frame lenses (when comparing lenses with similar focal lengths and maximum apertures). When I want to scale down for traveling and still get great image quality, I often choose my Olympus OM-D E-M5 and Olympus 14–42mm f/3.5–f/5.6 lens. The lens weighs just under 4 ounces (about 100 grams) and the body plus a battery weigh just over 15 ounces (425 grams).
Lenses with the same model number (even if brand new) may not all arrive to you in their best possible condition. Due to the fact that lenses are made from many different parts (including a lot of precision-cut glass), your experience with a specific lens may be very different from that of someone who tests a lens. In other words, you may just have a less-than-perfect copy if you are noticing extreme softness in one corner, or extreme vignetting or chromatic aberrations that you don’t see in any other tests. That’s why it is critical to do some lens testing soon after purchasing each of your lenses. If a lens is still under warranty, it is much easier to get it repaired or replaced by the manufacturer for no cost (except maybe shipping fees).
Microadjusting the Autofocus—one other major thing to keep in mind is that some lens and camera combinations may not autofocus on the exact spot your autofocus system “thinks” is the best plane of focus. Because of this, some higher- end cameras have the ability to microadjust the camera for specific lenses (the camera then remembers the adjustments you make).
Sigma stands out in this area, going much further by allowing you to attach some of their newer lenses to a USB dock, and the dock to a Mac or Windows computer. You can then update lenses’ firmware, adjust parameters like autofocus at different focal lengths, and in some cases, adjust the way in which the lenses’ optical image stabilization (OIS) performs. A search online for “lens microadjust tutorial” will bring up some excellent articles and videos on this overall topic. If your camera does not have a lens microadjust function, you may be able to have the manufacturer tune your lens to your camera body if it is not focusing properly.
One specific product I’ve used to help me determine whether my lenses need to be adjusted is the Datacolor spyderlenscal focus calibration tool (see fig. 20.2). One particularly good article on the topic that includes a DIY option for checking and making microadjustments can be found on www.the-digital-picture.com (search for “AF Microadjustment tips”).
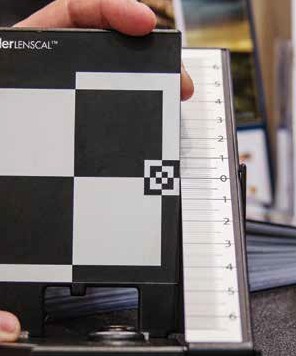
Fig. 20.2 Datacolor’s SpyderLensCal focus calibration tool.
Two other products worthy of mention that help with this process are LensAlign and FocusPyramid (www.focuspyramid.com). An excellent how-to article that covers LensAlign can be found here.
Teleconverters/Extenders—Teleconverters extend your lenses’ reach by magnifying the image (like a magnifying glass). Depending on a number of factors, these can do amazing things. The most important factors are starting with a high-quality lens and then only using a very high-quality extender. I’ve found them most useful for wildlife photography (especially of birds) and for taking photos of the moon. Also note that not all extenders work with all lenses. All will reduce the amount of light coming into the camera, some won’t allow autofocus, and some are not compatible at all (even when using a matching camera brand). Illustrated in fig. 20.3 is one of my favorite lens/teleconverter combinations. The image quality is very good to excellent, but not as good as most higher-end telephoto lenses without a teleconverter that can weigh two to three times more. I’m able to achieve a focal range of 105–450mm with this combo when using full-frame cameras, and together, they weigh only 26.1 ounces (740 grams). Kenko also makes 1.4x and 2x Pro model Teleplus teleconverters that get very good to excellent reviews. I’d also recommend looking at teleconverter options from your camera’s manufacturer, but make sure they are compatible with the lens(es) you are planning to use. In some cases, they will work but will not allow autofocus, which makes them much more difficult to use (especially with DSLRs). For much more on this topic, search online for “teleconverter information.”

Fig. 20.3 A Canon EF 70–300mm f/4–5.6 IS and Kenko DG 1.5x Teleplus MC Teleconverter.
In-Camera Lens Corrections and Post-Processing— this is a complicated subject but important to cover. No lens is perfect. Many have inherent distortions, such as pincushion or barrel distortions, and many have vignetting (darkening of the corners and/or borders). When shooting in RAW or JPEG mode, some cameras allow you to apply different lens corrections to your images as the photos are taken, such as reducing chromatic aberrations (an optical issue that shows up in the form of color “fringing,” usually seen around high-contrast areas like tree branches). Unless you are not able to do any correction to your photos due to deadlines, or some other reason, I recommend turning off any in-camera corrections so that you can apply corrections afterward in a program like Photoshop, DxO Optics Pro, DxO ViewPoint and Lightroom (my preferred option because it fits very well into my raw workflow). There is even a way (via an import Preset and a Develop setting) to set “auto chromatic aberration removal” for all of your photos immediately as they are imported into Lightroom so that you don’t have to remember to do it later.Visit www.askandrewd.com and search for “chromatic aberration removal” for a video tutorial.
Lens Filters—The subject of lens filters, usually made of glass or hard plastic, could encompass an entire book! And for good reason. Even with the advent of better quality lenses and amazing software to improve the look of our images, there are some things that can’t easily be corrected, and there are some filters that every serious photographer should consider having in their bag. Two of those include a circular polarizer for darkening skies and controlling reflections in some situations, and a neutral-density, or ND, filter, which is useful for long exposure shots like waterfalls, especially on sunny days.
Some of the websites listed here, such as www.dpreview.com, have discussion boards where people talk about different filters, and many of the sites do hands-on reviews of different filters. The one headache often introduced by adding a filter is vignetting (due to the fact that their width can extend into the edges of the frame), and I have a solution for that, which is shown in fig. 20.4. I attached a step-up ring to my filter threads on my lens. I then added a circular polarizer. And to show that another filter can be stacked, I added a Tiffen filter ND filter to the front of the circular polarizer. In real-life use, the circular polarizer should be placed in front of any other filters so that you can more easily adjust it.

Fig. 20.4 Here I’ve attached a 58–77mm step-up ring to the 58mm filter threads on my Canon EF 70–300mm f/4-f/5.6 IS lens. Camera: iPhone 5S; Lens: Built-In 4.15mm f/2.2 @ 4.15mm; F-stop: f/2.2; Exposure: 1/380 Sec.; ISO: 32
When using the circular polarizer, be sure to only turn it in the same direction from the way you attached it to the camera to avoid potentially unscrewing it by mistake (been there, done that!). Also consider the fact that any glass you add to a lens will degrade image quality in some way, which is why I don’t normally use a UV or Skylight filter unless I will be taking photos near an ocean or dusty environment. Skylight filters add a slight color tint to the image, so if I were to suggest one over the other, I would recommend a UV filter instead. Roger Clark (www.clarkvision.com) has some excellent tests on his site that show that telephoto lenses can be especially prone to image softening when using filters (just search for “filter quality”).
Super Tip: I can’t take credit for this one (I saw the suggestion online), but if you are having a problem removing a filter from your camera, try attaching a rubber band snugly around the filter and giving it a turn. It’s pretty amazing how well it can work!
I chose to show the picture in fig. 20.5 to demonstrate three features found on some higher-end lenses:

Fig. 20.5 Camera: Sony A7R II; Lens: Zeiss Batis 85mm; F-stop: f/1.8; Exposure: 1/100 Sec.; ISO: 2000
- First, the selective depth of field you see was possible thanks to a maximum aperture of f/1.8. If the maximum aperture had been f/2.8 or f/4, there would have been more depth of field (the type on the menus would probably have been sharp). This is assuming that I focused on the same object in the scene (the head of the statue of the woman praying).
- Second, there is a very bright reflection from the sun on the statue (camera left) but the contrast in the image is still excellent, and there are absolutely no chromatic aberrations.
- Third, there is a creamy and very pleasing “bokeh,” or out-of-focus area in the background of the image.
Below are some of the websites (in alphabetical order) that I rely on for lens information; many of them also review cameras and other photo-related products.
Camera Labs (Cameralabs.com)—An excellent online resource with recommendations of lenses that are well organized by the lens manufacturer. It includes many actual tests of lenses showing their center and corner image quality at different apertures (often comparing similar lenses on the same camera body, which is no easy feat!). They also have some easy-to-read lists of “best lenses” from different manufacturers.
Digital Photography Review (dpreview.com)—A very popular site known for its user forums, Digital Photography review has a database of many lens reviews. They have also partnered with DxO labs to provide DxOMark data, which allows readers to compare various lenses at different apertures in multiple areas, including sharpness, distortion, vignetting and chromatic aberration.
DxO Labs (dxomark.com)—DxO labs has thousands of lens tests on their site. Don’t miss their well-written “Best lenses” articles, which cover lenses for specific cameras. You can find the articles by doing a search for “Best lenses” on the site.
EPhotozine (ephotozine.com)—Another useful online resource with many lens tests and helpful real-life images (not just photos of test charts).
Photozone (photozone.de)—An excellent, well-categorized resource with extensive testing (including a test of bokeh) and many outstanding real-life images. The site also has a nifty sample image viewer that allows you to see a blown-up view of a small area instead of downloading an entire image.
Popular Photography (popphoto.com)—Popular Photography magazine has been doing lens tests for many decades, and their tests can be very useful in part because they are usually written by people who have had a lot of “on-camera” experience with lenses. The magazine also publishes very interesting lens-related articles like “21 cool lenses for Any compact system,” which can be found in the April 2014 issue.
SLR Gear (slrgear.com)—this site combines reviews done by the editors of the site with recommendations in a few different categories from users of the lenses.
This article was last modified on January 8, 2023
This article was first published on July 26, 2017
Commenting is easier and faster when you're logged in!

Recommended for you

Premiere Pro Tutorial: Simple Color Correction for Video
Adobe Premiere Pro can feel a bit intimidating if you are new to the program and...

100 Most Important Cameras in History
If you didn’t get exactly what you wanted for the holidays, here’s a treat you c...

Before&After: Design a Card the Easy Way
A photo and one block of type are all it takes to make a beautiful business card...