

The Home-Court Advantage: Getting the Edge with EdgeRank
Using Facebook’s built-in scheduler may also give you a strategic advantage with EdgeRank, the proprietary set of algorithms that determine which postings get displayed to whom in Facebook’s News Feed. (See “Reaching Your Audience on Facebook: Understanding EdgeRank” for much more info on EdgeRank and how it works.)
Why? Because postings that originate from Facebook’s own scheduler tend to score better with EdgeRank, and are therefore displayed to more people, than postings that come from third-party apps like Hootsuite.
This may be because Facebook feels that if you’re taking the time to post content directly on Facebook, it’s more likely to be high-quality content that speaks directly to your audience. And on the flip side, if you’re blasting out the exact same posting across multiple networks, it’s likely to be a more generic message that’s less customized to Facebook and its audience — and it might even be downright spammy.
So if saving time is your only consideration, go ahead and send the same cookie-cutter status update to Facebook that you’re also posting on Twitter and LinkedIn and anything else you can hook up to Hootsuite.
But if you want maximum impact and exposure in Facebook’s News Feed, take the extra few minutes to tailor your posting to the Facebook audience, and post it directly to Facebook using the built-in scheduler. (And of course, in some cases it may be best post it in real time, if it’s urgent or if you’re posting it to a personal profile where the scheduling feature isn’t available.)
How to Set Up a Post with the Facebook Scheduler
Now that we’ve talked about why you should use Facebook’s built-in scheduling feature, let’s talk about how it works. Start by going to any business or official page on Facebook for which you’re currently an admin. Next, make sure you that you’re currently using the identity of the page itself, rather than your own identity as an individual.
There are two easy ways to check this. You can look at the Voice menu at the very top of the page, which will tell you whether you’re currently posting, commenting, and Liking as yourself or as the page. If it’s you, go ahead and click on “Change to [name of page]” so that you’re now speaking in the page’s voice.

Figure 3: The Voice menu shows you whether you’re communicating using your own identity at the moment, or in the voice of the page. Click on either your name or the page’s name to change which hat you’re currently wearing.
Alternatively, you can fully log in as the page by clicking the Edit Page button in the Admin Panel at the very top of the page, and choosing “Use Facebook as [name of page]” from the menu. Once you do that, you’ll be communicating in the voice of the page. (And as a bonus, the icons in the blue bar will show you notifications addressed to the page rather than to you as an individual, until you switch back to your own identity via the same menu.)
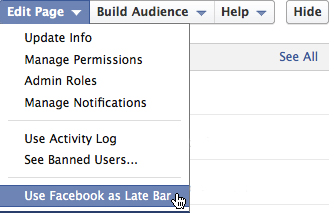
Figure 4: You can also log in as the page via the Edit Page menu in the admin panel.
Once you’ve made sure you’re posting in the page’s voice, head down to the publishing area to set up your post. Once you click in the “Write something … “ field, you should see a little button with a clock icon on it appear in the lower-left corner.
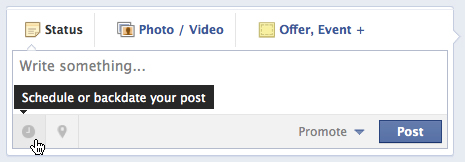
Figure 5: Clicking in the “Write something … “ field causes the clock button to appear in the lower-left corner.
Click the clock button, and you’ll begin to see a series of prompts to enter the date and time on which you’d like your posting to be published. The first control says “Add year,” and once you click that and choose a year from the menu (most likely the current year unless it’s either the end of December or you’re working very far in advance), an “add month” prompt will appear. Continue this process by adding a day, hour, and minute — as you set each parameter the next one will appear.
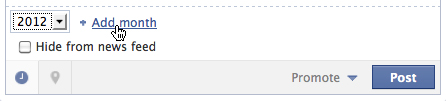
Figure 6: Controls appear one by one that allow you to specify the year, day, hour, and minute that you want your post to be published.
You should also notice that the Post button has changed to a Schedule button, since you’re working in advance. Once your post is all set up, and ready to go, click the Schedule button. You’ll see a confirmation message from Facebook letting you know that your post in now queued up for future publication to your page.
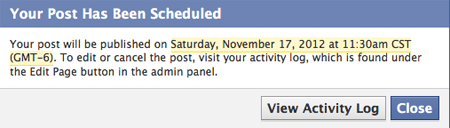
Figure 7: Success! Facebook lets you know that your upcoming post has been scheduled.
How to Check the Activity Log to See Your U
pcoming Posts
Of course, you don’t have to take Facebook’s word for it. You can check to make sure your scheduled postings are queued up accurately any time you want by visiting your page’s Activity Log, where you can also change their scheduled posting times, edit them, or cancel them altogether if you choose to.
To check the Activity Log, head back up to the Admin Panel at the top, click the Edit Page button, and choose Use Activity Log from the menu.

Figure 8: Access the Activity Log via the Edit Page button.
Once you arrive at the Activity Log, you’ll see any future posts you’ve already queued in the Scheduled Posts area.
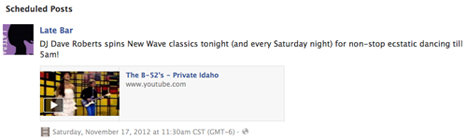
Figure 9: A scheduled post as it appears in the Activity Log.
Mouse over to the right-hand side of a scheduled post in the Activity Log, and you should see a downward pointing arrow appear. Click that, and from the menu you can choose to change the time of the posting, publish it immediately, or cancel it altogether. (Unfortunately, you can’t edit the text of the posting itself in the Activity Log. If you need to do that, you’ll have to cancel it, and then set it up again correctly from scratch. Editing posts is at the top of my Facebook feature wish list these days!)
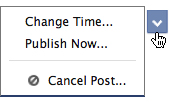
Figure 10: The options in the arrow menu for a scheduled post.
As I mentioned earlier, if you get in the habit of scheduling all of your postings in advance, then looking over your queued-up posts in the Activity Log will give you an opportunity to make sure that they work not just on an individual basis — but as part of a well-rounded mix of content.
And somewhere, Ben Kingsley will be nodding ever so slightly in approval.
This article was last modified on December 14, 2022
This article was first published on November 26, 2012
Commenting is easier and faster when you're logged in!

Recommended for you

What is the cost of cheap design?
We could probably spend all day making a list of the many jobs whose economic vi...
CreativePro Week 2025 Preview: 5 Can’t-Miss AI Sessions
Our Editor in Chief lists his must-see sessions on the topic of AI at CreativePr...

Editor’s Picks for The InDesign Conference 2025
Our Editor in Chief lists his must-see sessions for the InDesign Conference 2025...