
Explore a Little-Known QuarkXPress Gem

Recently, I had to send a QuarkXPress 6.5 file to a service provider so that they could create a sign. It was a simple layout — really, just text. But, as often happens, the service bureau didn’t have the fonts and neither did I; the artist provided me with the XPress layout file only, uncollected. The fellow at the service bureau didn’t really want me to send along the font files, either; he suggested instead that I send the text as outlines. (Some printers make this request even when you do have the fonts.)
How do you take that on in QuarkXPress?
Text to Box — Our Hero!
The solution is actually quite direct, but not a lot of people talk about it or use it. It’s on the Style pulldown menu, and it has a sort of awkward name: Text to Box.
But it’s well-named. Text to Box is exactly that: a functionality that takes text you specify and converts it into a QuarkXPress Beziér picture box, which can then be filled with an appropriate color. The box is no longer editable as text, but it’s not connected to any font file, thus breaking through this designer-service bureau stumbling block.
Because it is a Beziér picture box, it has all the features and functions of one. You can fill it with color or a picture, and, as Pariah Burke showed in an inspiring how-to, you can fill each separate letterform with its own image. Pretty nifty.
Basic Boxing
The basic operation of Text to Box is straightforward:
1. Using the content tool, highlight the text you’ll want to convert.
2. From the Menu Bar, choose Style>Text to Box.
That’s all there is to it for the basic function.
You will now, however, find that you seem to have two copies of the text you just boxed (Figure 1). The original text is still in place, but a new copy — one which has a big “x” through like traditional picture boxes, and all the Beziér handles highlighted — will appear, typically below the text box in the layout.

Figure 1.
Now either the text or new text box can be deleted, changed, copied, pasted, filled with color or “Get Picture” command, or put on another layer and hidden. The box can also be stroked for even more design effect, using options in the Frame page of the Modify dialog box.
You can move the new text box the same way you move a regular picture box: by choosing the Item tool, mousing over the box until you see the cursor change into the four-way pointer, then dragging.
You can alter the shapes of the letterforms themselves with the handles along the edges of the letters, which can come in handy for logo designers, for example.
Advanced Boxing
The basic Text to Box leaves you with an integrated picture box with discontinuities, not unlike a word-shaped mask. Also, you can’t move the letters independently; they are all parts of the same box, and you can’t scale the word-shaped box up and down, as you can text.
You can work around this using a simple keypress:
1. Highlight the text you want to convert.
2. Go to Menu Bar>Style>Text to Box, this time holding down the OPT key on the Mac or the ALT key in Windows.
The text will change to a discontinuous picture box as before, but something different has happened: it has not been replicated and has not left the original text untouched (Figure 2). Also, if you try to move the boxed text, you will find that, first off, you can’t do so.
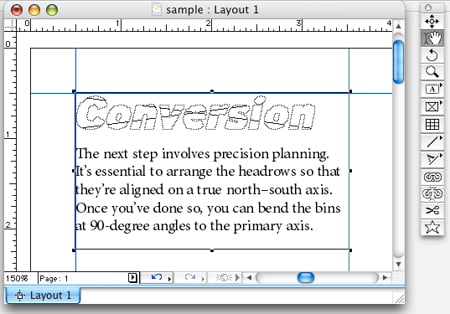
Figure 2.
This is because the text has been converted in place in the text box you originally generated, and the object has been anchored inside the text box. You can scale this anchored object by the traditional method of holding down CTRL-SHIFT-OPT and the < or > keys (or live dragging with the mouse). The object can’t be edited as text, of course.
Break It Up, You Guys
If you find the integration of letterforms into a single yet discontinuous picture box irritating, never fear, there’s hope! However, the following trick works only on type converted using the basic method, not on type converted to an anchored object.
Once you’ve selected your boxed text, go to Menu Bar>Item>Split. The Split menu has two items, which work in notably different ways:
A. All Paths: With boxed text, choosing this option has the effect of breaking all letterform box shapes into discrete boxes — they are no longer unified. Counters in the letterforms become holes in the boxes.
B. Outside Paths: Choosing this option breaks out the letterforms into separate boxes and creates boxes out of the counters. On the minuscule “e”, for example, the counter becomes a half-moon shaped object you can move off the “e”-shaped picture box, leaving no hole behind.
It’s The Path To…What?
Text to Box allows us to convert our text to, essentially, paths, and play boxy games with them. But what is all that good for?
In addition to letting you fill the letterforms with one or more pictures, Text to Box quickly solves problems associated with sending fonts to a service provider. Delinking the font and its metrics from the appearance of your aligned type can prevent unexpected shifts of type — not every similarly-named font has identical metrics, and having metric-independent letterforms can prevent unwelcome surprises down the road.
This font-file independence pays off in many ways, not just between designer and service bureau: exporting files as PS and EPS files and importing them into other applications on other machines becomes much less error-prone.
Just one word of warning; displaying Beziér text boxes requires a great deal more information than simple picture boxes or text, so the more complex the outline, the more work it is for your computer to move them around. If you convert heavily serifed or decorative fonts, such as Papyrus, prepare to be patient as the application catches up with you.
However, in the main, it’s a clever and powerful QuarkXPress feature, and if you like playing with type, it will be right up your street.
This article was last modified on January 10, 2022
This article was first published on January 5, 2007
Commenting is easier and faster when you're logged in!

Recommended for you

Field Guide to Composition Highlighting
Have you ever opened an InDesign document and wondered, geez, why am I seeing al...

Making Responsible Choices with Gen AI
Simple guidelines for choosing generated images that won’t undermine your credib...

The Case of the Pinched Page Numbers Contest Answer and Winner!
Solve this InDesign mystery for a chance at winning a great prize.