
Expanding Artwork in Illustrator
Learn the benefits and consequences of rendering live effects as real vectors.


This article appears in Issue 7 of CreativePro Magazine.
Some of the most powerful features in Illustrator allow you to create artwork or change its appearance in a nondestructive way, so you can quickly and easily make major edits right up until output. These features include envelopes, blends, brushes, variable strokes, Live Paint, Image Trace, symbols, compound shapes, and transparency (Figure 1).

Figure 1. Some examples of live objects in Illustrator: appearances, blends, brushes, repeats, Live Paint, envelopes
But as cool as these features are, at some point in your workflow you may need to convert live effects into simple (or, more likely complex) vector paths. This process of rendering live effects is called expanding or, in the case of transparency, flattening (Figure 2).
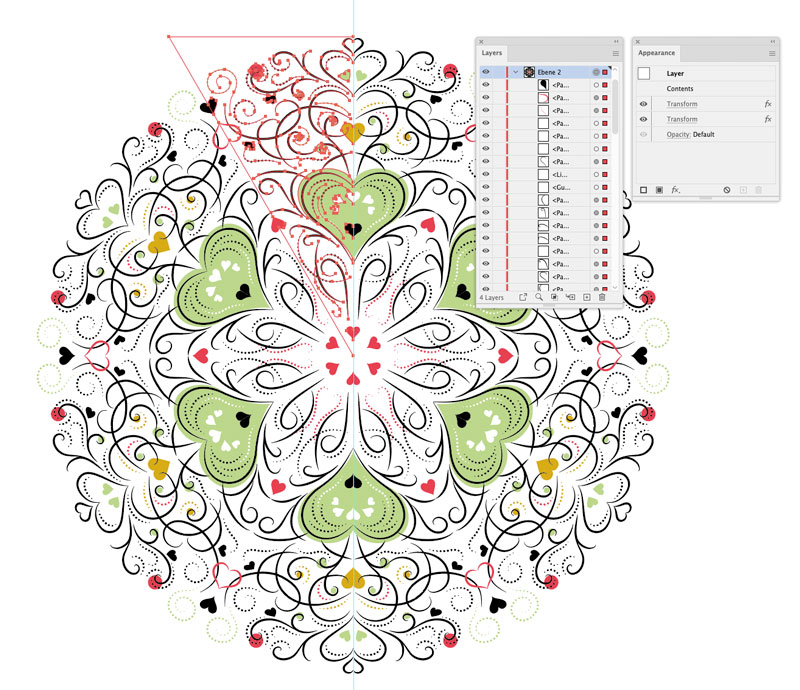


Figure 2. Top: A mandala design, created using variable width strokes and two instances of the Transform effect.
Bottom: The paths after expanding the effects. Edits made to an individual path in the after state will affect only that path, not all the reflected copies, as would happen in the before state.
You will need to expand your artwork when you want to edit the auto-generated parts of live objects or when you need to deliver a design in a simple vector format—perhaps for output on a plotter or another device that can’t use live Illustrator files.
Illustrator offers several commands you can use to expand your artwork, including Expand, Expand Appearance, Outline Stroke, Outline Text, Expand Envelopes/Blends/Live Paint, and, of course, Flatten Transparency. There are also times when expanding happens automatically without you using any of those features. In most cases, expanding is something that cannot be reversed after you save and close the file, so it’s very important you understand your options and what to expect. Now, allow me to expound on expanding.
Expanding Commands
There are several features in Illustrator for rendering live effects as regular vector paths. These are the ones you’ll use most often.
Expand
Using Object > Expand, you can expand most live elements in Illustrator. Among its many uses, the Expand command can convert a gradient into a special kind of mesh/envelope. Meshes in Illustrator are usually rectangular, but by expanding a radial gradient you can bend them into a circle. Start by applying a radial gradient fill to a circle. Limit your gradient to two stops—that will make it easier to work with—and then select Object > Expand. In the Expand dialog box, choose Expand Gradient to Gradient Mesh (Figure 3). Now, you can use the Mesh tool () to move or recolor the individual mesh points.
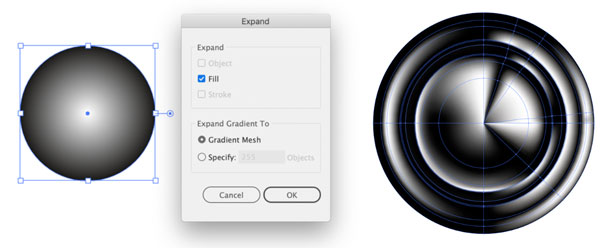
Figure 3. Expand a gradient to a mesh, which can then be used to bend a linear gradient.
The Expand command is very flexible. You can even use it on several selected live objects at once—unless any of them that have appearance attributes (such as multiple fills or strokes, or effects like drop shadows that you can see in the Appearance panel). For those items, the Expand command will be grayed out and instead you need to use Object > Expand Appearance.
Expand Appearance
Expand Appearance separates appearances with multiple strokes and/or fills to separate objects while rendering effects and brushes as vector paths (Figure 4).
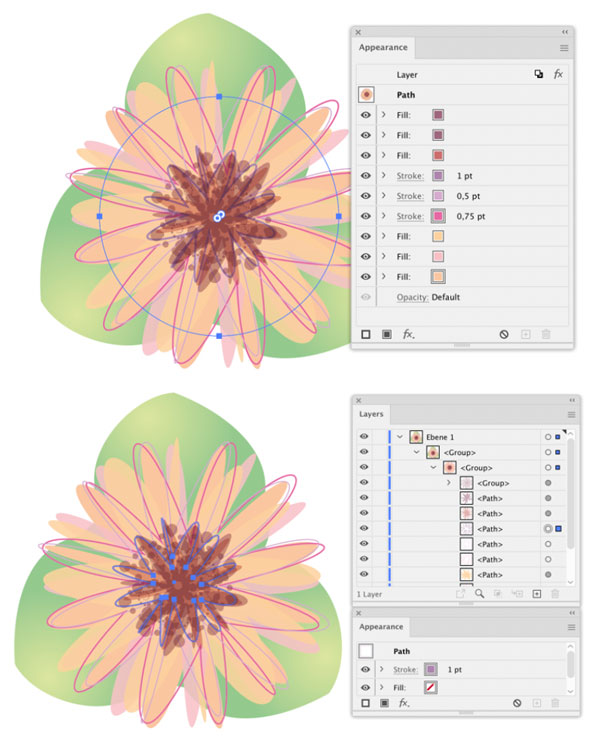
Figure 4. Before (top) and after (bottom) using Expand Appearance. Notice how one path with several fills and strokes becomes a group of several separate paths.
Note that effects and brushes will get outlined and filled when you expand them. You will need to add any desired strokes manually.
Flatten Transparency
A function that expands and outlines every live effect and appearance is Flatten Transparency. InDesign users have long used transparency flattening when exporting PDFs to such standards as PDF/X-1A and X-3, both of which include Acrobat 4 compatibility, which doesn’t support transparency.
In Illustrator, you can select any objects (even ones that don’t use transparency!) and choose Object > Flatten Transparency.
Why would you want to flatten transparency in live artwork? One reason is to resolve missing font problems by outlining text in AI files or placed PDFs. As long as you don’t need to edit the text, this can be very useful workaround when you get something like a logo file that doesn’t have the fonts outlined. If the logo file was saved with PDF compatibility, you can create a new file in the same document color mode, then choose File > Place and navigate to the logo file to place it. Important: Be sure to select the Link option in the Place dialog box; if you embed the file, this trick won’t work. Then use Object > Flatten Transparency and select the option to Convert All Text to Outlines (Figure 5).
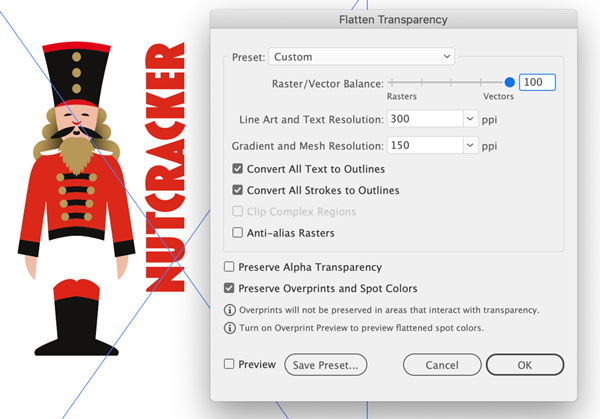
Figure 5. Missing a font in an AI file? No problem: Place and link it in a new file, and then use Object > Flatten Transparency. Note that this will not work when the AI file lacks an embedded PDF. How can you tell if it has an embedded PDF? Try previewing the AI file with Quick Look (macOS). If it works, then the file also has an embedded PDF.
This technique is also handy when text in a PDF is illegible after opening/importing it in Illustrator, or as an alternative to using Type > Create Outlines. For example, glyphs tend to be missing after you outline a Hebrew or Arabic text. The transparency flattener’s text outlining often produces better results than the Create Outlines function.
Here’s another cool use for Flatten Transparency: to keep overlapping paths when outlining a stroke. When you outline a stroke using Object > Expand or Object > Path > Outline Stroke, overlapping paths are automatically united. This might cause problems when you want to build with those shapes after expanding them. Instead, you can keep the overlaps in the expanded stroke when you expand it using Flatten Transparency (Figure 6).

Figure 6. A flourish can be made from a self-overlapping path (1), but when you outline the strokes, the overlaps are automatically united (2). Instead, use Flatten Transparency (with Convert All Strokes to Outlines enabled) to keep the overlaps (3), then you can use them to build gaps, for example (4).
Rasterize
Object > Rasterize is the “nuclear option” when it comes to expanding Illustrator artwork. It will wipe out all vectors and live effects and render them as raster (pixel-based) artwork. In the Rasterize dialog box you choose the color mode, resolution, background, and other options (Figure 7). Rasterized artwork will be embedded in the Illustrator file, but you can unembed it and save it as a separate linked file that you can then edit with Photoshop, with the commands in the Control panel.
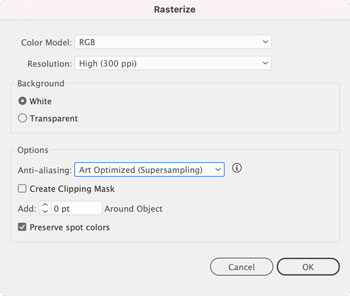
Figure 7. Rasterize settings for converting paths and effects to pixels
Rasterizing art is an extreme solution, but in some cases it may be the best (or only) way to get an extremely complex file to output. Think of artwork composed of hundreds of thousands of intricate paths, transparency overlaid with patterns, and so on. Most of the time this kind of artwork will be rasterized by InDesign at output anyway. Doing it before output time will save you or your collaborators from last-minute headaches. Just be sure to keep backup copies of all artwork you rasterized because there’s no going back!
Why Are There So Many Commands for Expanding?
By this point, you might be thinking, if Expand can expand many objects at once and Flatten Transparency can squash everything, why do all these other options exist at all?
The reason is to preserve the flexibility and nondestructive nature of live effects as much as possible. For example, if you want to expand some Live Paint groups so you can tweak the look of your artwork, you can select all objects and then use the dedicated command for expanding just Live Paint groups, while leaving your other live effects intact.
Another reason is that it can be very difficult (or impossible) just to select the thing you want to affect. Recent versions of Illustrator have improved the situation, but it can still be a problem. By expanding specific parts of your artwork, you can make them selectable.
Of course, a neat and functional layer structure will also make it a lot easier to select specific objects. So will the free Select Menu plug-in by rj-graffix.com.

Special Cases
Some types of objects in Illustrator deserve special attention when it comes to expanding, including 3D effects, graphs, clipping masks, and outline effects.
3D effects
Expanded 3D effects usually have lots of clipping masks that you have to get rid of in order to continue working (Figure 8). (More on that in a moment.) Before cleaning up your expanded art, you will usually need to inspect the Layers panel. And be warned—some of the expanded art might be very difficult to work with. Some live features cannot be cleaned up easily—one such example is a long shadow built with either blends or the transform effect (Figure 9).
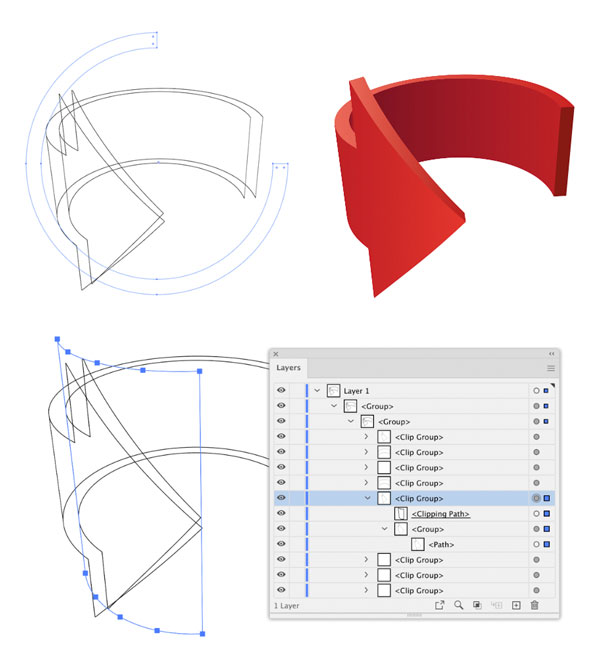
Figure 8. Above: A live 3D effect applied to a curved path. Below: Expanded 3D effects usually have lots of useless clipping masks you’ll want to get rid of.
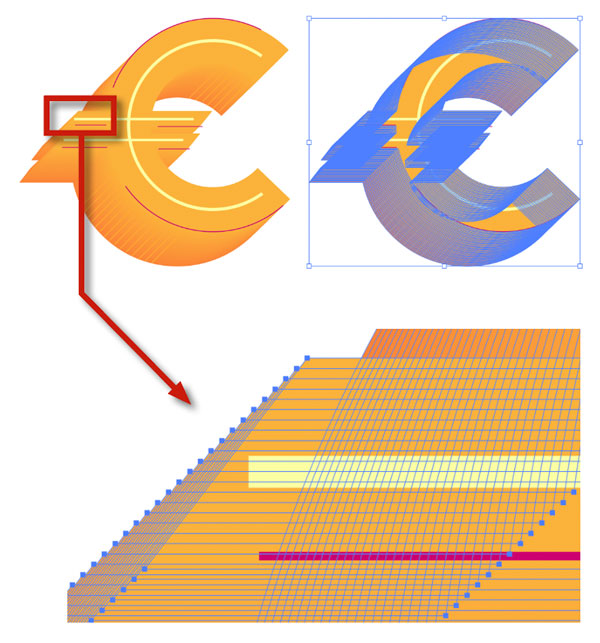
Figure 9. The long shadow consists of hundreds of paths, and you cannot prevent a stairstep look, no matter how many steps you cram into it. It’s okay if you rasterize the image, though.
Graphs
If you want to expand a graph, don’t try to use the Expand command. It does nothing when you try to apply it to a selected graph. Instead, choose Object > Ungroup. You’ll get a warning that you won’t be able to edit the graph’s style or data once it’s ungrouped. But before you take this irreversible action, consider that maybe you don’t need to expand that graph at all because the edits you would like to make are possible with a live graph. See this post for examples of what you can do to customize bar charts.
Clipping masks
Clipping masks are one of the things that many Illustrator users would love to expand—but clipping masks don’t have a dedicated Expand function. Sometimes you expand them via other commands, but often they simply cannot be expanded—at least not without losing some objects along the way.
One workaround you can use if your clipping mask includes just shapes—no effects, and no strokes (you can expand those first)—is the Crop command on the Pathfinder panel (). It will expand the clipping mask (Figure 10).

Figure 10. Here’s an example of a multi-step expand operation. In order to expand this clipping mask, you first need to expand the blend, then the strokes (or use Flatten Transparency for both), then use the Pathfinder Crop command.
Outline effects
The Outline commands (Effect > Path > Outline Stroke and Outline Object) offer another way of expanding artwork that can be used in preparation of pure magic. For example, you can create a nice uneven, scribbly looking stroke by applying Outline Stroke and Effect > Distort & Transform > Roughen. Note: It’s important to apply those commands in that order—Outline Stroke first, then Roughen—otherwise it won’t work. Afterwards, you still need to arrange them in the Appearance panel, because that is also important (Figure 11).
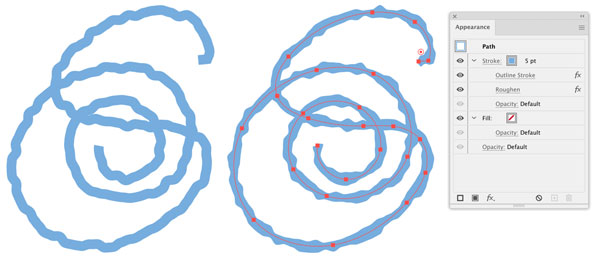
Figure 11. Applying the Roughen effect after Outlining Stroke produces this nice irregular stroke, which can be made into a graphic style and will give your artwork a handmade look (Left: just the Roughen effect without Outline Stroke for comparison).
When Expanding Happens Automatically
In addition to the many commands you can apply manually to expand artwork, there are a couple of scenarios you should be aware of when expanding happens all by itself.
Downsaving
When you downsave a file to make it compatible with an old version of Illustrator, some objects may be expanded. This happens when the older version doesn’t support features you used, so the respective objects need to be expanded to a construction that version can handle. This can of course get in the way of editability and thus your collaborative workflow. If it’s not possible for all collaborators to use the same version, then the safest practice is for everyone to agree to only use features that the lowest version supports. This can be easy when it’s a feature like freeform gradients that you can avoid completely. It’s more difficult when it’s part of a bigger feature such as certain options in pattern brushes. You need to know those details in order to avoid unpleasant surprises.
Unfortunately, downsaving can also happen without you noticing it at all, because of one of Illustrator’s quirks that few people are aware of. When you press Command/Ctrl+S after editing an old file, Illustrator will save into the existing version of the file. So, for example, when you save a file from 2005, you will save it into version CS2 (or even older). Any newer functions you used in your edit will be expanded—probably without you even noticing if you turned off a certain warning (Figure 12).
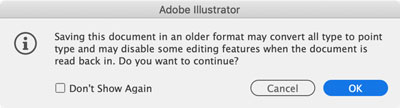
Figure 12. If you click OK in this dialog box, you will expand at least some objects. Despite its prominence in the warning, text being converted to point type is probably the least of your concerns. Note that this warning will even appear when there is no text at all.
So, when you get this dialog box, to avoid the downsave expanding problem, click Cancel and then choose Save As. If you might at some point have hidden this warning by clicking Don’t Show Again, choose Preferences > General and click Reset All Warning Dialogs. Forewarned is forearmed.
For more information, you can visit my website to find a list of affected features and how they will be expanded when a file is downsaved to each version of Illustrator.
Export
Depending on your settings, some expanding and flattening will happen automatically behind the scenes when you export your file to a PDF or save it as an AI with PDF compatibility. This is because live effects aren’t supported in PDF. Transparency is supported in PDF, and so are clipping masks, but effects and other live objects will be expanded automatically when exporting to the format.
Unbaking cakes: Can Expanding Be Undone?
When after some time you realize that you have expanded something you still need to edit, you’ll wonder how to un-expand it. Unfortunately, in most cases, there is no way back. So, it’s a good idea to duplicate the object, the layer, the artboard, or the entire file before expanding. You can, of course, undo or revert, but once the file is saved and closed you’re going to need a backup to restore the full functionality of your live effects.
One semi-exception to the rule is for outlined text. Astute Graphics offers a plug-in called VectorFirstAid, which can replace outlined text with live text (Figure 13), but it works only if you have the right font installed.
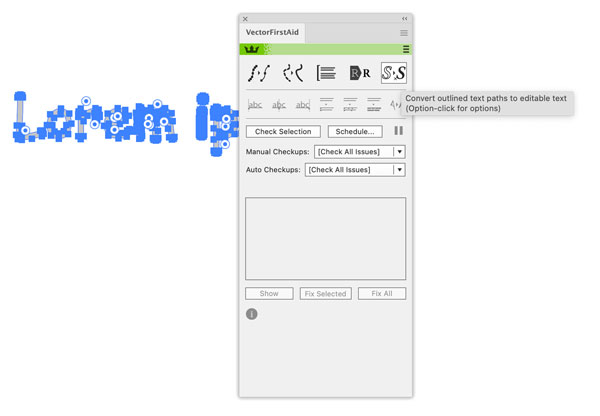
Figure 13. Using VectorFirstAid to convert outlined text back to live text
For outlined strokes there are some techniques you can try (Figure 14), but most of the time they require more work than just redrawing the art.

Figure 14. To un-outline a stroke and get the original formatting back, delete the endings of the path. Then select both the
long paths and Object > Blend > Make. Finally, expand
the blend and delete the two original paths.
Caveat Expander
The ability to expand artwork in Illustrator is a powerful, but double-edged, sword. Wield that power wisely, and you’ll be able to select, edit, and output complex art trouble-free. Just be sure you always know when and how your art is being expanded, and leave yourself a backup plan to access all your work with its original, live appearances.
Commenting is easier and faster when you're logged in!

Recommended for you

Transforming Type
You can make some nifty type effects with InDesign alone, but for unlimited crea...

Designing with Text Reflections and Cast Shadows
Maya P. Lim shows how to add lighting effects like cast shadows and reflections...
How to Work with Illustrator’s Effects
Learn how to work with effects in Illustrator and make further adjustments, incl...