

One of the things I like about InDesign is the way you can make the program work for you. The program offers several ways to configure or customise the way you handle your files, use tools and make yourself comfortable. Unfortunately, some of these options can also work against you. And while you’re away from your desk to get a fresh cup of coffee, your “evil” colleagues might grab hold of your computer and change a few settings behind your back as a practical joke. So let’s take a look at how you can troubleshoot a few of these common practical jokes.
#1 The Missing Save Option
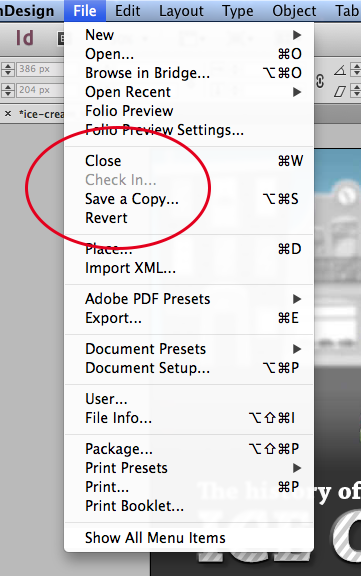
This one is a classic evil trick. You’re working on your file and would like to Save or Save As. So you go up to the File menu … only to discover these options went missing!
Solution:
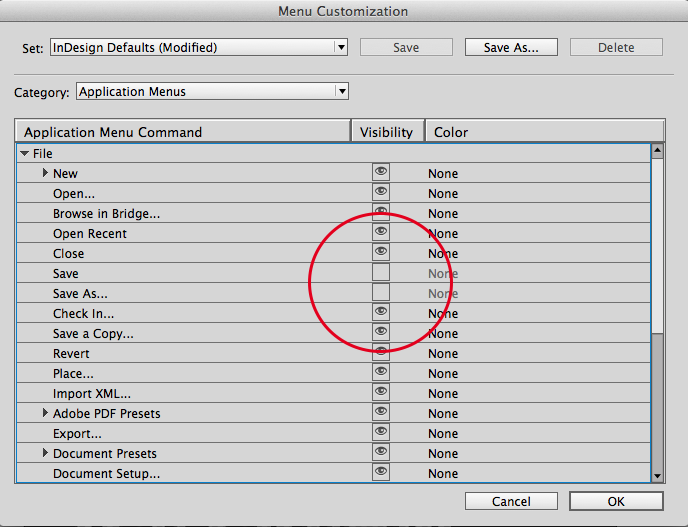
InDesign allows you to highlight or hide commands from the Application Menus or Context & Panel Menus. Fortunately it’s pretty easy to find out if this option was used: You will see a Show All Menu Items command at the very bottom of your menu. To fix this, just choose Edit > Menus, navigate to the command you’re missing and click the Eye icon next to it to bring it back. If you quickly want to reset all these options to the defaults you can also choose InDesign Defaults from the Set options at the top of that same window.
Note: remember that menu customization can also be saved in a custom workspace.
#2 Sudden unwanted formatting
While you’re creating objects and placing files, you suddenly notice that these objects use formatting you didn’t ask for. Including a few that might really make you scratch your head like automatic drop shadows, a default Comic Sans font, or worse, an applied non-printing attribute, 0% Opacity or a heavy colorful rainbow stroke.

What’s up with the formatting of this rectangle?
Solution:
You might have even caused this phenomenon yourself accidentally in the past. When you set certain object or text formatting options while having nothing selected, InDesign will consider that formatting as the default for all new objects you create from then on. So check your formatting options while having nothing selected, and fix whatever damage was done.
Note: if you were still wondering about the rainbow stroke, take a look at David’s article from way back.
#3 Impossible to see the Baseline Grid on your page
It seems to be impossible to see the Baseline Grid on your page, whatever you do. But strangely enough you do clearly see the result of the applied Baseline Grid to your text?
Solution:
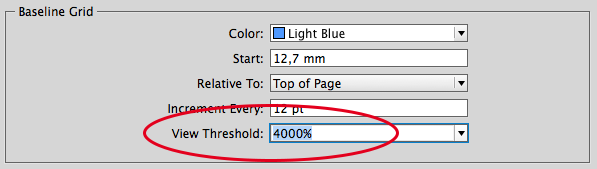
This one is a little harder to solve and is most likely caused by a setting in the Grid preferences. So open the InDesign preferences by using the Ctrl+K (Cmd+K on Mac) shortcut and click on the Grids category. There you’ll see an option called View Threshold, which is likely set to a very high number like 4000%. This means that the grid will only be visible at a zoom percentage of 4000% or higher (though you can’t get any higher). Very sneaky indeed!
#4 Unexpected (or embarrassing) Placeholder text
You just set up your placeholder text frames, threaded them together and are ready to fill them with placeholder text. So you right-click the text frame and choose the Fill With Placeholder Text command. But what you expected to be a pretty intelligent looking Lorem Ipsum text seems to be a text about bacon?!
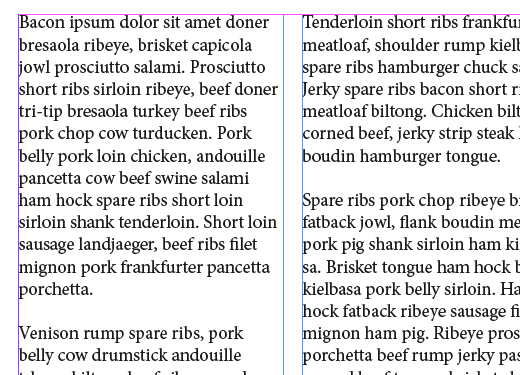
I don’t remember ordering meat?
Solution
You can use any text you like as placeholder text in InDesign, and using this trick can be a big surprise for your colleagues. First, type the text you like e.g. “Happy birthday Michael” or “You should really clean up your desk” in a new .txt file. If you want more inspiration be sure to check out Bacon Ipsum, Gansta’ Ipsum or other fun Lorem Ipsum generators. Next, save your file as “placeholder.txt” into the main InDesign program folder. InDesign will now use this text next time you use the Fill With Placeholder Text command.
Note: you can also use default non-latin text following the steps in this article.
#5 Lost your colors?
You notice your InDesign layout turned to black and white, even though the document swatches still show you color.

Solution
You can spot the cause of this problem by looking at your filename in InDesign. Look out for the words [Dot Gain] or [Gray Gamma] or anything else in brackets. What happened is, someone activated the Proof Colors option. This is a soft-proof option you can use to simulate what your document will look like when targeting a specific output device. In this example, a grayscale profile was chosen to simulate black & white print. To use this, choose View > Proof Setup > Custom and set your options. Then choose View > Proof > Proof Colors to activate it. So just deactivate this option to fix this.
Tell Us Your Evil Pranks
Do you have any fun (and only slightly evil) InDesign pranks that you’re preparing for April Fools day this year? Tell us below! (But be sure to include a solution!)
This article was last modified on December 30, 2021
This article was first published on March 25, 2014
Commenting is easier and faster when you're logged in!

Recommended for you

New from Adobe: InDesignLite™ (Finally!)
[Editor’s note: This was our 2017 April Fool’s Post] Have you ever t...

InDesign CS5: Every Feature Revealed In Amazing April 1 Scoop!
Hear ye! Hear ye! Read all about it! Get your CS5 news here! Major leaker tells...

News Release: Adobe InDesign Goes All-in with iOS, Drops Support for Mac and Windows
SAN JOSE, CA — 12:01 AM 1 APR 2015 — FOR IMMEDIATE RELEASE [Editor...